How to Make Elderberry Wine and Identify Wild Elderberry Bushes
How to make elderberry wine – it’s something I’ve wondered about since watching Monty Python’s Quest for the Holy Grail many years ago. (“Your mother was a hamster, and your father smelt of elderberries.”) It turns out that making homemade elderberry wine is pretty easy, as long as you have elderberries.
If you don’t have wild elderberries nearby, you can buy plants and grow your own. (Seeds are not very reliable. I wouldn’t waste my time or money on them.) I also make up elderberry jellies and syrups, too, but this post is all about the finding the berries and making wine.
Note: If you don’t have access to elderberries, but still want to make elderberry wine, Amazon stocks Elderberries Vintner’s Harvest 96oz Canned Elderberry Fruit Wine Base. This base is pure elderberry fruit juice concentrate. It makes 5 gallons of light wine or 3 gallons of full-flavored wine. Recipes are included.
How to Make Elderberry Wine – 2 Recipes
Both of these recipes are adapted from the book “How to Make Wine in Your Own Kitchen“, which is out of print but worth tracking down.
Elderberry Wine Recipe (Sun Extraction Method)
Ingredients
- 4 quarts loosely packed elderberries (be sure they are dark ripe)
- 2 quarts boiling water
- 6 cups cane sugar
- 1 cup of chopped raisins
Directions
This recipe is made in stages. In stage one, you steep the elderberries in water; in stage two, you add the sugar and raisins.
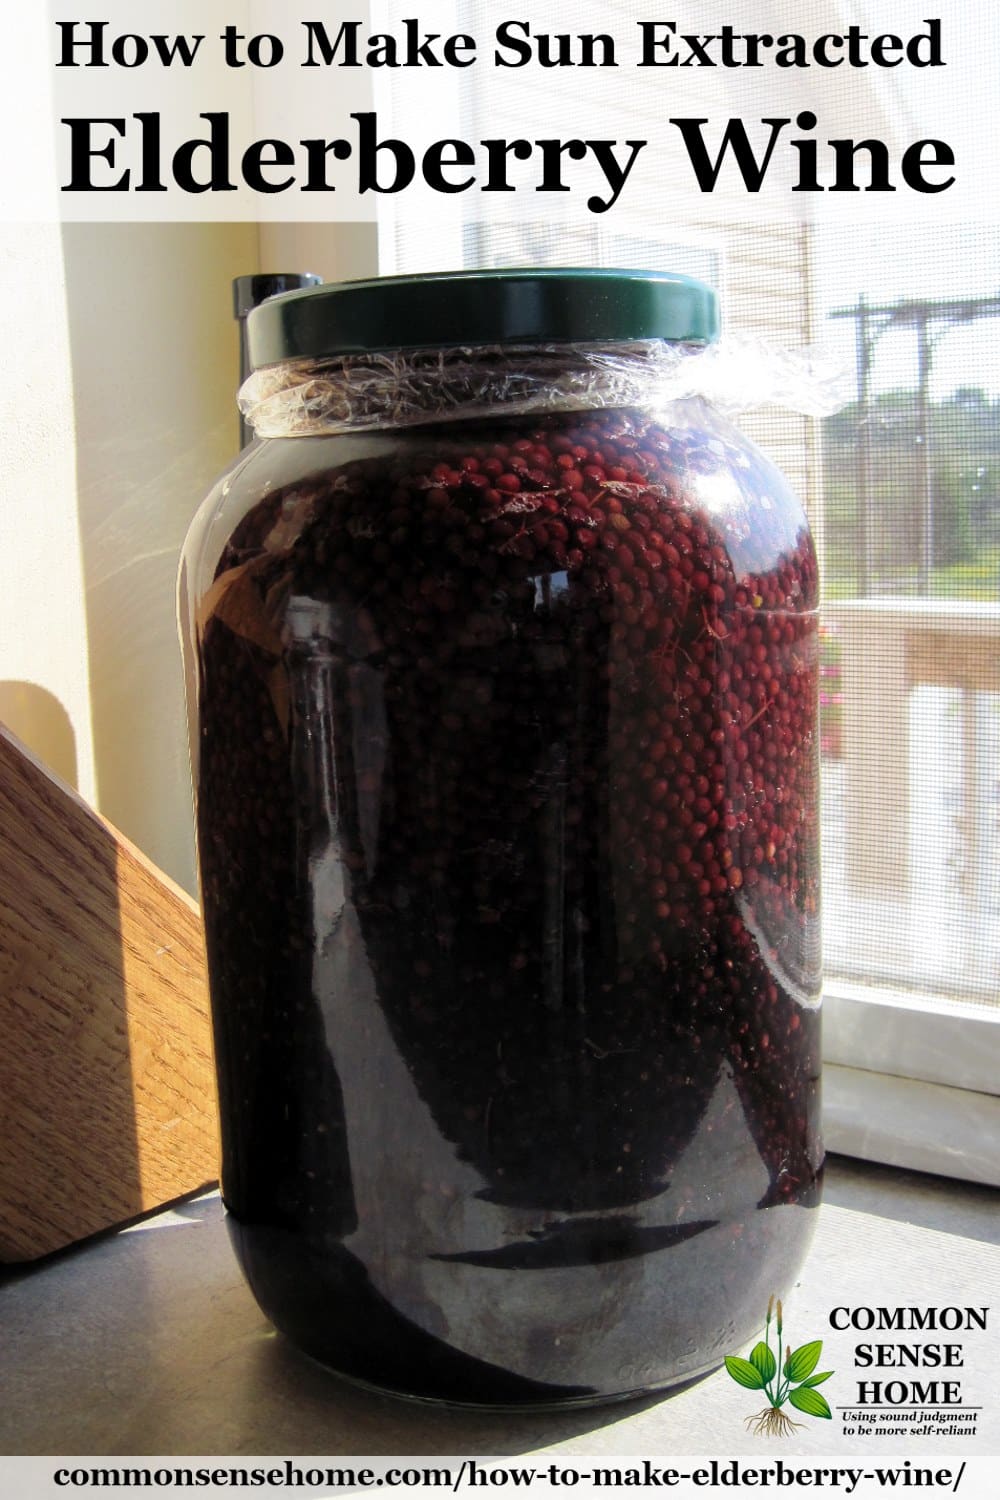
Remove elderberries from stems and pack in a gallon glass jar. Bring two quarts of water to a boil. Make sure your jar is warm (you can set it in a tub of warm water) to prevent breakage. Pour the boiling water over the elderberries. Leave a healthy inch of space at the top, because they will swell and expand.
Make a plastic liner for the metal cover. Put the cover on loosely (enough to keep the bugs out, but loose enough that it can vent). Set in a sunny place outside for three days.
After three days, strain the berries through a jelly bag or flour sack towel, squeezing out as much of the liquid as possible.Pour juice back into the glass jar or one gallon crock. Stir in the sugar, making sure it is all dissolved. Add chopped raisins. Cover loosely and keep in a warm place indoors to continue fermentation for three more weeks.
At the end of this time period, strain through several layers of cheesecloth (a flour sack towel or old cotton t-shirt will also work). Siphon into clean, sterilized bottles. (See Easy Cleaning and Sanitizing and Wine Siphoning Instructions.) Cork lightly at first (or put a balloon over the top). When your balloon doesn’t inflate or you see no bubbles on the bottle walls, cork tightly and store on their sides. Seal with wax for longer storage. Keep for at least one year before drinking.
Elderberry Sun Wine Notes
I set mine in a sunny window, then out on the deck in various spots, and then brought it inside at night. We have a groundhog that’s been visiting the deck at night, at I didn’t want it getting in the hooch. The liquid should be bright red in color after three days in the sun.
You’ll note that this recipe has no added yeast. This made me a little nervous, since wild yeast can be less reliable. Mine didn’t start bubbling right away, but I cheated a bit and used the same spoon to stir both batches of wine. (The other recipe has commercial wine yeast.) Spoon sharing got the fermentation going. If you don’t see bubbles within a couple of days, it’s probably safer to add commercial yeast so your wine doesn’t spoil or turn into vinegar.
PrintSun Extracted Elderberry Wine
An easy elderberry wine with just four ingredients, brewed in the sun.
Ingredients
- 4 quarts loosely packed elderberries (be sure they are dark ripe)
- 2 quarts boiling water
- 6 cups cane sugar
- 1 cup of chopped raisins
Instructions
- This recipe is made in stages. In stage one, you steep the elderberries in water; in stage two, you add the sugar and raisins.
- Remove elderberries from stems and pack in a gallon glass jar. Bring two quarts of water to a boil. Make sure your jar is warm (you can set it in a tub of warm water) to prevent breakage. Pour the boiling water over the elderberries. Leave a healthy inch of space at the top, because they will swell and expand.
- Make a plastic liner for the metal cover. Put the cover on loosely (enough to keep the bugs out, but loose enough that it can vent). Set in a sunny place outside for three days.
- After three days, strain the berries through a jelly bag or flour sack towel, squeezing out as much of the liquid as possible. Pour juice back into the glass jar or one gallon crock. Stir in the sugar, making sure it is all dissolved. Add chopped raisins. Cover loosely and keep in a warm place indoors to continue fermentation for three more weeks.
- At the end of this time period, strain through several layers of cheesecloth (a flour sack towel or old cotton t-shirt will also work). Siphon into clean, sterilized bottles. (See How to Clean and Sterilize Bottles and How to Siphon Wine.) Cork lightly at first (or put a balloon over the top). When your balloon doesn’t inflate or you see no bubbles on the bottle walls, cork tightly and store on their sides. Seal with wax for longer storage. Keep for at least one year before drinking.
Notes
- I set my elderberry sun wine in a sunny window, then out on the deck in various spots, and then brought it inside at night. We have a groundhog that’s been visiting the deck at night, at I didn’t want it getting in the hooch. The liquid should be bright red in color after three days in the sun.
- You’ll note that this recipe has no added yeast. This made me a little nervous, since wild yeast can be less reliable. Mine didn’t start bubbling right away, but I cheated a bit and used the same spoon to stir both batches of wine. (The other recipe has commercial wine yeast.) Spoon sharing got the fermentation going. If you don’t see bubbles within a couple of days, it’s probably safer to add commercial yeast so your wine doesn’t spoil or turn into vinegar.

Heavy Elderberry Wine Recipe
Ingredients
- 4 quarts of loosely packed elderberries
- 4 quarts of water
- 8 cups of cane sugar
- 2 cups of raisins, finely chopped
- 3 shredded wheat biscuits or 1 cup Wheat Chex – OR – 1 teaspoon yeast nutrient (to aid fermentation)
- 1 package of dry granulated yeast, or one package wine yeast
Directions
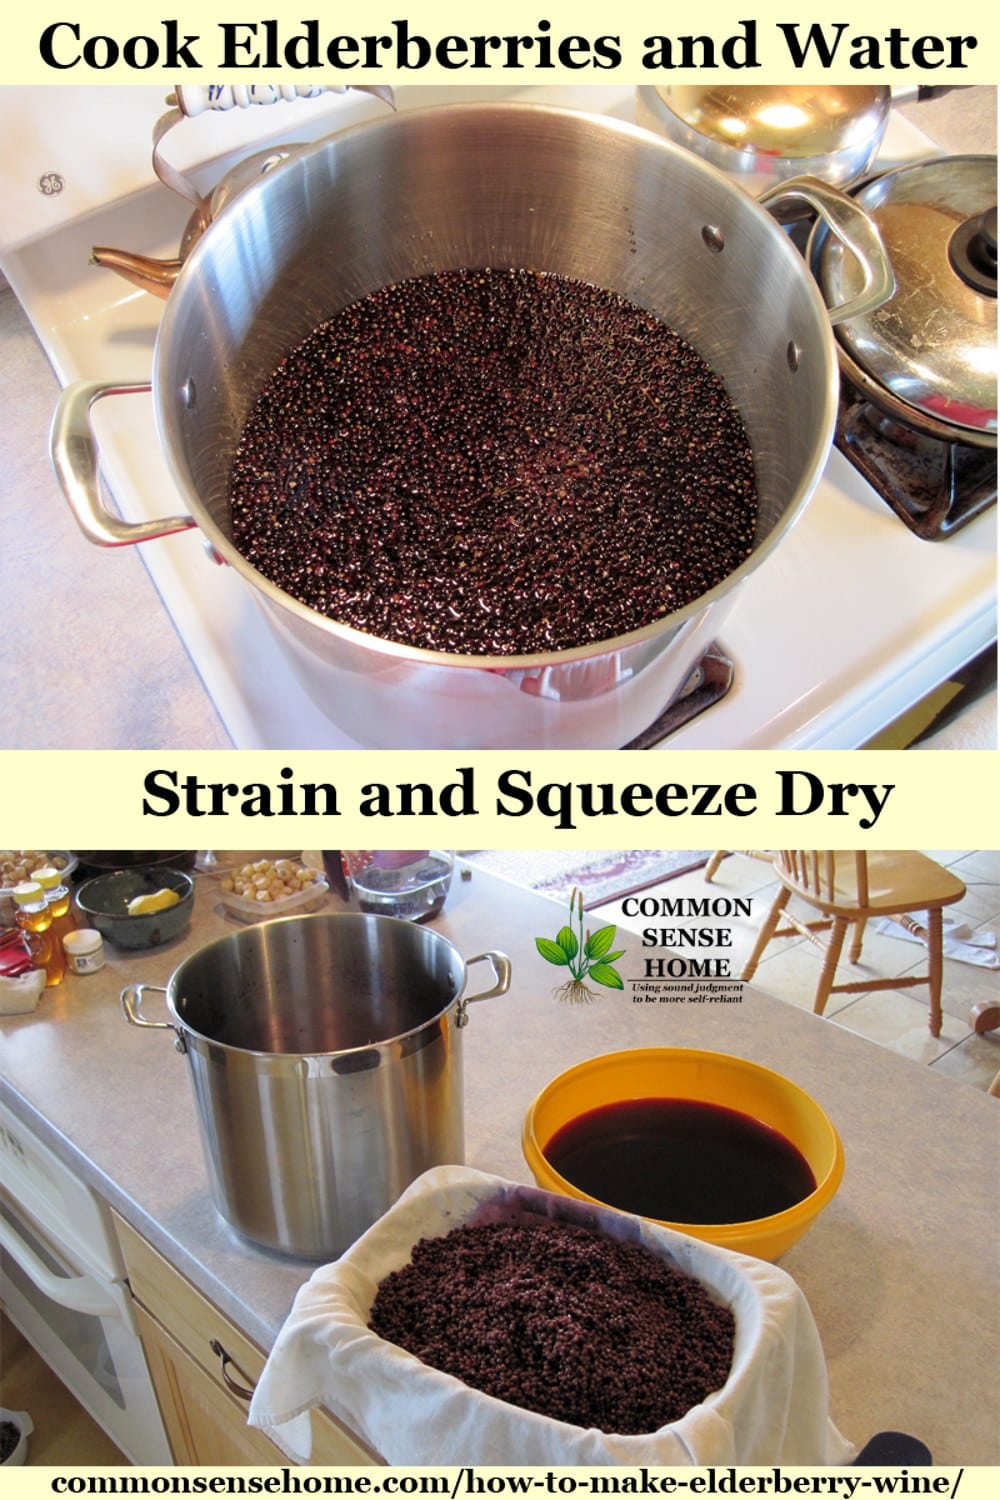
Place elderberries in a large stockpot with 4 quarts of water. Boil for 30 minutes. Let cool to lukewarm.
Strain elderberries through a jelly bag or flour sack towel, squeezing until the pulp is very dry. Note: this will coat the towel with blue/brown sticky “ick” that is very hard to remove. I’ve washed mine twice and it’s still tacky.

Would you like to save this?
Pour the juice into a crock or large canner kettle. (I used my 3 gallon crock for a double batch.) Stir in the sugar, making sure it is all dissolved. Add the finely chopped raisins. Break the shredded wheat over the surface; or, if using Wheat Chex, sprinkle whole over the surface. Note: If you are gluten sensitive, you may wish to substitute two teaspoons of yeast nutrient for the wheat products.
Distribute the dry yeast over the surface; allow to hydrate and then mix into wine.
Cover with a flour sack towel and put in a warm place to ferment for three weeks. I keep the towel secured with an old hair band to keep fruit flies out. (They love wine.) Stir gently twice a week.
At the end of this period, strain through several thicknesses of cheesecloth. Return to kettle or crock to settle for two days more. Siphon off into clean, sterilized bottles and cork lightly (or cover opening with a balloon). When fermentation has ceased, cork tightly and store for at least one year before drinking.
PrintHeavy Elderberry Wine
A sweet elderberry dessert wine with a pleasant kick.
Ingredients
- 4 quarts of loosely packed elderberries
- 4 quarts of water
- 8 cups of cane sugar
- 2 cups of raisins, finely chopped
- 3 shredded wheat biscuits or 1 cup Wheat Chex – OR – 1 teaspoon yeast nutrient (to aid fermentation)
- 1 package of dry granulated yeast, or one package wine yeast
Instructions
- Place elderberries in a large stockpot with 4 quarts of water. Boil for 30 minutes. Let cool to lukewarm.
- Strain elderberries through a jelly bag or flour sack towel, squeezing until the pulp is very dry. Note: this will coat the towel with blue/brown sticky “ick” that is very hard to remove. I’ve washed mine twice and it’s still tacky.
- Pour the juice into a crock or large canner kettle. (I used my 3 gallon crock for a double batch.) Stir in the sugar, making sure it is all dissolved. Add the finely chopped raisins. Break the shredded wheat over the surface; or, if using Wheat Chex, sprinkle whole over the surface. Note: If you are gluten sensitive, you may wish to substitute two teaspoons of yeast nutrient for the wheat products.
- Distribute the dry yeast over the surface; allow to hydrate and then mix into wine.
- Cover with a flour sack towel and put in a warm place to ferment for three weeks. I keep the towel secured with an old hair band to keep fruit flies out. (They love wine.) Stir gently twice a week.
- At the end of this period, strain through several thicknesses of cheesecloth. Return to kettle or crock to settle for two days more. Siphon off into clean, sterilized bottles and cork lightly (or cover opening with a balloon). When fermentation has ceased, cork tightly and store for at least one year before drinking.
How to Find Elderberries
Elderberries like moist soil, so you’ll find them in ditches, along the edges of wet woodlands, near lakes and rivers, and other damp ground. They are native to North America, and can be found throughout most of the US and Eastern Canada, except for in the northwest (see USDA elderberry range map).
We went foraging for elderberries along country roads here in northeast Wisconsin. My friends had scouted out the area in previous years, so they knew where to start looking. The plants don’t look very showy, but you can watch for the clumps of berries near the top. Here’s an elderberry patch we spotted on the side of the road.
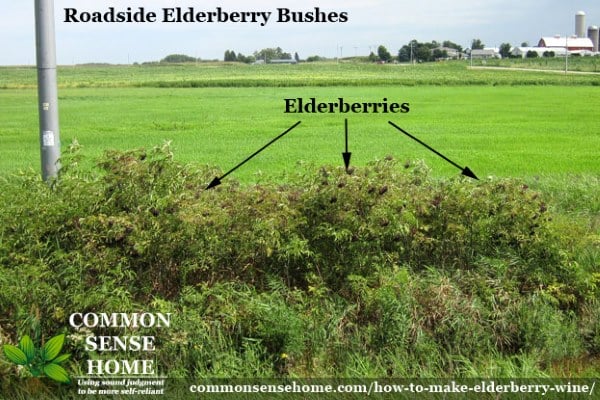
Elderberry berries grow in clusters that stick out above the foliage. If you look closely at the photo above, you can see dark blobs in the shrubs.
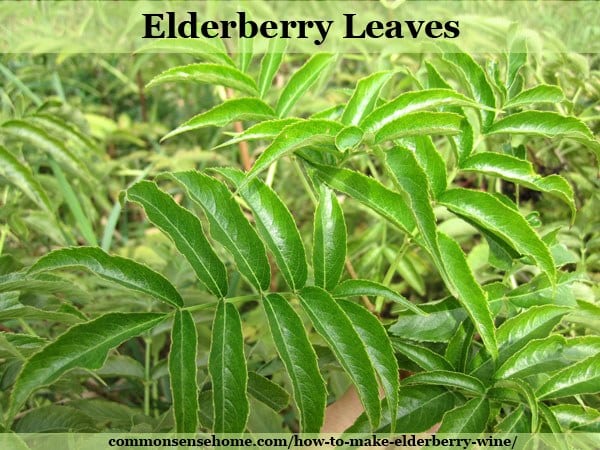
Be careful to make sure you have a positive identification. Elderberry is sometimes confused with water hemlock, inkberry, or pokeberry, but if you look closely, these plants are quite different.
Elderberry leaves grow on soft green stems in pairs.
Alternatively, if you can’t find elderberries in the wild, some folks are now raising them for sale (but you normally have to buy in quantity, unless you can find them locally).
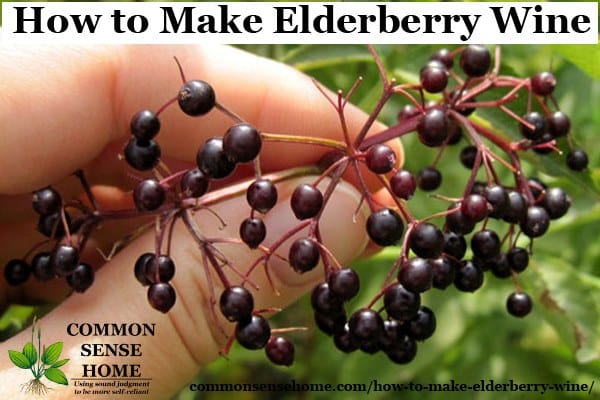
Berries are most easily harvested by snipping off the clumps and gathering them in a bucket. They will stain if smashed, so trying to strip off individual berries is asking for a mess. I like to tie a bucket around my waist and wade right in.

How to Clean and Process Elderberries
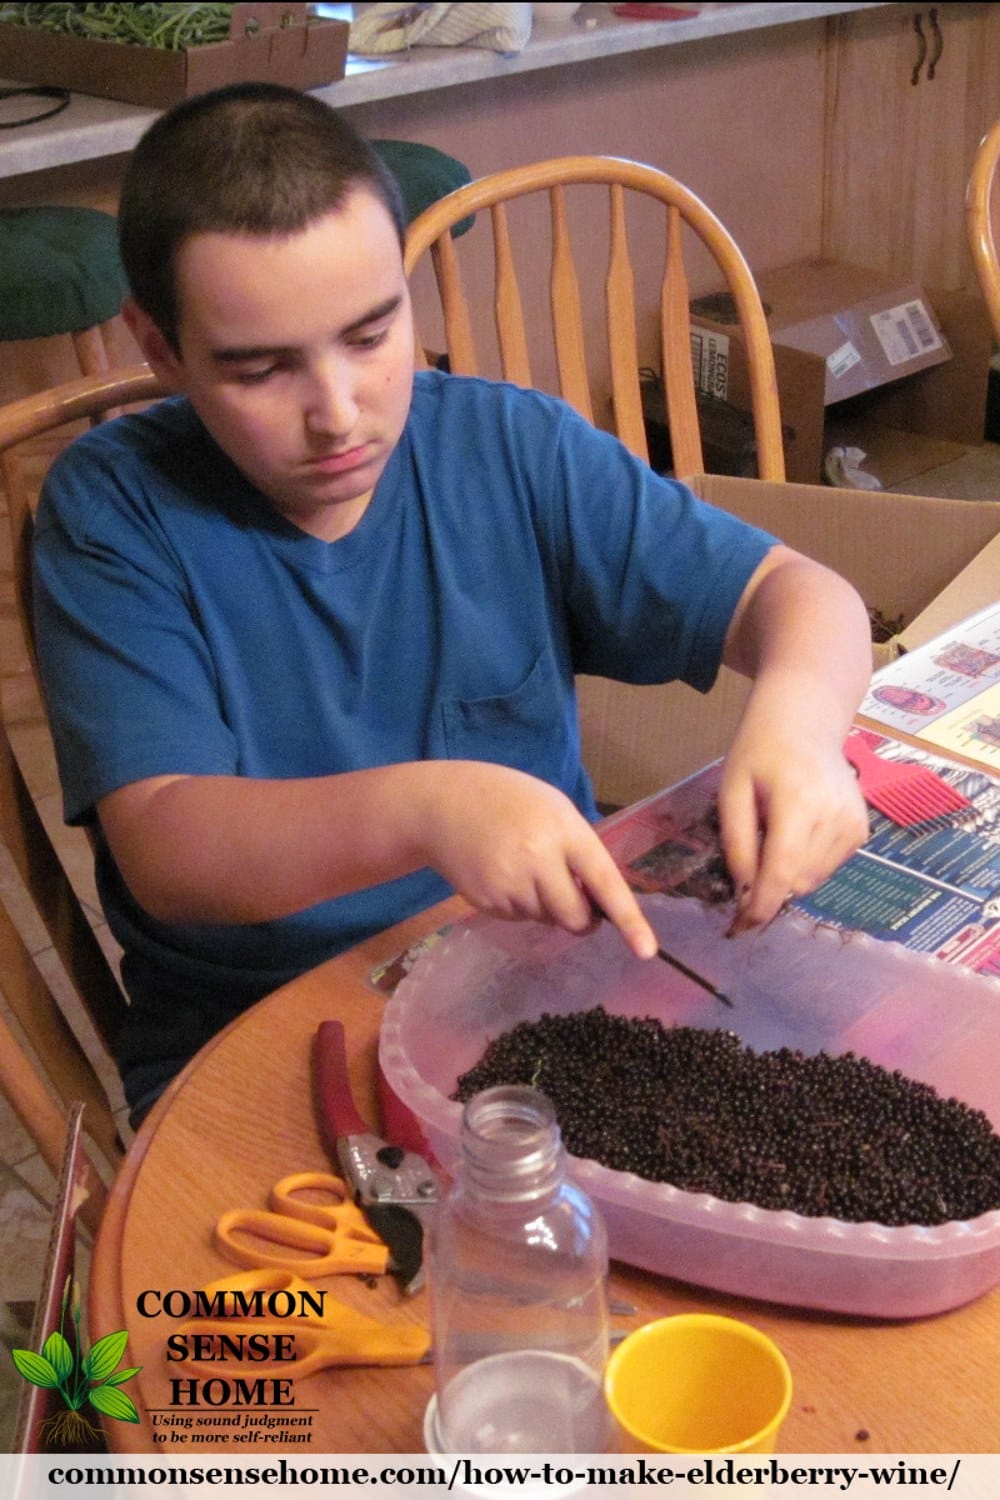
Once you have enough berries, they should be stripped from the stems before making the wine. A few stems is fine, but you don’t want a lot of them because they contain cyanide-inducing glycoside (a glycoside which gives rise to cyanide as the metabolism processes it). They are also very sticky – like glue – and will coat your hands and your fermenting vessels. Elderberry stems are bitter, too, and high in tannins. A few bugs tend to hitch rides in the bucket as well, and you don’t want them in the wine.
The boys preferred to comb the berries of the stems with a wide-toothed comb, I just used my hands. Some site suggest freezing first to make them easier to strip, but this worked fine with the modest amount we had (about two five gallon buckets full).
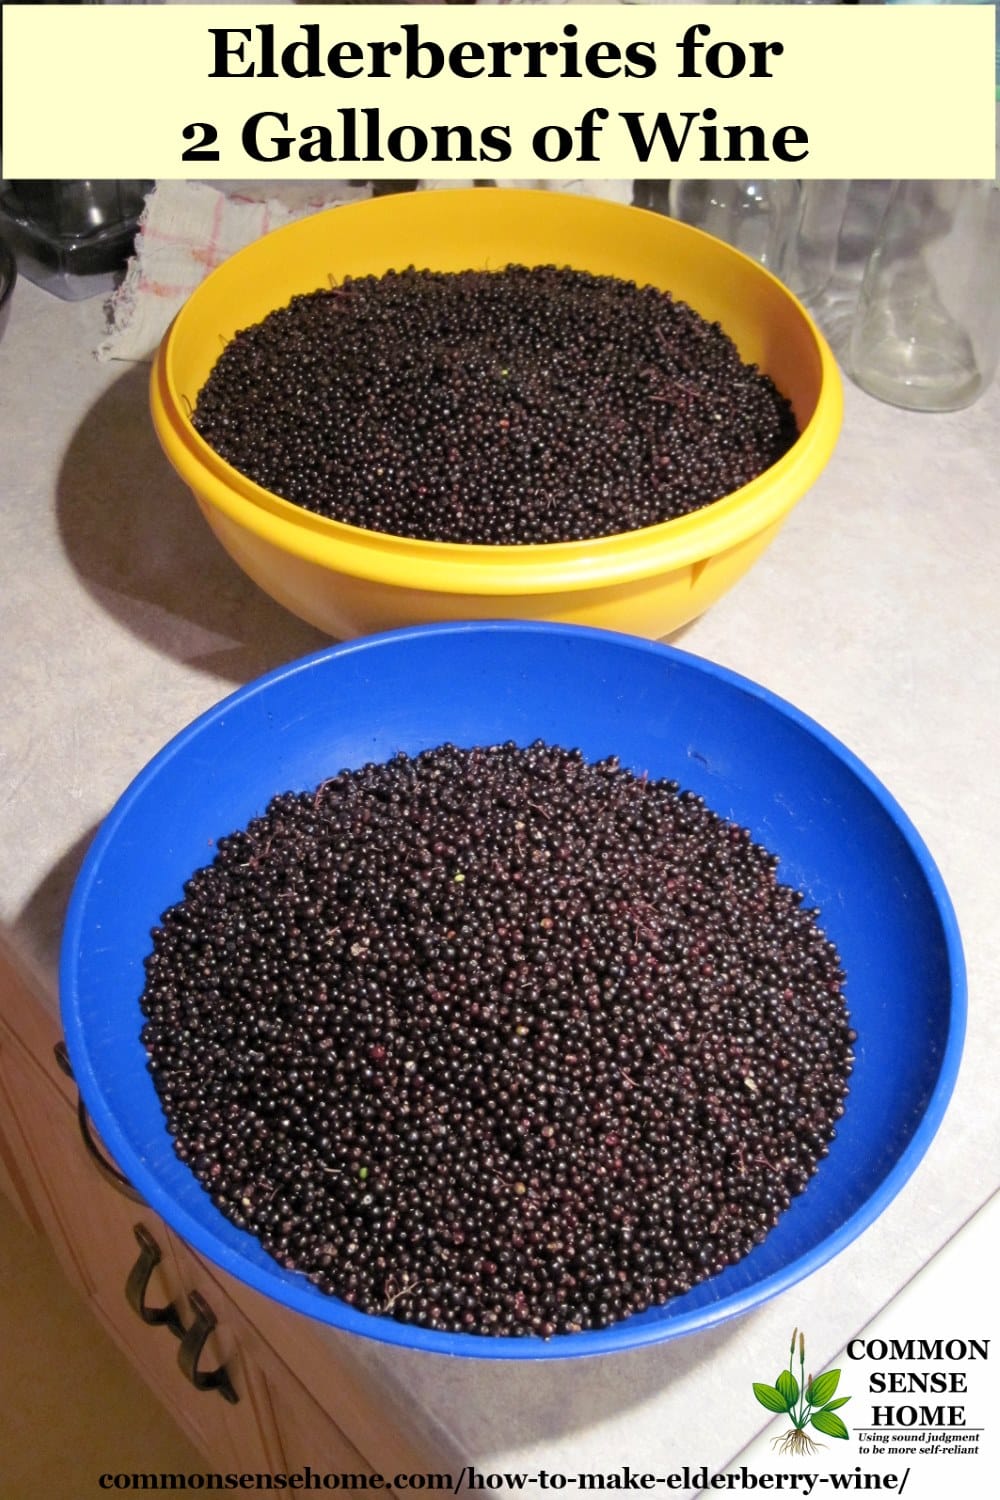
I put the finished berries in my Oneida Expanding Colander over the sink strainer and gave them a rinse before starting the wine. Here are the cleaned berries for two 1 gallon batches of elderberry wine.
Savoring the Elderberry Harvest
Both of these wines are rich, sweet and fruity. Heating the elderberries really brings out the berry scent, and once the yeast kicks into action it fills the kitchen with earthy, yeasty goodness. To me it smells like abundance. If I have enough fruit to ferment, then it’s been a bountiful year. I’m not much of a drinker, but it’s nice to have the option to share a special brew with friends and family. Wine is quite forgiving, and so far my home wine making results have been pretty good.
You may also enjoy:
- Easy Strawberry Wine Recipe – Perfect for Beginners
- Pumpkin Wine
- Dandelion Wine – Like Sunshine in a Bottle
- Pear Wine – A Great Way to Use Very Ripe Pears
Originally published in August 2012, updated in 2016. The boys are much bigger now.



I wonder if it is possible to decrease the sugar to make a dryer wine. I’m not a fan of sweet wines. I have 3 elderberry bushes in my yard and would like to try wine making.
I have not tried this (we drink only a small amount of wine, so I don’t make a lot of it), but it should certainly be possible to make a drier wine.
I’d cut the sugar to 5 cups, and add a teaspoon of acid blend powder for more tartness (or a tablespoon of lemon juice). You may also want to select a wine yeast specifically recommended for dry wines, like this Red Star Cote des Blancs.
I think something went horribly wrong with my first attempt of elderberry wine making. I just pulled the two one gallon jars I have on the second ferment and find little spots of mold on the top. Will this be going to the compost pile or is it salvageable and okay to bottle at this time? Please advise. Thank you.
If there’s mold I would compost it.
Did you have an airlock on top of the gallon jugs, and was the fluid level close to the top? To prevent mold during the second fermentation, the top of the bottle should be filled with the carbon dioxide from the fermentation, and not open to the air.
As far as yeast and natural fermentation goes, I think you should choose organic raisins. There are natural and healthy yeasts in raisins and grapes, but commercial raisins are often sulphated or otherwise preserved.
Try a couple of batches with organic raisins and you may not have to use commercial brewers or wine yeast.
Keith
Hey, Laurie! Would you happen to have any suggestions how to remove those tiny worms in elderberries? Shame on me but I can’t get past the ick factor but don’t want to waste the bumper crop we have this year.
I think I can soak them but in what and how much?
I suspect you’re dealing with drosophila larvae (fruit flies), and I don’t know any way offhand of getting them out, since they have a self-contained lunch buffet safely sealed inside the berries.
You could try a vinegar water or salt water soak, but unlike broccoli, they’re hiding inside, not outside the produce, so this makes them harder to remove.
We had issues with them last fall in the raspberries. It was so wet that the fruit got soft and spoiled quickly. When I kept up picking them every couple of days it was better, but the chickens got quite a few berries. I know elderberries often ripen in one flush, so that might not be an option.
Thanks! I did try the salt bath and that did remove some.
One more question, please..
I dried a second round of berries. They aren’t all black like the first batch. It’s looking like I might have “almost ripe but not quite” berries mixed in with the proper black ones. They’re not green but a burgundy color and not black. I wish I could attach a photo. Are they going to be safe to boil down with the rest? I’m my mind I’m thinking they’re not ripe enough. What’s the consensus on that?
The berries don’t all ripen evenly in the clusters, but as long as they are not completely green, I wouldn’t worry about it.
To easily remove elderberries from stems, place berries in plastic bags then put in the freezer. Once frozen cut a small hole in the bottom corner of the bag. Shake bag hard. Berries come off and you can pour them out of the bag into your pot. A few stems might come out but easy to pick out a few.
why don’t you put the weights and liquids in lbs and ozs or metric.
which home winemakers use instead of ”CUPS”
thanks
kind regards
j.jones
Because the original recipes that I used were in these measurements, and I have the measuring instruments in the kitchen, so I use “cups” all the time.
If you need a specific conversion, there are many online unit conversion tools, such as http://www.onlineconversion.com/.
I’m sorry the flowers are called Queen Anne’s Lace. Thanks
But Queen Ann’s Lace isn’t a tree. It’s a plant about 3-4 feet at the most. I think you may have sambuca which is what elderberries are and some of the flower clusters look like queen Ann’s lace. Look it up. There are lots of varieties.
I have what my mother called Queen Lace trees growing around my pond. The berries and leaves look like your picture but just want to be sure. Thanks
Queen Anne’s lace is an unrelated species. You can learn more about it here – https://commonsensehome.com/queen-annes-lace/
has anyone ever used apple juice instead of water when making elderberry wine. please let me know because iam going to make some wine as soon as the elderberrys are ready.
I haven’t tried it but I’m sure it would ferment. If you give it a go, make sure to reduce the sugar.
Hi I am in the process of making elderberry wine. After picking the berries I kept the mine the fridge for two days then froze them for three days whilst I collected some more wine making equipment. I pulled all the berries off the stems quite easily when I came to start the wine making process off as they were still a little frozen. I mashed them a bit and then began. I am in the first five days of stirring daily and to my horror have found five worms in one batch and two in the other. I have also seen a fruit fly buzzing around. The thought of the worms is putting me off going any further even though I fished them out. Should I throw it all away?
Well, that’s up to you. I’d probably lean towards composting, but if you want to try and save the batch, I’d heat it up enough to kill anything still alive in it and then add fresh yeast after it has cooled.
Hi Laurie
okay thank for your advice, the more I think about it I am veering towards composting which is a shame. I guess I should have washed them really well to start with but I was afraid of washing all the juice away.
The eggs may have been in the berries, stuck to the berries, or brought in after the brew was started. It’s hard to say, but fruit flies only need a tiny, tiny point of access, and they love wine.
I guess I was unlucky then. Maybe next year I will just pick the flowers and try to make Elder flower champagne. Thanks for your comments though.
We missed the bulk of our season this year, but hopefully next year will be better, and our own plants will finally take off so we can keep a closer eye on ripeness instead of guessing on the side of the road.
I’m drinking a little bit of homemade elderberry wine as I read this, though we make ours very differently. I hopped online to find out how to keep it from turning to vinegar and find out how long to age it. The comments were very helpful about why you wait and what time is preferable.
We make wild elderberry wine the old fashioned way, with the standard directions for making any wild fruit wine (fruit, distilled water, sugar or honey). The batch I’m drinking right now hasn’t aged yet (we just made it about a month ago and I’m transferring it to bottles today) but it is still very good. It’s not very sweet at all. I can’t remember the amount of sugar we added this time but we just used a lot of fresh elderberry juice, distilled water and sugar. We put it in a gallon ice tea jar with plastic wrap on top and a couple of pinpricks in it, burped it occasionally, then transferred to bottles on the counter with baggies rubber banded on top with pinpricks. It has a bit of a merlot flavor to it, definitely not sweet. But I’ve also had batches of wild stuff go wrong, so it’s always a crap shoot.
Today’s batch is on the counter now — two gallons of elderberry wine made according to a pamphlet I got for fruit wines at the liquor store. We’ve done this one properly with a camden tablet to kill off wild yeast, sugar, yeast nutrient, distilled water (never tap water, as the chlorine will kill yeast) and wine yeast added after a day. I’m looking forward to seeing how it compares.
Incidentally, the recipe I have from my fruit wine book only adds raisins if you use dried elderberries to start, and yes, you can use dried elderberries. The process is just a little different.
I wasn’t a big wine drinker for most of my life. I have 5 kids now and 3 of them are teenagers, and I find that I enjoy wine more and more. 😉 My husband and I find it quite fun making it ourselves and experimenting with fruits from our garden and our foraging adventures.
I tried a wild elderberry mead this fall, and I think I let it get a little too warm and it’s headed to vinegar territory. I know the commercial yeasts will actually kill off acetobacter bacteria, which is what creates acetic acid and turns the wine to vinegar.
That’s a really great recipe, I never heard of Elderberry wine and would love to try it! I used to make Elderberry syrup, I love it especially during hot days (a splash of syrup plus ice cold water). Sometimes I also mix a bit of syrup with dry white wine (can be also sparkling). I need to try your recipe!
wondering about the purpose of the grapes?
Raisins improve the mouth feel of the wine, giving it caramel elements (more with dark raisins, less with light raisins) and causing the fruitiness of the wine to linger on the tongue longer.
I’ve made plum (2 kinds) wine, blackberry wine, and mix berry wine in addition to apple cider and beer. I tried all sorts of methods for wine and they all involve adding white sugar. The reason the wine is sweet is not due to the fruit itself (anything but grapes don’t have enough fermentable sugar on their own) but rather due to the amount of unfermented white sugar added to the wine. The method I worked out for making a drier wine is to start with 1/3 of the recommended sugar for the initial fermentation and cover the jug with a balloon (I used rubber glove instead because that’s what I had) with a pin prick hole in it. When the fermentation gets going, the balloon inflates and when the sugar is running out it will start to deflate. Add another 1/3 of the sugar and cover again- the balloon will inflate again and then deflate. After it deflates and before adding the final 1/3 of the sugar, taste the wine to see how sweet it is. If it is sweet that means you’ve reached maximum alcohol content for the yeast to survive (wine yeasts will only go to about 14% alcohol by volume max) and no more sugar is needed and you’ve got a sweet wine at this point. If it is pretty dry, try adding small amounts of sugar at a time and let the balloon inflate, deflate, taste test, repeat in order to catch the wine at the point of maximum alcohol content and minimum extra sugar. The first batch of plum wine I made called for 9# of sugar for 5 gallons of must and I didn’t follow this process and it was really sweet. With subsequent batches I created this process and ended up with a much drier wine as was my preference.
As for elderberries- I’ve got 4-5 trees in the yard of the house I just moved into and I’m going to try elderberry wine this fall. And the year wait- it’s not crucial but it definitely helps mellow out the wine and reduce the “hotness” of the alcohol flavor in any wine. I’ve tried wine and cider at increments of 6 months, 1 year, and over 18 months and anything over a year is best but 6 months is drinkable. As for freezing the fruit- I found no difference between fresh and frozen for making wine. The flavor is still there if you freeze the fruit and with some fruit it makes it easier to clean (plums with their stones are a pain) if the cellular structure is compromised by freezing. Wild yeast will yield a much lower alcohol content due to the nature of the yeast itself, but I’m betting your sharing spoons transferred enough of the one yeast to the other batch. All the yeast needs is a starter and then they multiply on their own. I hope these tips help you or your readers. I found all this out by trial and error and other online forums, so I’m just spreading the info I have.
Thanks, Justin.
Can you use honey for the sugar or substitute some of the sugar for honey?
Yea, but then you’re making mead. 🙂 My friend, Colleen, has an elderberry mead recipe at http://www.growforagecookferment.com/how-to-make-elderberry-mead/.
To remove elderberries from the stalks easily and quickly use an electric drill with a clean paint stirrer in a large bucket. Add the berries on their stalks and enough water to cover. Whizz them up for about 30 seconds and strain the mixture through a coarse sieve. ( a garden riddle works well) The berries will fall off the stalks easily this way and you can then crush them in the usual way to extract the juuice
Thanks for the tip!
Thanks almost Laurie, I really don’t want to experiment and find out 6 months later it didn’t work. If I get an answer, I’ll let you know.
I’m in the same boat. The guy at the local homebrew shop suggested upping the sugar a little (maybe 10%), but didn’t have any hard and fast suggestions. As is, they wine came out pretty sweet already, so I’m not sure about more sugar.
All recipes give ingredients based on the amount of berries used in pounds ie: 1 lb or 2 lb. I’m trying to determine what the liquid equivalent would be. I have a gallon of already squeezed elderberries. Any help would be appreciated.
If you could find such a recipe, I’d love to see it, because I have some juice stashed, too.
Spray or wipe anything that is left with the green sticky residue from elderberries with cooking oil and then wash. It will come right off.
Thanks for the tip.
Sweet and yummy. Now that’s definitely a good description for a wine. At least it’s something I can tolerate. Thanks for the great ideas.
HI Laurie
Interesting story on making elderberry wine. How about a followup on how each batch turned out? Recipe preferences? What would you do different? Scale up issues? Why the year wait? Most wines are drinkable at about 6-8 months. I noticed in the story you indicated NE wisconsin. N S E or W of GB? Have you made any elderberry wine since 2012?
Scottie
Hi Scottie. I should get around to an update, but the posts get only a small amount of traffic, so it hasn’t been at the top of my to-do list. As for how they turned out – both are good, and make a sweet wine with quite a bit of kick. I think the sun extraction method had a higher alcohol content and the heavy wine was sweeter. We just opened a bottle of the sun extraction batch for solstice.
A year wait was suggested by the original recipe, and since we don’t drink much wine, I’m generally in no rush and prefer to let my wine age a year or two.
I haven’t made elderberry wine since 2012. We picked so many in 2012 that we are still working to use up all the juice in storage. Next season we will probably go again.
I haven’t attempted to scale up, because my equipment is sized best for smaller batches, and as I mentioned, we don’t drink much wine.
I live between Green Bay and Lake Michigan, but went picking west of Green Bay with friends.
I made my first batch July 2016. Celebrated Christmas with family and toasted first bottle. It was rich with flavors. More of s dinner wine. Absolute deepest color. I used white raises. No yeast.
Then last week I opened another bottle and it was absolutely stunning. Fully body, heavenly bouquet, deep rich color. My guest was in awe at the first sip.
Oh, yes the jelly is perfect breakfast delight.
Thanks for sharing your experience, Judy. Elderberry is one of my favorite homemade wines.
Holy smokes, Laurie! You really got it going on here, don’t you? I think I will start with this one because we have TONS of elderberry down on our land. You may be hearing from me with questions! Thanks, again!
This wine is quite sweet, but very yummy! I’m hoping to make another batch this fall.
Can you use dried elderberries for this recipe? If so what would the amount of dried berries equal out to?
Thanks…
I don’t think there’s any easy way to convert for dried berries, since it’s the juice you’re looking for to make the wine. You could try a simple grape juice wine and add the dried elderberries to the brew to bump up the flavor and medicinal properties.
Love the sound of these but I am trying to find a water and sugar ratio for making elderberry wine out of 16 oz. of Elderberry Extract. Do you have any tips for this? Thanks
I was looking for something similar myself for making wine from berries that had been juiced. I didn’t have much luck, but when I asked the owner of a local home brewing shop, he suggested cutting the sugar by 10% and using roughly the same volume. I ended up turning my juice into jelly and making wine out of fresh berries.
Thanks so much for posting the recipe I have looked all over for this kind of recipe. I remember my Dad trying to make wine or beer out of raisins when I was a little girl. I don’t know how it turned out but I did love the smell. Thanks again. Lana
I love the smell of winemaking, too – rich and yeasty.
Oh my goodness! Thank you for the trip down memory lane! My father made both elderberry and dandelion wines when I was young! We picked wild rose hips, too, I think for jam. I remember having tastes of the elderberry wine when I was about 8. Thanks for the post!
My momma never made elderberry, but she did make dandelion wine and blackberry wine. Like you said, good memories. 🙂
Can you use this same recipe for the blackberry wine??? I’m not sure we have elderberries readily available in SC. When I was young they were all over the place in upstate NY. :0)
Here are a couple of recipes for “Any Fruit” wine, shared by Sondra on Facebook:
Wine-makes 1 gallon
1lb fruit-any kind rinse off dirt, don’t scrub, mash just a little to get juices flowing. (We have added more fruit each batch for a more fruity flavor)
4 c. sugar
3 qts. hot (not boiling) water
1/8t. yeast-you can use baking yeast but brewer’s yeast is better
You will need a gallon jug, a big balloon (condoms work great, don’t laugh!)
Put sugar & 1-2 qts of water in jug. shake to mostly dissolve, add fruit, yeast & rest of water, give a good shake. Top jug with balloon and tape down. Set in warm, but not hot, place where it will not be disturbed. Let balloon expand & deflate. Strain well, bottle.
Be careful to keep an eye on this, you may have to replace balloon once or twice, they have busted on me before and you do not want air or fruit flies to get to it.
I do not like to add additives to our wine, this is a very dry wine. I like mine sweeter but then I would have to add something to stop fermentation (can’t remember what it is called)
Old wine recipe
You will need a large stone crock & either cheesecloth or a large towel to cover just to keep the bugs out.
1 gallon of water
1 gallon of fruit (3-4 lb. to the gallon)
Start out with 3 lbs. of sugar (it wouldn’t hurt to add 4 obs. if you like it sweeter) Extra sugar will make it stronger
Put all in stone jar/crock & set out in the sun for no longer than one week, if that long. Be sure to cover with a cloth to keep bugs out. Cover with a lid in case of rain.
Stir everyday, tasting as you go. Strain & bottle when done.
I haven’t tried these, but the wines I have made have been pretty forgiving.
I would like to try this with the abundance of sour cherries I get each year from my tree. As we are right in the middle of winter here in Canada, the cherries are in my freezer. Is it possible to use them to make wine or is fresh fruit the best option? Thanks!!
I don’t see why frozen fruit wouldn’t work.
I have an abundance of sour cherries every year. As we are right in the middle of winter here in Canada, they are all in my freezer, can I use them to try this recipe or would you recommend using fresh fruit?
Thanks!!
To prevent bugs, critters from getting in, as well as air, I use a balloon. to prevent the balloon from popping of from over inflation I used a needle to poke a small hole that allowed the excess gasses to escape. Works well for me.
Just a few questions I have,
For the 1gal receipe that sits in the sun for 3days can I use wine yeast instead of raisens, and how much should I use?
Also can I skip the wheat products or wheat yeast and still have a good wine?
Thankyou
Don’t skip the raisins. They are critical for the flavor development of the wine. As mentioned in the post, if you are avoiding wheat, you may substitute yeast nutrient. If you are using a wine or champagne yeast, there should be no wheat yeast involved.
This looks great. I have elderberries growing in my back yard, not enough to make wine yet, but one day.
Thanks for sharing!