Building an Eco Home – part 3 of 8
This post may contain affiliate links. Read my full disclosure here.
The “Building an Eco Home” series is a set of articles that were originally published in The Healthy Independent while we were in the process of building our current home. I have made only minor edits to include links and format for the online publishing.

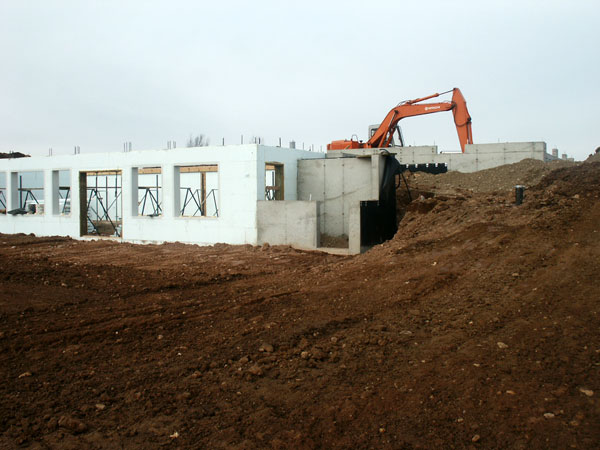
After all the months of waiting, we are finally building our new home! As of this writing, we have a large hole in the ground complete with footings and the beginnings of the frost walls and basement walls. I think our builder is probably as relieved as we are, as this means no more “tweaking” the footprint of the house and revising window and door placements. We also have (almost) finalized our heating and cooling choices, as well as our choices for potable water and “wastewater”.
While the thermal mass potential of ICF (Integrated Concrete Form) construction is well suited to passive solar design, the structural requirements of the concrete itself require that a bit more thought be put into window and door placement. In order to get within the recommended window square footage of 7–12 % of floor area, we had to work with Bart (our builder) to enlarge and “line up” (vertically) the windows in the main floor and exposed lower level. Maintaining symmetry between the upper and lower levels reduces the needs for specialized supports in the concrete.

To keep the house from overheating in the summer, a four foot overhang runs the entire length of the south wall of the house. This overhang is a simple extension of the roof on the main level. The roof extension then shelters a four foot strip of deck, which acts as the overhang for the lower level. We envision using this space as a multipurpose area reminiscent of an old fashioned sun porch. In the summertime, annual vines (or grapes or hardy kiwifruit that can be cut back in winter) will provide additional shading at ground level. A laundry line strung down the length of the deck will provide free drying time for the laundry in a convenient location. An excellent shareware website that provides an animated demonstration of overhang performance is located at Sustainable by Design: Light Penetration. Another excellent resource for passive solar design is The Solar House: Passive Heating and Cooling by Daniel D. Chiras.
No matter how well the house is designed and built, we all realize that the sun doesn’t always put in an appearance at convenient times during the Wisconsin winter. Initially, we were planning to use a propane forced air furnace for heating, but we eventually decided to switch to a propane boiler with in floor hydronic heating. With all of the flooring in the home being solid surface materials, we decided that warm floors were worth the additional expense. The tubing for the basement level will be buried in the sand underneath the slab, while the main floor tubing will be mounted under the floor in a “fin” type installation rather than placed into a gypcrete bed. Should something go wrong at some point in the future, this type (under floor) of installation would be much less costly to repair.
Radiant heating also gives us the option of installing a solar thermal system for heating. We did considered using solar thermal at this time, but the estimated installed cost of the solar component of the system alone was $12,000- $13,000, not including the radiant tubing, distribution system, etc. This would have provided us with a system that still didn’t meet our entire heating load and we would have had to install the boiler for backup heating. Another problem was what to do with the massive amount of heat produced in the summer. While it could simply be “dumped” into the ground, that seems like a waste.
The only undecided part of our heating scheme is the woodstove. While I’ve fallen in love with the idea of having a masonry stove (see The Book of Masonry Stoves: Rediscovering on Old Way of Warming by David Lyle), the cost is quite high. We received a rough quote from Gimme Shelter of around $20,000, which is way out of our budget. Tempcast prefab units run around $4000-$5000 for the heater core, plus the cost of installation and the veneer materials. Standard EPA approved woodstoves are much less expensive (a good unit can be purchased for under $2000), but they just don’t have the charm or the long, slow heat release of the masonry stove. A footing has been poured that will support the masonry stove, but we still don’t know at this point whether or not it will become part of our home.
Would you like to save this?
The cooling system is relatively straight forward in comparison to the heating system. As I mentioned earlier, the overhangs will keep out the bulk of the summer sun. Insulating shades will also be in place so they can be lowered if needed (this will help out with winter heating, too). The thermal mass of the concrete and the partially earth sheltered design of the home should also help to regulate the temperature. Windows have been placed to allow easy cross ventilation of air, which will allow for quick intake of cooler night air. We have included a small high-efficiency air conditioning unit and Energy Recovery Ventilator to deal with potential humidity problems or extremely warm conditions.
There’s one more house item I wanted to discuss in this issue – the last minute addition of an attached greenhouse. August and I had been trying to figure out a site plan for the balance of the property, including an earth sheltered greenhouse similar to one we had seen in a recent issue of Countryside magazine. While lying in bed one sleepless night, I started wondering if we could place the greenhouse on the east side of the home and use the back wall of the greenhouse as a retaining wall to keep the dirt fill in place on the south side of the root cellar. I ran the idea by August in the morning and he suggested attaching the greenhouse to the home and adding a doorway directly from the home into the greenhouse. August talked the idea over with Bart and he recommended putting in full poured footings around the perimeter of the greenhouse because they would be relatively inexpensive and would greatly improve the stability and durability of the structure. For now we’ll probably finish off the enclosure with plastic sheeting while we keep an eye out for used or discounted glazing. I can hardly wait for next spring and the opportunity to jump start my little seedlings!
I had hoped to discuss rainwater, greywater and septic in this issue, but it looks like I’m running out of space. As we are approaching the season of Thanksgiving, I want to send out a big “thank you” to all of those who have made this project possible: family, friends, our builder, and someone who was a stranger just a few short months ago but will hopefully become a lifelong friend, our new neighbor, Ryan Maigatter.
When we approached Ryan a couple of months ago about trading a strip of property along the lot line so we could put in a driveway to the pasture where we wanted to build, his response was, “Sure. That’s what neighbors are for.” This young man had only purchased his property a few months earlier and had just recently finished fencing the area in question. Without complaint, he pulled out the posts along the fence line and moved them over – not a small job, especially in the cool, soggy weather we’ve been having. He has been nothing but helpful and supportive all through the process, and I hope we can help him out with projects on his homestead in the future. After all, that’s what neighbors are for.
Until next time, stay warm and have a joyous holiday season.
Eco Home Building 8 part Series
- Building an Eco Home Part 1 – Introduction
- Building an Eco Home Part 2 – Getting Ready
- Building an Eco Home Part 3 – Construction
- Building an Eco Home Part 4 – ICF, HVAC and Plumbing
- Building an Eco Home Part 5 – Floor Plans
- Building an Eco Home Part 6 – Deck, Cabinetry and Woodwork
- Building an Eco Home Part 7 – Masonry Stove and Passive Solar
- Building an Eco Home Part 8 – Eco-Friendly Flooring

We’re planning to build a new home and have started looking into ICF recently.
Just wanted to say your blog has been very helpful because it’s always good to see how a technique is used in a real world situation.
Thank you.
You’re welcome. I hope your home building goes smoothly.
My husband and I build an ICF home as well about 5 years ago. We love living in it because it is so efficient. Happy to see others are doing the same.
Peace~