Potato Towers – Best Varieties to Grow and Other Tips for Success
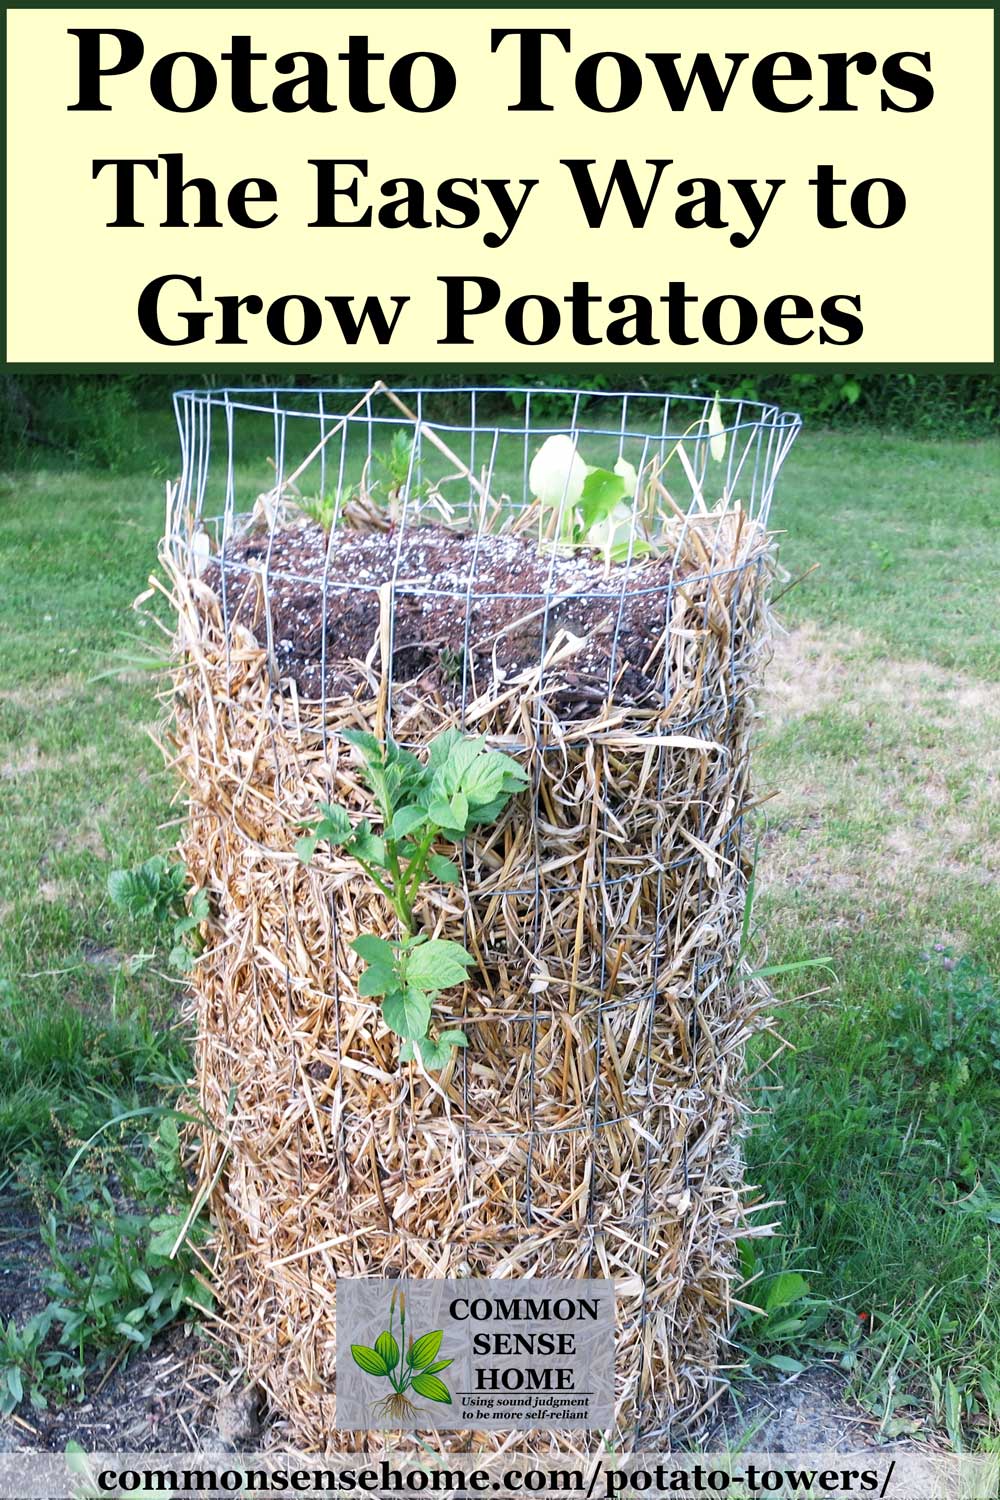
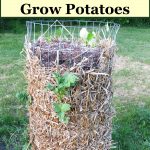
Planting potatoes in potato towers with straw and soil is an excellent alternative growing option to avoid having to dig up your potatoes (and risk injuring the potatoes in the process). We share an easy to build tower, plus the right way to get the most plants from your potato starts and the best varieties to grow
This modified raised bed method also helps to save garden space, making it a great choice for small gardens.
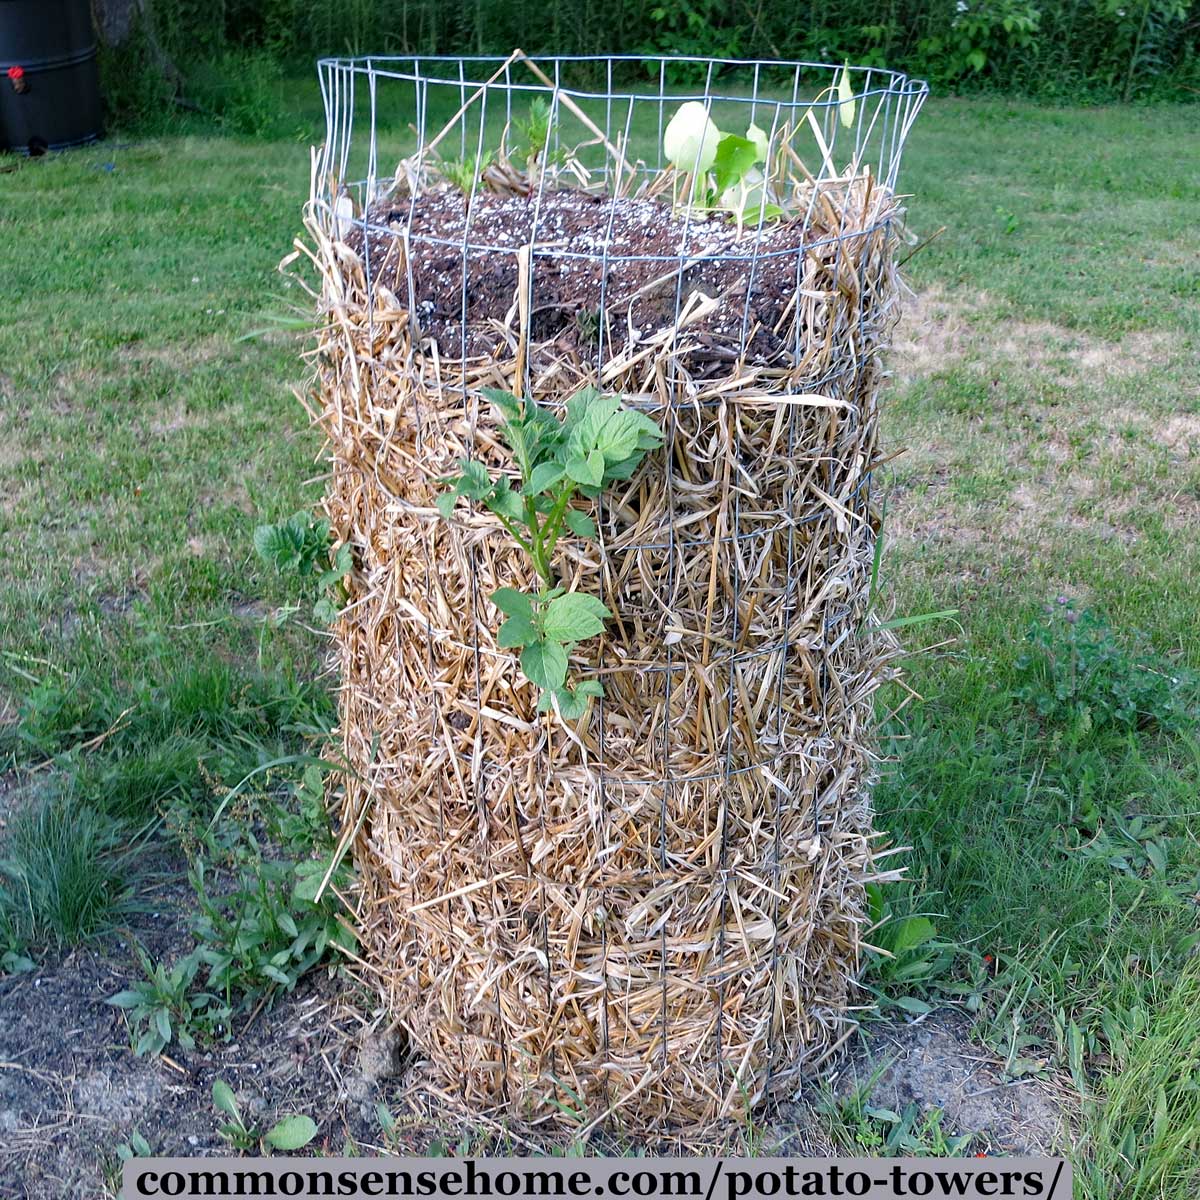
Growing Potatoes in Potato Towers – Materials List
To make and plant a potato tower, you will need:
- Field fencing 4 ft wide
- Straw (not hay)
- Compost or garden soil
- Seed potatoes (about 2 lbs per tower)
What Varieties of Potatoes Work Best in Towers?
To get the most out of your potato tower, look for longer season varieties (sometimes referred to as indeterminate potatoes). These types of potatoes will continue to set more potatoes over a longer period, so they’re a better fit for the tower method.
Some indeterminate and late season potato varieties include:
- All Blue
- All Red
- Amarosa*
- Bintje
- Blue Mac
- Desiree
- Elba
- French Fingerling*
- German Butterball
- Green Mountain
- Irish Cobbler
- Norland
- Nicola
- Pink Fir Apple*
- Russian Blue
- Russet Nugget
- Russet Burbank
- Ranger Russet
- Umatilla Russet
*indicates fingerling potatoes
Preparing the Potatoes for Planting for a Bigger Harvest
Whether you’re using the traditional method or towers, if you use whole seed potatoes, they will grow, but you will be wasting a lot of potential potato plants. To maximize your seed potatoes, you’ll want to cut them up.
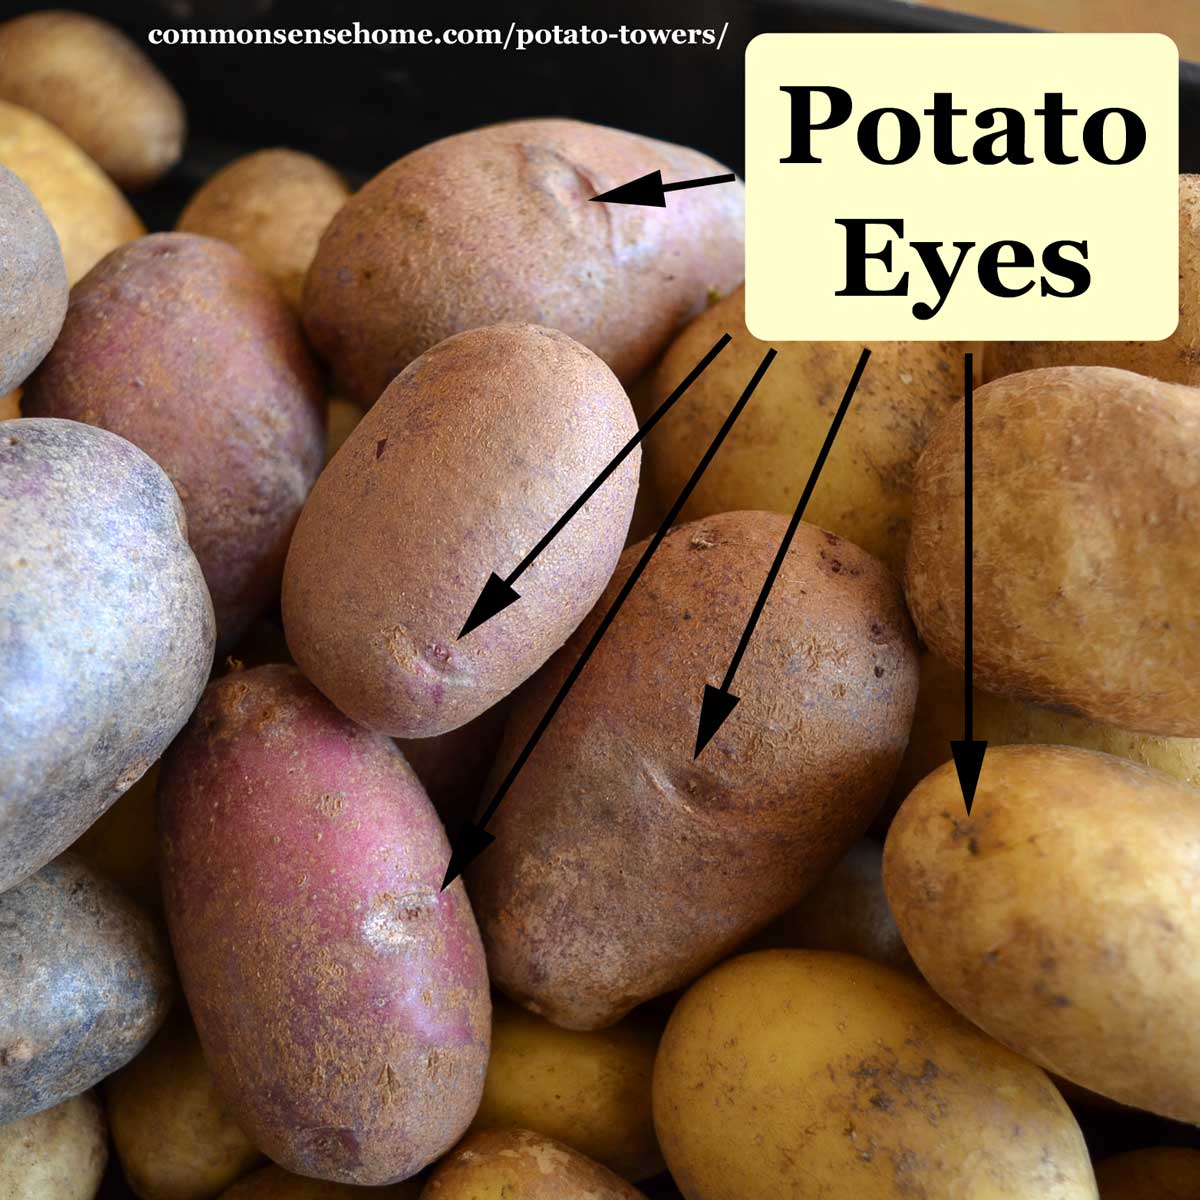
A day or two before you plant, cut your seed potatoes into 2 inch chunks with at least 2 eyes on each chunk. It takes a little bit of time and practice to get a feel for where to cut each potato.
If you’re unsure, leave them on the bigger side because fewer potato plants are better than no potato plants! Lay them out on a baking sheet, tray, tarp, etc. and place in a breezy and dry location to cure for 12-48 hours.
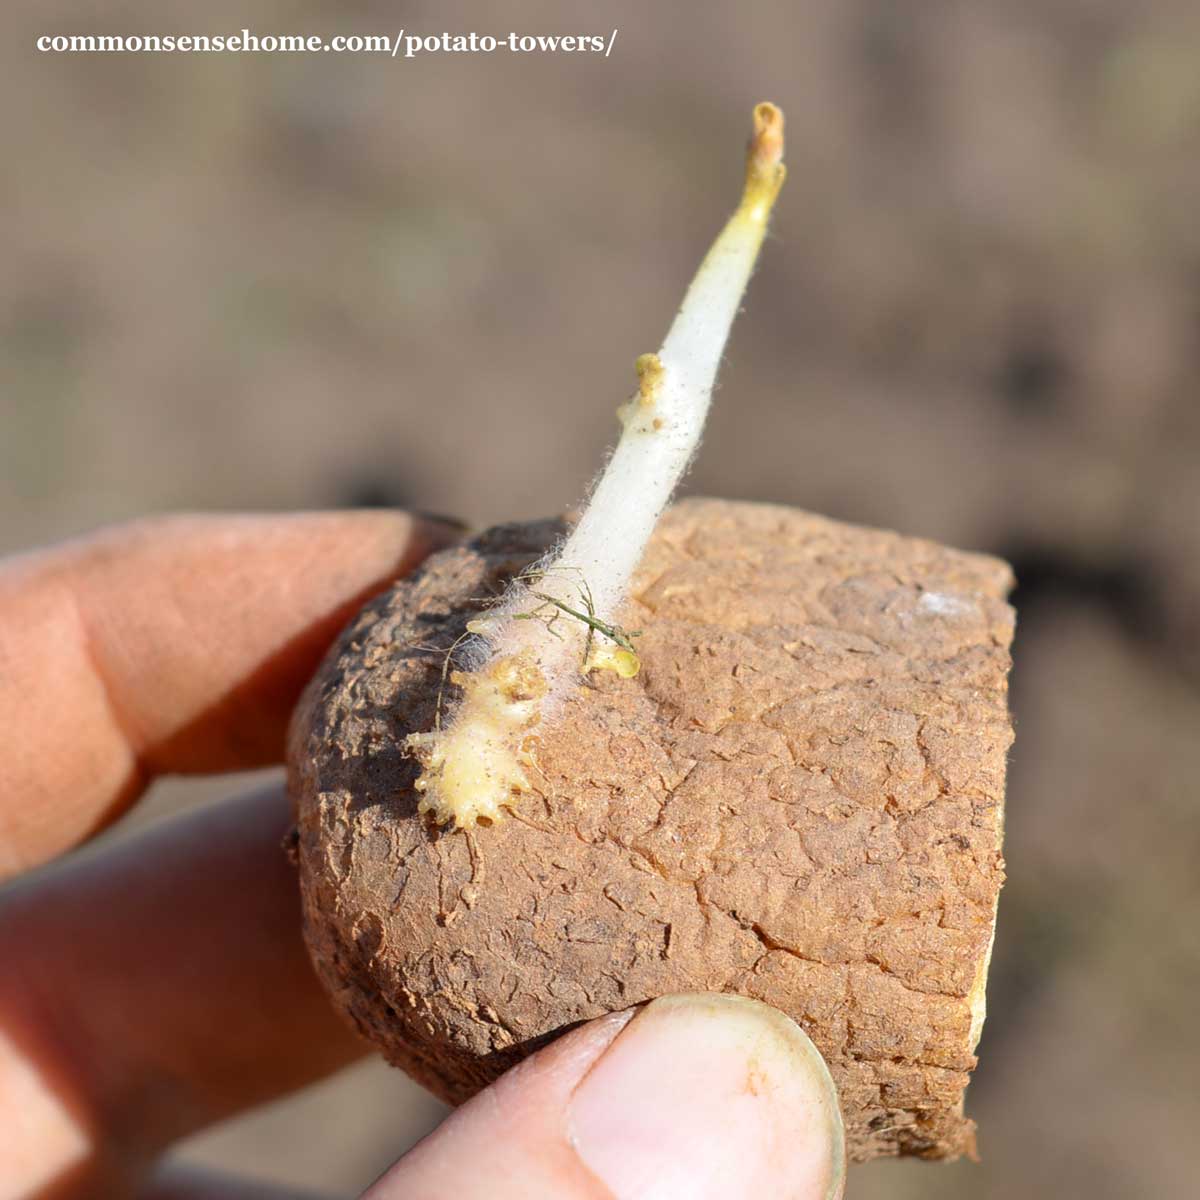
This will help the cut sides scab over so they are less likely to rot in the ground before sending up sprouts. You will need 12-24 seed potato pieces per tower.
Preparing the Potato Towers
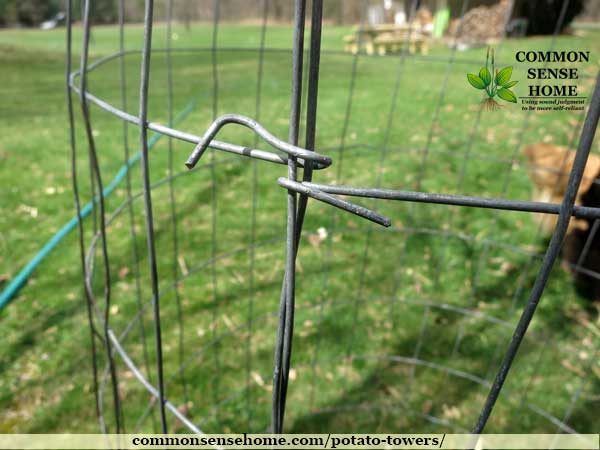
Start unrolling your field fencing to form an upright cylinder. Its best to keep the cylinder around 2-3 feet in diameter because anything smaller may fall over easily and anything bigger won’t fall over easily enough! (we’ll get to that a little later). Cut the wire with wire cutters and fold the wire back on itself to catch the other side.
Planting the Potatoes in the Potato Towers
Start by choosing a spot for your towers. I have kept mine together in the past but I recently realized that (duh!) if I separated them they would be less likely to all go down if there was an insect or disease problem.
So if you are doing more than one tower, consider placing them in different locations (and away from tomatoes too).
Once you’ve chosen your spot start by lining the bottom of the tower with straw.
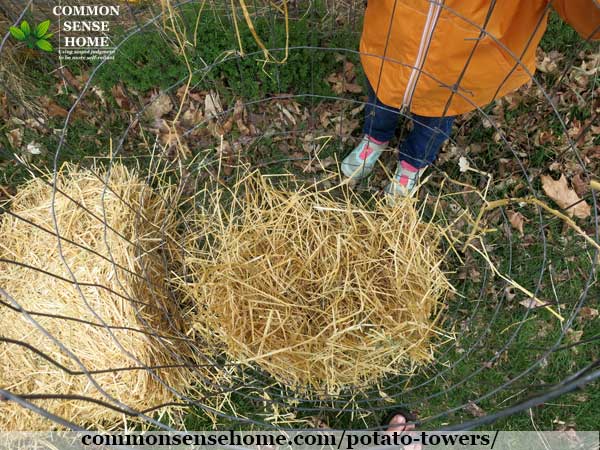
Then begin filling your potato tower with a foot of soil. Arrange your seed potatoes around the edges about 3-4 inches from the edge and about 6 inches apart.
Be sure to point the eyes outward as the plants will be growing out the side of the tower. You should be able to use 4-6 seed potatoes per layer.
Keep in mind that the farther apart they are the potentially larger your potatoes will be.
Would you like to save this?
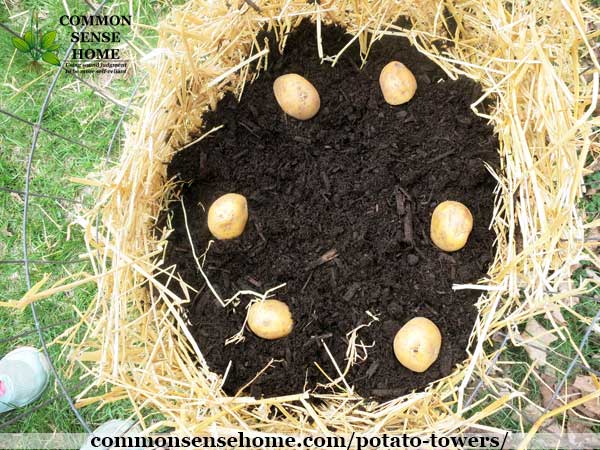
Arrange more straw and add another foot of soil. Arrange another layer of potatoes. Water each layer well. Continue like this until the tower is full.
I like to add calendula or marigold as a companion plant to the top, which can help with pest control and looks pretty! Learn more about companion planting here.
Some people like to grow salad greens on top.
How many potatoes will I get from a potato tower?
It really varies depending on the variety you choose, how close you plant them and how rich the soil is. A good estimate is 10-20 lb per 1 lb of seed potatoes.These potato towers can produce around 50 pounds of potatoes.
Avoid this Potato Tower Mistake
NOTE: If you live in a warm, dry or windy area, the tower method may not be a fit for you. As noted in the article, “A Simple Way to Get High Yields of Potatoes“:
“…researchers in tropical climates have found that when soil temperatures rise above 75°F (25°C), potato plants signal their roots to stop making tubers.
Instead, the plants may rev up other reproductive strategies, like developing more fertile flowers, or popping out little green potato-like organs on the main stem.
Daytime heating of roots is one reason why potatoes grown in above-ground containers may fail in warm summer climates. Potatoes can take warm air temperatures, but when the roots warm up too, productivity plummets.
A second problem with growing potatoes in towers, pots or bags is the dwarfing effect caused by the containers. The plants sense that they are growing close together, which makes them produce numerous small tubers rather than a few large ones.”
Growing potatoes with mid-afternoon shade may help with keep them from overheating. but those with high temperatures may need to either grow a different starch or try potatoes in their cool season.
Harvesting Your Homegrown Potatoes
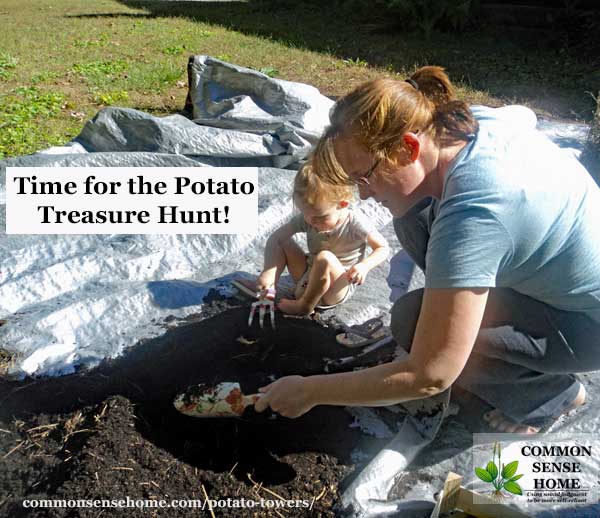
When your potato plants have started to dry up and die back you can begin harvesting. Get a large tarp and lay it on the ground next to the tower. Push the tower over and gently pull the soil and potatoes out.
This part is really fun for kids young and old. It’s one of my favorite end of summer activities! Because dumping the soil out loosens it, you can comb through the soil with your hands, making it easier to grab potatoes without harming them.
Use your harvest to make potato pancakes or cheesy scalloped potatoes, or cure them and store them in the root cellar for later use.
What to Do with the Soil from the Potatoes
Now that you’ve dumped a bunch of soil onto a tarp, what should you do with it? It’s not a great idea to use the soil, as is, for next year’s potatoes since it could hold insects or diseases, so you have a few options:
- Solarize your soil to kill insects and disease
- Use the soil in the plot in your garden rotation that will have legumes next year
- Add the soil/straw mix to your compost
- Give the soil/straw mix to your (or somebody’s) chickens
If you want to skip the fencing, you can try potato grow bags for container gardening. Same concept!
Do you plan on growing in potato towers? Let us know how it goes in the comments!
More Gardening Information
Did you know we have over 100 gardening articles on the website, all sorted by category on the Common Sense Gardening page?
They include:
- How to Start a Garden – 10 Steps to Gardening for Beginners
- Free Printable Gardening Journal Templates and Planting Calendar
- How to Grow Garlic – From Planting to Harvest
- Starting Seeds Indoors – 11 Steps to Help You Plant Seeds with Confidence
- Growing Asparagus – Planting, Care and Harvesting a Perennial Favorite

Mindy Wood is the voice behind Our Inspired Roots, where she shares tips to slow down, simplify, become more self sufficient and live a healthier, happier life. As a wife, mom of two, writer, and aspiring homesteader, she’s always looking for ways to encourage others in living a joyful and authentic life.
Originally posted in 2016, last updated in 2019.

I have constructed five potato towers in accordance with this tower inspiration. I have an empty (extra) leftover.
May I plant carrot seeds, spaced 2/3 inches apart with 12 inches of soil in-between layers with this potato tower construction?
I’m not sure I follow what you are asking, but will try to help.
Carrot seeds need to be near the surface, so they can shoot up greens to grow the roots. I would not attempt to layer them in a tower like the potatoes can be layered, but you could used the tower as a framework for a raised bed so the carrots have plenty of non-rocky soil to set their roots deep. There are some super long varieties of carrots such as Manpukuji that could potentially grow to nearly the length/height of the tower.
Thanks. Our soil leans toward clay, so root veggies don’t do too well the traditional way. I will give this a try this year and will come back to let you know how it went. 🙂 Love following you when I have time.
I hope it works well for you. Our winds are blasting again today, reminding me why I rarely attempt container plantings. Everything gets blown over. 🙂
This looks so cool! What a great way to get more potatoes!
Re your potato tower: I love this idea but wonder if the potatoes on the outside of the ring get green? I’m old school and it seems to me that there would not be enough darkness to prevent greening.
If properly set up with straw around the outside and the potato set into soil a couple inches inside the straw, risk of green potatoes should be low.
I really want to grow potatoes, I don’t know why I feel so nervous. With Corona now may be the time to take the leap. thanks for the great tutorial
It’s never a bad idea to invest in growing your own food.
oh sweety, dont be nervous. working in the garden makes me feel young and alive (I’m 62). It doesnt matter if some thing doesnt work out, some years are better for some things and not others. so laugh a lot, play in the dirt and enjoy the fruits of your labor.
This article really interested me, despite my only having a covered balcony in Florida. I have 2 cats, however, and read that the potato leaves are poisonous to cats and I KNOW my girls would be nibbling on them, so this wonderful idea is not an option for me until maybe someday when I have a yard and some way to keep pets away.
I bought sweet potato plants from the garden store. Do I have the vine stick out the sides?
I’d try some out the sides and out the top.
Can chicken wire be used as well?
As long as whatever you use is sturdy enough that it won’t tip over, you can use it.
I’m going to have to use pine needles because the children have celiac disease, and we can’t have wheat straw in the yard at all. I’ll let you know if it works.
What zone are you in? I’m in zone 7b, which gets hot. I’m going to put them where they get morning sun but not afternoon sun and hope for the best. I’ve already found I can’t grow them in garbage cans. Too hot.
Oat straw is another option. No gluten in oats.
No idea where to get oat straw and wouldn’t trust it. Oats grown in fields rotated with gluten-containing grains are not GF. Certified GF oats are grown in fields with no rotation and a specified number of miles from gluten containing grains. But I appreciate your suggestion.
Wheat straw does not contain gluten. Straw is the stem of the plant and the gluten is found in the wheat berries. The gluten is also not water soluble. I find it hard to believe straw would adversely affect your children!?
Based on how allergic I am to corn I can believe her. The process or separating the wheat from the chaff is not a clean process and they don’t exactly vacuum the dust off the straw. Allergies should be given more respect by people lucky enough to not have anything worse than hay fever.
How should potatoes be away from the edge? Should they be close to hay, or center?
“Arrange your seed potatoes around the edges about 3-4 inches from the edge and about 6 inches apart.” There’s a photo in the article where you can see an example of potato positioning. They should not be in the straw. The straw holds the dirt in.
IIm trying a potato tower for the first time, what type of straw do you use for the tower and why can’t you use flax straw?
When I use straw for potatoes. it’s typically oat or wheat straw, because that’s what we have available in our area. I don’t think there would be a problem using flax straw, as mentioned in response to your previous comment, as long as there were no herbicide or pesticide residues. So many crops get sprayed with chemicals nowadays you never know what’s going to be contaminated unless you get it from somewhere you trust and specifically ask.
What type of straw can you use e.g. wheat, flax?
Most should work, as long as they don’t have any herbicide or pesticide residues.
BTW: My son-in-law’s mother manages a chicken farm in North Carolina. She has a knock out garden. She said to start seeds in egg shells! Nutrients are still available and will assist in the growth process.
We live 30 miles west of Chicago. We usually have near 100 degree temps for a period of time during the summer. Will I be successful with those temps? Thank you
Probably. I can’t say for sure given that there are any number of variables in each garden. You’ll need to keep the tower well watered, and may want to see up where it gets afternoon shade during that part of the season.
What varieties of potatoes do well in towers? Also for a shorter growing season of 3-4 months. I am in Alberta, Canada. Thank you
If you have a variety that grows well in your area, you should be able to grow it in a tower.
I’m in Texas and I have a friend that grows his in a tower in nothing but hay. He has grown it that way for 2 years now and has great success. I’m going to try for my first time this year. I however think that I will do mine in the soil. Might do one of each and see which does best.
I’d be interested in hearing which gets better results.
I tried the tower method this year. It looked wonderful and just finished digging for my potatoes. Unfortunately, there are mostly little bitty potatoes and only about 30. The dirt was moist and
looked wonderful. There were no bugs to speak of so I can’t figure out why they didn’t grow larger.
Any suggestions you may have will be appreciated as I am not giving up and will try again next year.
Did your tower get hot during the growing season? Potatoes like cool temps, so the tower method can be challenging in areas with hotter summers, or if the tower gets full sunlight.
Would this work with a potato bag – would I need to cut holes in the sides of the bag to let the leaf growth out or will the bottom ones make it to the top?
I’m pretty sure potato bags are intended for the leaves to come only out the top. Too many holes in the bags and you risk bag failure.
Hi, I have many stems growing out of the tower, is this okay? Or do I try to put vines back in soil or cut them? Thank you
I’d try to tuck them back in or leave them be, not cut them.
Thank you, I’ll give it a try.
Good luck. If you think of it, drop me a note and let me know how it goes.
Could I plan other vegetables in with my potatoes. I mean in layers like the bottom half potatoes up to the middle and then Rall radishes?
Only one way to find out. As long as you allow room for everything and enough moisture and soil for germination, it should work.
Is it possible to store the potatoes in the tower through the winter?
I wouldn’t recommend it if you get freezing temps. You might try it if your temps don’t get too cold, but I’ve never heard of anyone doing it.
I was thinking fall and winter for me. I live in Arizona and we don’t get much freezing in the valley. Since it gets to 122 in summer hear and it’s in the 70-80s now I should probably wait. But I have some sprouted potatoes so I will try the other method and see if it has time to produce before it’s too hot.
If you have a spot with partial shade that may help, but yes, in general potatoes prefer cool weather.
I also live in Arizona. Outside of Tucson. I am wondering about the heat and direct sun. Wondering if lining with a white sheet would help. Maybe a huge one that could be pulled up over them during the intense sun during the day?
Whatever you can rig up to keep the temps lower would probably help. If you try something and it works, I’d appreciate it if you have time to share your results.
I’m in Alabama and summertime temperatures are way too hot for good potato production but I have been trying to figure out how best to utilize my greenhouse in the winter and this might actually be perfect. I’m thinking that setting them up in October would allow them plenty of time to get some growth before temperatures get really low and then I can keep them above freezing through the winter and just watch them in the spring to know when to harvest. I love experimenting!
How long does it take to start seeing the plants through the mulch? We have quiet a thick layer of sugar Cane mulch instead of straw and forgot to dry the potatoes that were cut before planting. I’m now concerned that it is all just dead…how would I find out digging it all up?
It’s hard to say exactly because conditions can vary so much, but I would think you should see some signs of life within a couple of weeks.
I have been doing towers for the last couple years. Unlike yours I used the other method of adding straw and soil as the plants grow. My yields are low though and potatoes are small. This last load had ants in the soil and potatoes were full of holes. Would that have been the ants? Have not had this in the past. I think I will try your method this time. Sounds like a little less maintenance.
It could indeed be the ants. Slugs and other critters like earwigs will also chew holes in potatoes.
We have used landscape fabric to line the inside of a similar cage with great success. This may also help absorb some of the heat people need for sweet potatoes. You can cut a slit in the side and insert a cucumber plant or two. I would recommend a cucumbers bush variety for this and you can plant swiss chard, lettuce, radishes, or similar short crop plant on top until you potatoes mature and pop thru. We have put a piece if pvc with holes drilled in them done down the center to assist with watering. Great kid or grandkid project!
Thanks for sharing your experience.
As an alternative to using straw (to keep soil and compost from falling out the holes in the sides of the tower)—I’ve had success using overlapping layers of newspaper. Vinyl window screening mesh works best to keep out voles and moles out, the soil in and still allow water to drain.
Sinking a perforated pvc pipe (or a column of repurposed plastic water bottles down the center of the tower as it is being built is a great way to deliver water efficiently throughout the tower. The perforated pvc pipe works great as well for deep watering of tomatoes and can do double duty to aid in staking.
I repurpose two tent stakes at the bottom of my towers to keep them from falling over .
Thanks for the additional tips, Becky.
In Louisiana, when you search for “straw”, 99.9% of the results are for “pine straw.” Would it be acceptable to use, or would it lower the pH too much?
I don’t think it would work very well because of the acidity. Potatoes can take some acidity (it helps to prevent scabbing), but pine needles? I’ve never tried it, so there’s a chance I could be wrong.
I tried this method last year with out a lot of success. We had a very dry summer and I found it very hard to get water to penetrate down to the lower levels.
Thinking this year that I am going to put a 4″ perforated pipe down the centre so that I can make sure that all the seed potatoes have sufficient water to grow.
It’s worth a shot. Lack of water and soil that gets to warm are the two biggest potential problems with the towers.
Can I use dried leaves instead of straw?
I would think so. I have not tried this, but leaves make good mulch.
Leaves will probably just fall out of the fencing. Same with dry grass clippings. The longer stems of straw/hay keep it in the fence.
You mentioned the width, but how tall. Does it matter? I have lots of scraps of fence in varying heights.
Height is flexible, although I don’t think I’d bother going about 4 feet because it would be unlikely the potatoes would grow that big and the tower would be more likely to tumble over.
This looks easy and lots of fun to have when ready. Whenis the right/ good time to start planting them?
I would like to add more to our garden I also just want to know do they need direct sunlight or some sun. I have alot of sunlight in my yard and I think it might be too much my garden didn’t do to good last year.
I’d plant near or slightly before your average last frost. The towers should get sun, but if your area tends to be hot and dry, some late afternoon shade is a good idea. Because they are above ground, the towers are prone to dry out. Too hot + too dry = poor yield of potatoes. In the rest of your garden, organic mulch would help moderate soil temperatures, as would planting close enough that the mature plants shade the soil. I tend to plant in blocks rather than rows, so more of the soil is shaded by plants.
Hi. Was wondering why not hay? When I asked locally for straw they said we have several more before straw is available and I should use hay. Just wondering.
Hay tends to have more seed heads, which can lead to unwanted plant growth in the tower. Straw is what’s leftover after the grain heads have been harvested, so it tends to have fewer volunteers.
Does this work for sweet potatoes?
It would appear so.
This guy packs a lot of info into his 3 minutes. He also has extensive notes below the video. Until recently, Beauregard has been the variety commonly recommended for Northern gardeners. This year Johnnie’s Seeds lists a 90 day sweet potato named “Mahon Yam” The catalog comments that it really is not a yam, and lists it with sweet potatoes. My experience last year with the potato tower made me hesitate to try it again with potatoes, but I’m game for anything that will yield a crop of sweet potatoes in Zone 3. Instructions I have previously read for growing them up North are to use raw compost to generate the extra heat sweet potatoes need. This is sure to draw the mice who are, next to me, my garden’s biggest fans. Maybe black plastic and partly finished compost will heat things up sufficiently. I might try a dark mulch around the base of the tower, and possibly some sort of thermal mass on the north side of it, as well as placing it as close to the northern border of my garden as I can. The notes he provided also comment that the vines kept getting nibbled by what he thinks were deer. I grew up eating sweet potato leaves that my Grandmother dropped into soup a little before serving, and they are tasty! If I can figure out how to encase the tower with 3/8″ hardware cloth, this would probably protect the roots from my little buddies until I get to them. I did not know about the 85F sunbath, but I have successfully stored sweet potatoes by wrapping them thoroughly in kraft paper and keeping them loosely piled in a shallow basket. They will last a long time where they can stay, away from light, dry, well-ventilated and between 55 and 65F.
The curing time at 85F not only helps them keep longer, it also improves the flavor, so it’s best not to skip it. I can’t quite seem to get my timing right on my sweet potatoes – but maybe this will be the year that I do.
This was so informative. Thank you.
Lee
You’re welcome.
Thank you for your information. I have grown Beauregard in the ground in a raised bed which it takes over, and also in a pot (pot not very successful) so will try your method. We love home grown Beauregard sweet potato.
Without going to deep into the science of hay, I’m not worried about seeds. Are seeds the only reason not to use hay? I have a lot of “scrap” hay from what the cow doesn’t eat.
Seeds are the primary concern. In some cases, depending on the hay source, there may now be herbicide residue leftover in the hay that will kill or stunt your garden plants.
This can unfortunately be true of straw especially that sold by stores that are not garden centers. It’s worth an extra couple bucks to get either straw or hay where you can trust the source.
We tried the potato towers and stuck close to the instructions. We had a lot of rain this year and everything started about two weeks late, but we ended up with a long, lingering, mild fall, with conditions that would have seemed good for potatoes, desp8ite one 27F night in mid-Sept., pretty good for Northern Wisconsin in Zone 3b. Due to a lack of storage space and some travel time, I left my potatoes in the towers until late October. To my disappointment, roughly 4 lbs. of seed potatoes planted between towers, including a lot of fingerling potatoes, yielded 4 or 5 lbs. of mostly Russian fingerling potatoes, a handful of German butterballs and a hatful of very small rose colored potatoes that might have been small Norlands. In the case of the Norlands, I found a couple of gnawed out pink shells in the layer above where the intact Norlands were found. These were in a very compacted mass, I would guess from the weight of the mulch and compost in the upper layers. Whatever (whoever!) was feasting on my spuds may not have had time or strength to wiggle down to the lowest and densest layers. We know we have mice, have seen evidence of moles, and definitely have slugs in our garden. We haven’t noticed any appreciable loss to critters when planting in deep raised beds in the past. If try this again, I might resort to a 1/2″ hardware cloth mesh liner inside and lining the bottom of the original wire towers as is recommended for raised beds with mole problems.. I guess I would have to apply a wide band of non-climbable steel around the bottom. The honest truth is that there is no way the amount of raised bed space I have would plant enough potatoes to supply my husband for more that a few weeks. This may be one of the crops that we rely on our grocery store for, and save our garden space for other less vulnerable veggies. Until we have a rooftop garden with a good mouser cat, that is!
How many pounds of potatoes did you end up with? I want to try this but have heard mixed reviews. Some say they got a ton, and some get nothing or close to that. Thanks!
Mindy noted in the post that “A good estimate is 10-20 lb per 1 lb of seed potatoes.These towers can produce around 50 lbs of potatoes.”
I read that but that doesn’t say how many pounds she harvested from her tower that is pictured – just an estimate of what can be harvested. The post doesn’t say, “we got 21 lbs from planting 12-24 potato seeds in one tower”. Most gardeners are pretty specific about yields so that other growers know what to expect with that particular technique.
The thing is, what works for one person in one situation is no guarantee for everyone in every situation. I personally feel that articles that claim to give very specific results for a growing technique are well-intentioned, but my garden may have very different growing conditions than someone else’s garden.
Loved your way of growing potatoes. I will give it a try this fall. I have set aside an area for at least three bins away from the main garden. Looking forward to a nice crop.
I’ve only grown potatoes once (last year) and it’s my understanding that you need to add more soil as the vines grow. How does that work with this method?
That’s a different method where you get all of your potatoes from just one “round” of seed potato. In that method you would need to layer soil periodically in order to grow more potatoes. My method eliminates the need for adding soil, which makes my life easier 🙂
Also, your method probably works better where the growing season is short, like for our area, with 76 days on average.
I think it may also depend on whether you are using a determinate variety or an indeterminate variety. I think with indeterminate you start with a few seed potatoes at the bottom and keep adding soil as you see green growth though the top. I think the method in the article works better for determinate. This is not from personal experience but from researching potato towers and wanting to try it myself.
I haven’t done the towers myself (since our winds are very drying), but I think that the indeterminate varieties would work better because they’ll keep setting potatoes over a longer time period as you fill the tower.
That’s exactly what I was planning on doing and it’s been over 4 weeks and I’m not seeing any signs of new growth. I followed the directions closely but maybe I started too early in the season or did something else wrong? Tempted to dig it all up to check
By four weeks you should be seeing something, so it is probably a good idea to check and see what’s going on.
you do have to cut the seed.. to no more than 3 eyes per chunk.. set them out to ‘bruise’ (dry 2 days) and then plant.. otherwise the moisture will just rot the potato.
We made 3 towers this year and all white, red, and yellow are sprouting. We also are going to attempt setting sweet slips around their own tower.
This will be the first success with potatoes if all goes right. We battled grubs in grow bags last year and we decided this method allows us to grow other things.
This being kind of a deep mulch technique, I am wondering if it needs regular water or would it just be necessary later in the growing season during dry, hot weather?
It does need regular watering but by regular I mean a good soaking every 1-2 weeks. The best way to do it is to leave a low flowing hose in the top so the entire tower can get thoroughly soaked.
I put a piece of pvc lateral line in as I planted.this made watering easier, used less water and soil was watered all the way through the tower and I found I only needed to water once maybe 2 times a week dueing really hot days of summer.
Thanks, Margaret.
Mindy…….if I live in a hot , dry climate……will I need to water more than every other week!? The next person said she waters twice weekly!?
If you area is hot and dry, you may need to water daily. More than once a week is likely to be required for certain.
Always enjoy your information and articles. So can the same tower process be used for sweet potatoes ? Hopefully, cause I’m going to try it this year. Thanks for the info
People do grow sweet potatoes in containers, so you should be able to adapt the tower to sweet potatoes. Because sweet potatoes are grown from shoots, not directly from the potatoes, I’d go with a shorter fence and a single layer of slips planted in the top.
Love this one. Women were the first engineers of our race! I’ve read a variety of instructions for “no dig” potatoes, but this one finally convinced me that I can do this. No hammers, saws or nails, , mess at a minimum and lots of space left for my squash and beans. Thanks, Mindy!
I’m so glad!
Great idea! Questions: How deep is each layer of straw? And do you put the straw directly over the seed potato pieces or do you cover the pieces with soil first?
Thanks!
The straw is actually just to line the outside so the soil doesn’t fall through the holes of the fencing. So, it doesn’t go between the layers (though it won’t hurt anything if you do it that way).
Appreciate you asking that question and getting an answer. I was wondering the same thing. The answer Mindy gave made it very clear
Appreciate you asking that question and getting an answer. I was wondering the same thing.
I don’t know what a potato seed is, is it just the potato itself? Also I am not sure what an eye of the potato is! I never seen where there is a video on your site.
Hi Bob.
I’ve added a couple photos to help you out.
Seed potatoes are potatoes that you intend to plant. Sometimes potatoes sold in stores are sprayed with compounds that inhibit sprouting, so it can be hit or miss to use eating potatoes for planting.
If you check in your local garden center or hardware store that sells gardening supplies, they’re likely to have bins or packages labeled “seed potatoes”.
A potato eye is one of those weird circular indentations on a potato. I’ve pointed out examples in the photo I added to the post. There’s also a new photo of a small spout coming out of a potato eye. If your seed potatoes start to sprout before planting, don’t break the sprouts off. Simply lay the potato with sprouts intact in the dirt and cover gently.