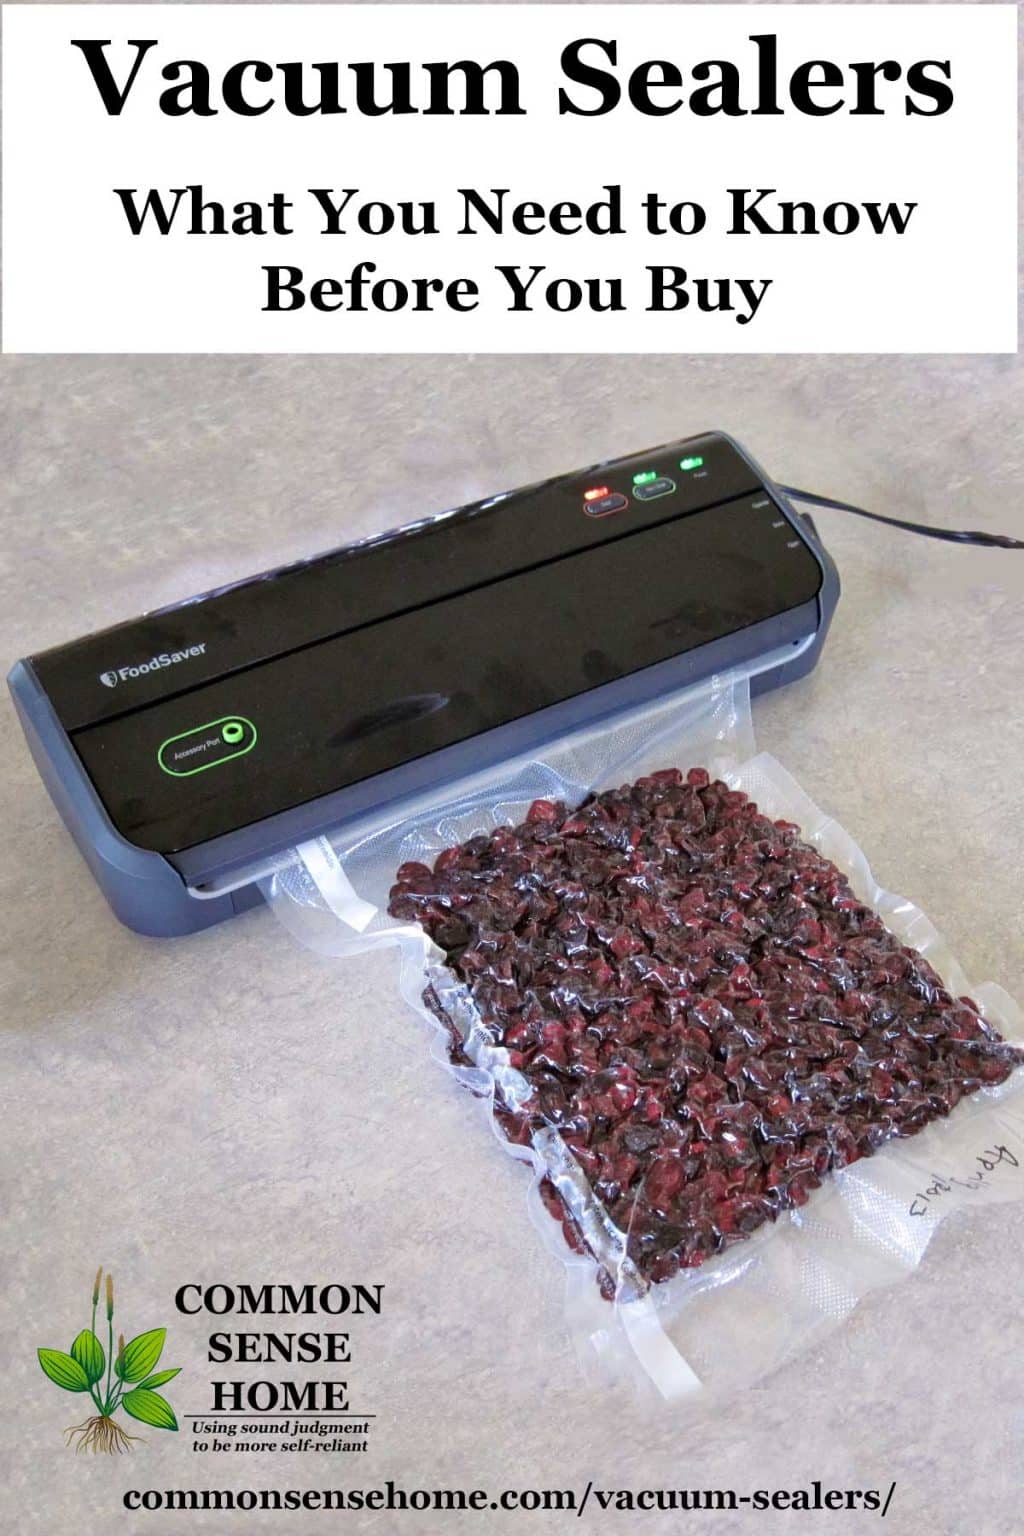
Vacuum Sealers – What You Need to Know Before You Buy
This post may contain affiliate links. Read my full disclosure here.

A vacuum sealer is one of those kitchen machines you don’t realize how much you’ll use – until you buy one. We use our vacuum sealer for food storage, sealing jars and bottles, corrosion protection, resealing bags and emergency preparedness. You can also use your vacuum sealer for sous vide cooking. In this post, we’ll discuss ways to use your sealer, do a comparison of Foodsaver models and their features, and share some tips on Foodsaver bags.
How does a vacuum sealer machine work?
Vacuum sealer machines sucks the air out of a plastic bag or container and seals it so no air can get back in. When sealing soft or juicy items in plastic bags for freezer storage, it’s best to freeze the items for a few hours before vacuum sealing them. This prevents the food from being crushed or losing its juice during the vacuum process. Vacuum sealing does a great job protecting the contents from oxygen, liquids and bugs.
Here’s a quick demonstration of how to use a vacuum sealer.
Why Get a Vacuum Sealer?
I’ve put together a list of different ways to use a home vacuum sealer to demonstrate how a vacuum sealer can help in your kitchen and home.
My Top Choices for Best Vacuum Sealer


#1 – Food Storage
I use my vacuum sealer for food storage more than any other use. Vacuum sealing dramatically extends the shelf life of food in the freezer, refrigerator and pantry.
In the Freezer
Have you ever tossed a bag of produce into the fridge or freezer, thinking that you’ll use it up quickly so you don’t need to do anything special with packaging, only to find it later, freezer burned or moldy?
It takes just seconds to vacuum seal food, and vacuum sealing extends the shelf life of foods to years instead of months. Vacuum sealed meats don’t oxidize and turn brown. We always get our bulk beef purchase vacuum sealed.
Produce Keeps for Years Instead of Months
I use my vacuum sealer for fresh frozen produce such as peas, broccoli, strawberries, peppers, blueberries, kale, chard, green beans and pretty much anything else that is not a puree.
I like to freeze the produce on sheet pans, and then pack into meal/recipe size bags and seal. That way, when I open the bags, the peas or berries aren’t all clumped in one big frozen block, and I can pour out at little or as much as I need at one time. Pre-freezing soft or high liquid items keeps them being crushed and juiced by the pull of the vacuum.
You can see my original vacuum sealer in action in this post about how to freeze peas, and the FM2000 in the post about freezing beans. The vacuum sealed bags can stack like books on a shelf in the freezer and take up little space. If you cut the vacuum sealer bags open neatly, you can also reseal and reuse the bags at least once, sometimes more.
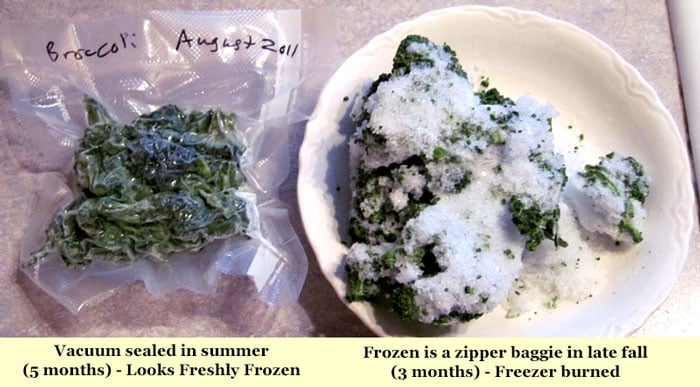
I can easily store food for a year or more, which is great if we have a bumper crop of something one year and a crop failure the next. Two year old vacuum sealed berries look like they were picked and frozen the day before. Try that with produce in a regular zipper bag, and you’ll end up with a block of ice.
Below is a comparison of two packages of broccoli, one vacuum sealed, one not. I thought I’d use the second package up quickly, so I didn’t take the time to vacuum seal. Big mistake.
How to Vacuum Seal Liquids and Single Servings for Freezing
One of our readers, Cheryl L., shared how she prepares high liquid foods and single servings for vacuum sealing on the Common Sense Home Facebook page:
I pre-freeze food with liquid, such as: soup, sweetened berries, tomato sauce, etc. in plastic bowls. When frozen solid, pop out the food, slip it into a bag and vacuum seal.
I also put individual servings such as enchilada’s with sauce into an open sandwich bag and freeze. When frozen, I pop the unsealed sandwich bags of frozen enchiladas into a a vacuum sealer bag and then vacuum and freeze. Placing the open sandwich bags into the vacuum bag allows the vacuum sealer to take out all the air, keeps the sealing area of the bag clean for sealing, and it makes removing individual servings very simple.
Portioning liquids and purees into ice cube trays is another option. Simply fill the trays and freeze, then pop the cubes out and vacuum seal. When you open the vacuum sealed bags or containers, you can use a little or a lot, and reseal if needed. You can also seal up leftovers in meal size portions for a quick to fix meal on busy weeknights.
In the Refrigerator
In the refrigerator, vacuum sealing helps food to last for weeks instead of days. Once you break the seal, the shelf life on many liquids drops dramatically.
Now you can use your vacuum sealer to reseal wine, oil or vinegar with Foodsaver bottle stoppers. Simply stick in the stopper, hook up the attachment hose, and seal.
They sell the Foodsaver® bottle stoppers in a 3 pack, so you can seal more than one jar at a time. This would also be a nice option for sealing jars of herb infused vinegar or oil.
In the Pantry
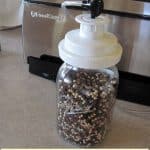
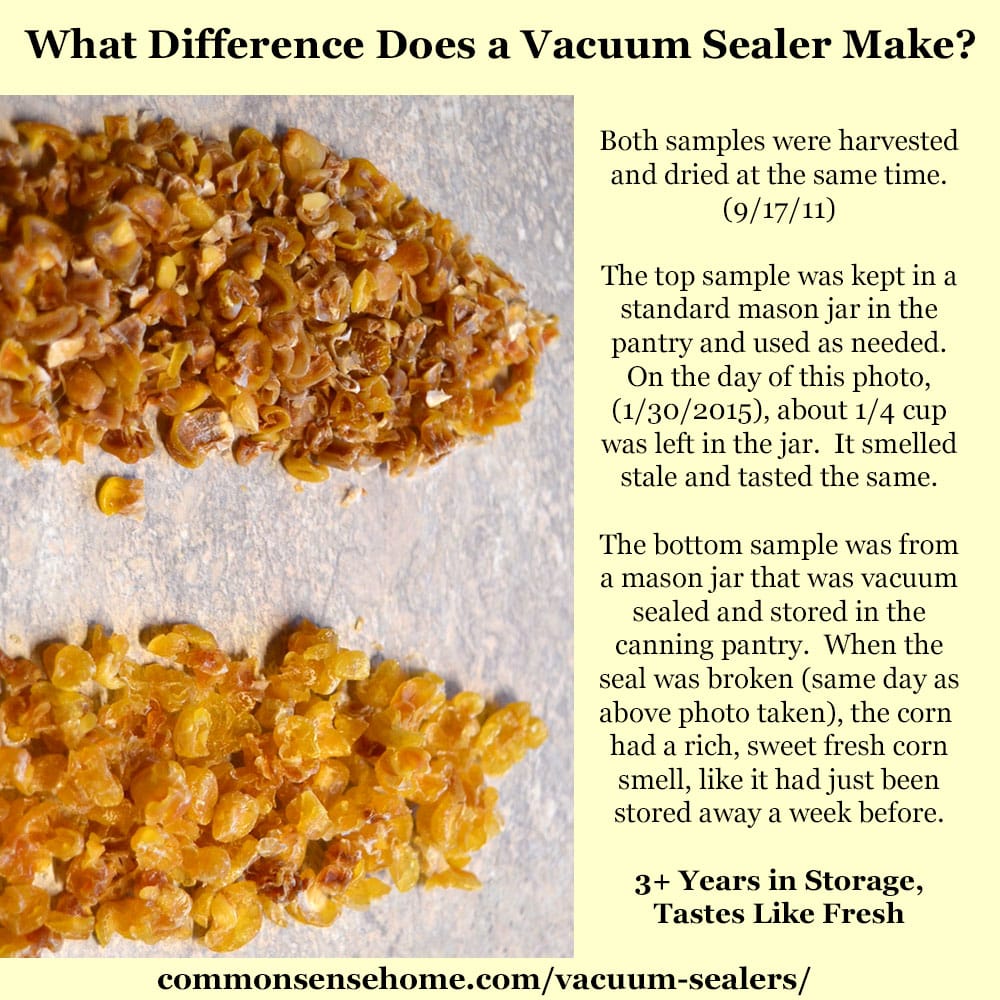
Vacuum sealers are also great for extending the shelf life of bulk dry goods, such as dried fruit, herbs and spices, or even flour and sugar. For non-powdery dry foods, like fruit, peppercorns or rice, I place the items in a mason jar and use the jar sealer attachment. This is also known as dry canning. This is especially helpful when you have a bumper crop that will be in storage longer because there’s so much to use.
For powdery items such as flour and sugar, I leave them inside their paper storage bags, and vacuum seal the entire package inside a vacuum bag cut to size. If you want to try sealing powdery material in a mason jar, make sure to form a hole in the center of the contents to increase airflow, and place a coffee filter over the contents to reduce the amount of dust being sucked into the seal and sealer.
#2 – Sealing (or Resealing) Non-FoodSaver Bags, such as Chip Bags
Chip clips and clothespins might keep bag contents from spilling all over the pantry, but they don’t work very well to keep the bag contents fresh, especially under humid conditions.
To keep the crunch in your crackers, simply use the Seal Only function on your vacuum sealer. I buy a lot of herbs, spices and baking supplies in bulk Mylar bags, so this is a great way to keep them from going stale before I use them up.
Can I vacuum seal Mylar bags?
You can’t vacuum seal Mylar bags without using an extra step, like putting an inch wide strip of textured FoodSaver bag plastic near the opening of the Mylar bag. Vacuum sealing a bag requires a textured area of the bag in the vacuum sealing channel. The textured area provides space for the air to get sucked out. Without the texture, the sealer clamps tightly shut, and seals before it vacuums.
#3 – Sous Vide Cooking
Sous vide cooking is a hot trend in some circles, and a vacuum sealer can help you prep your sous vide dishes. Foodsaver bags are sturdy, and hold up well to extended heating and liquid exposure. Removing the air from your sous vide bag prevents the food from floating. (Floating leads to uneven cooking.)
#4 – Vacuum Sealing Protects from Corrosion
From ammunition to fine silver, air and moisture exposure tarnish and corrode metals over time. You can use your vacuum sealer to protect the shine on your silver cutlery and save yourself a lot of time polishing. Just make sure to wrap the cutlery in a cloth or thick paper before sealing, so that the fork tines or sharp knife edges don’t puncture the vacuum bag.
If you want to protect ammunition, make sure to use the seal only function, not the vacuum and seal. Vacuum sealing bullets may cause the slug to “pop” out of the cartridge. You can add oxygen absorbers for extra protection.
For the welders out there, one of the members of SurvivalMonkey.com notes that they vacuum seal their Broco exothermic cutting rods and underwater welding electrodes to keep them fresh, which reduces waste from boxes being open and rods being exposed to the elements.
Would you like to save this?
#5 – Emergency Preparedness
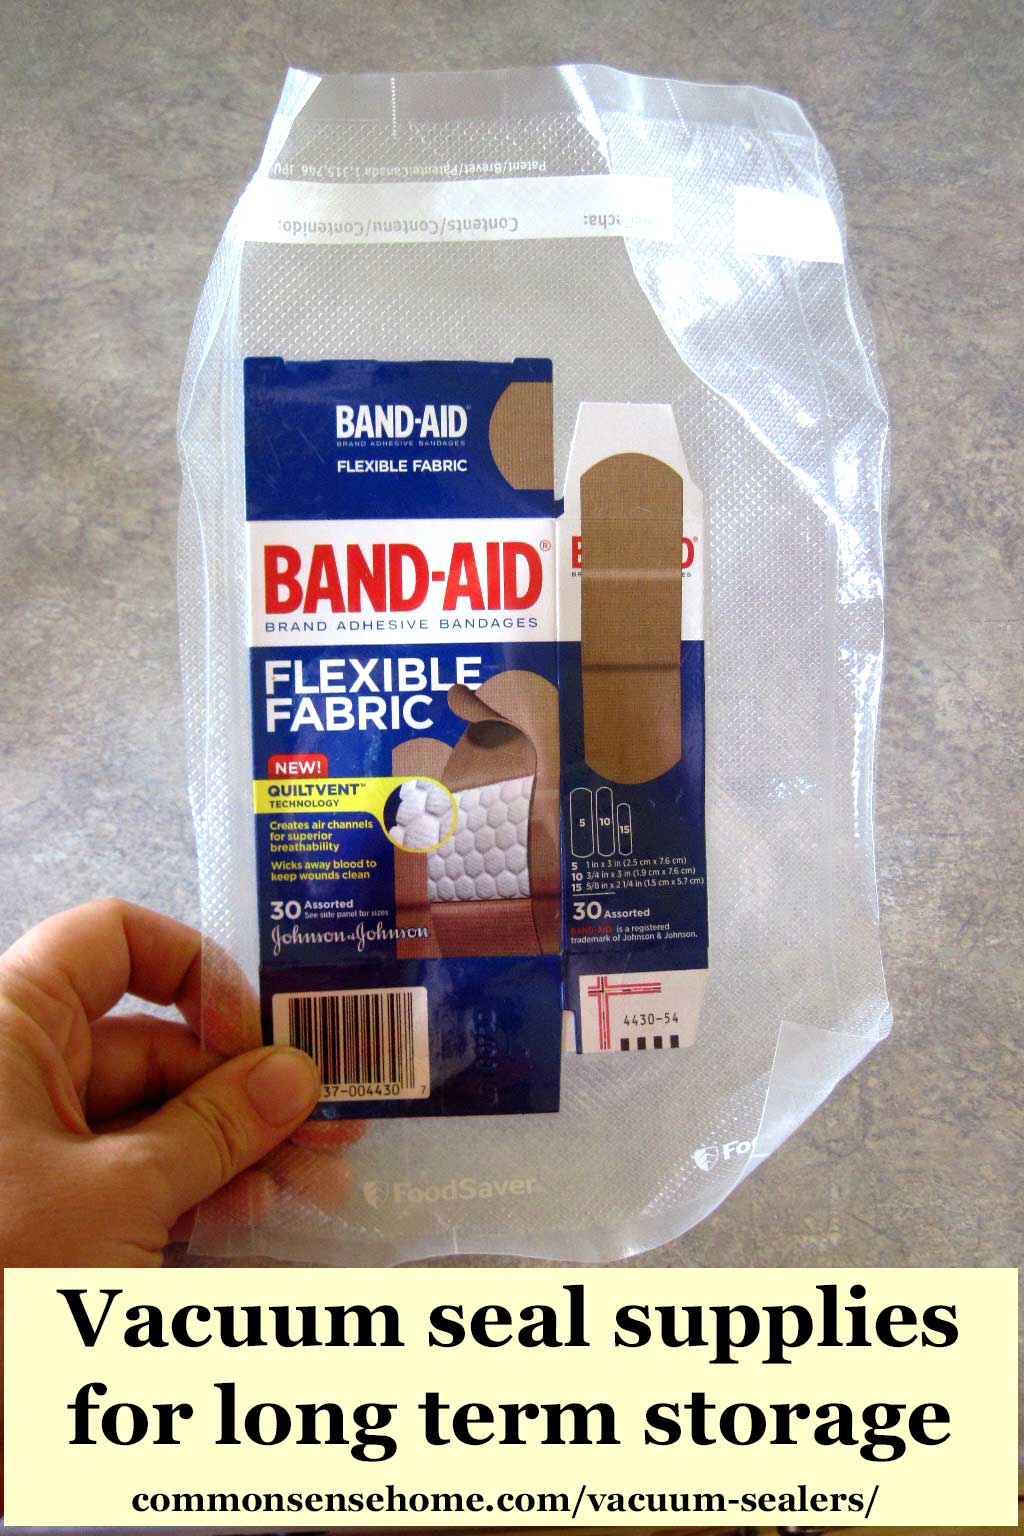
I like keep a stockpile of items we use regularly. When the boys were younger, we went through a ton of band-aids – because boys will be boys. I bought a LOT of band-aids.
Most were used quickly, but one box got shoved to the back of the linen closet. By the time I found it, the adhesive was starting to break down, and they were basically useless. (Note to self – clean linen closet more than once a year.)
Now when there’s a sale on band-aids, I unfold and flatten the boxes with the bandages inside, and vacuum seal the whole thing. When it’s time to use them, I snip open the bag, unfold the box, and it’s ready to go. They last for years.
You can use your vacuum sealer to:
- make your own premade meals
- preserve important documents and computer backups
- protect matches, clothing or emergency kits
- and probably one of the coolest options I read about – keep candles from melting into unusable blobs
Here’s another tip from SurvivalMonkey.com:
If you place your candles into a fridge/freezer first, then vacuum seal them, they hold their shape, regardless of the temperatures. They can be cooled down before opening, and used normally. I had tested a few, due to candles melting in my BOB’s (Bug Out Bags), in their cardboard boxes, which made a real disaster! Now, it doesn’t matter as they are in a predetermined cylindrical shape, and stay that way even if melted!
Please avoid vacuum sealing lighters, compasses and anything with sharp edges.

Features to Look for in a Vacuum Sealer
Fully Automatic or Partial Automatic Sealing
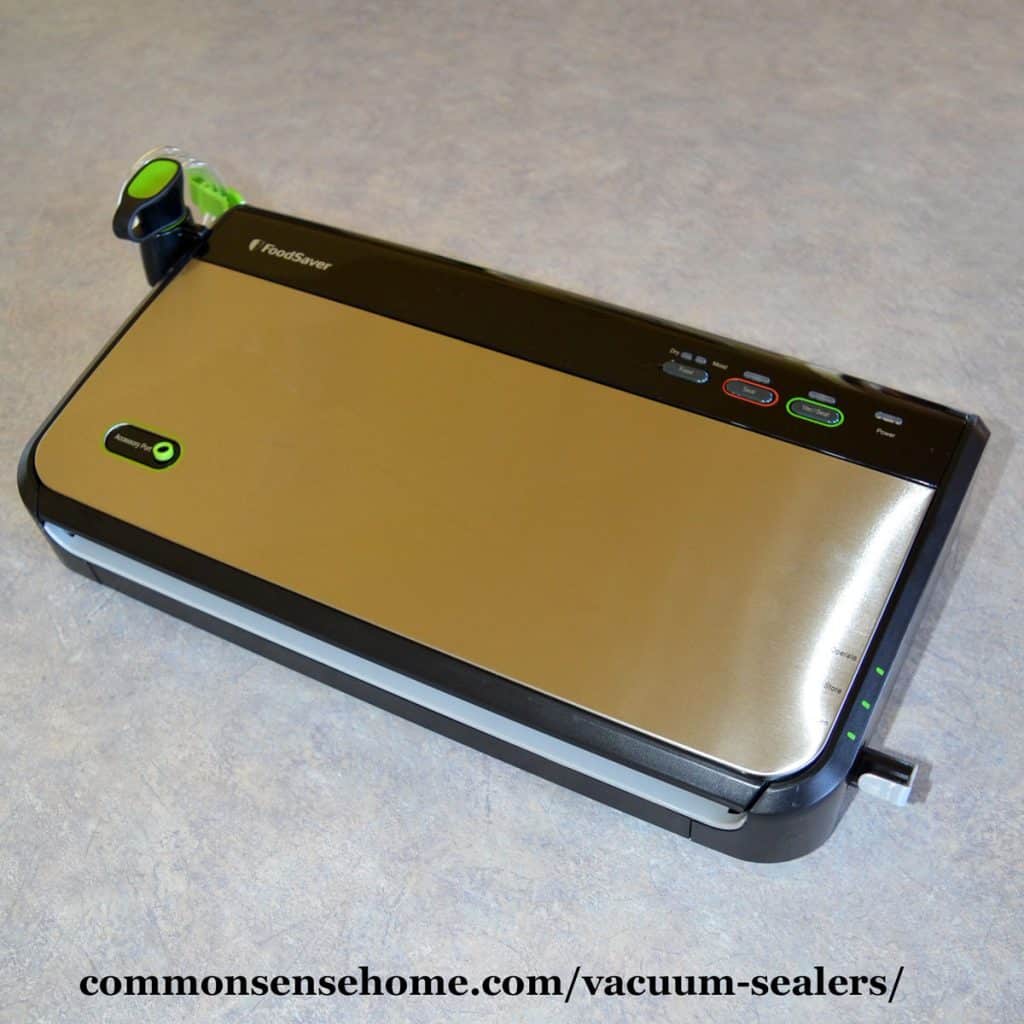
Some units, like the FoodSaver V4440 2-in-1 Automatic Vacuum Sealing System, are fully automatic. You stuff the edge of the bag in the slot and the machine takes over. The air is removed and the bag sealed, and you do nothing except insert the bag into the sealer. This is handy if you want the machine to do everything for you, but you need extra empty bag space to insert in the machine.
The FoodSaver® FM2000 Vacuum Sealer is partially automatic. It has a clamshell design, so you open the unit and line up the edge of the bag in the vacuum channel.
Once the bag is in place, you lock the unit in the “operate” position and push the “Vac/Seal” button. The air is vacuumed out and the bag is sealed. The unit stops automatically when the seal is complete. I prefer the partially automatic units over the fully automatic, because you waste a lot less bag material.
Accessory Hose Included
Some basic units have an port for an accessory hose (for sealing containers and vacuum seal zipper bags), but don’t include the house. The Foodsaver FM2000 is like this. I ordered a hose to go with my FM2000 (actually, I tried both types of hoses that Foodsaver carries), and neither one fit. It’s possible I got a lemon, but if you want to use an accessory hose with your vacuum sealer, I’d suggest buying a unit that comes with a hose.
Detached Accessory Hose or Retractable Accessory Hose
I had a Foodsaver Vertical V3840 vacuum sealer with a retractable accessory hose, which was really handy – until the boys pulled the hose out a little too far one time and it never went in again.
The Foodsaver V2866 has a neat holder for the accessory hose on the rear of the vacuum sealer machine, but it’s been discontinued. (You may still be able to find it from third party sellers.) The Foodsaver FM235-ECR has a clip that allows you to attach the accessory hose to the side of the unit. Both options help you to keep the hose close at hand without the risk of a retractable hose.
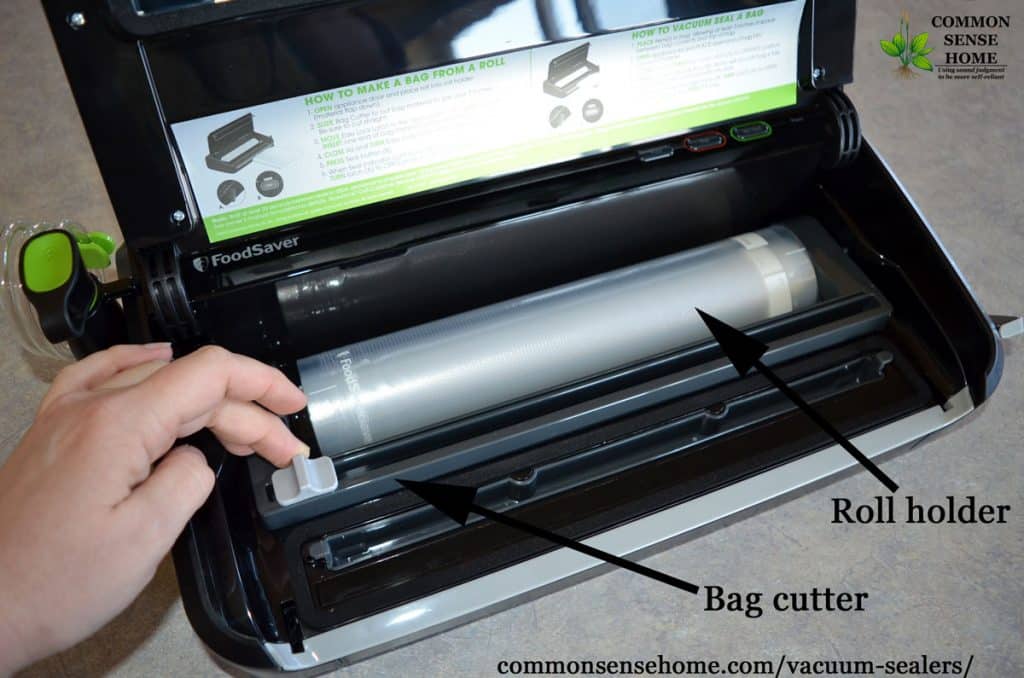
Bag Storage Built Into the Unit
Some of the larger vacuum sealers have room for a roll of vacuum sealer bags right inside the machine. These normally come with a built in cutter, making it easy to cut bags to size. If you don’t mind the slightly larger footprint, this is a handy option. Most smaller, less expensive vacuum sealers do not include roll storage or bag cutters.
Handheld Sealer Included
Many units with an accessory hose also include a handheld sealer, which seals Foodsaver zipper bags, canisters and containers. Basic units usually don’t include an accessory hose or handheld sealer.
Removable Drip Tray
You want a unit with a removable, washable drip tray. The first Foodsaver vacuum sealer I purchased many years ago didn’t have one, and it was a bear to clean up any liquid that got sucked into the vacuum sealing channel.
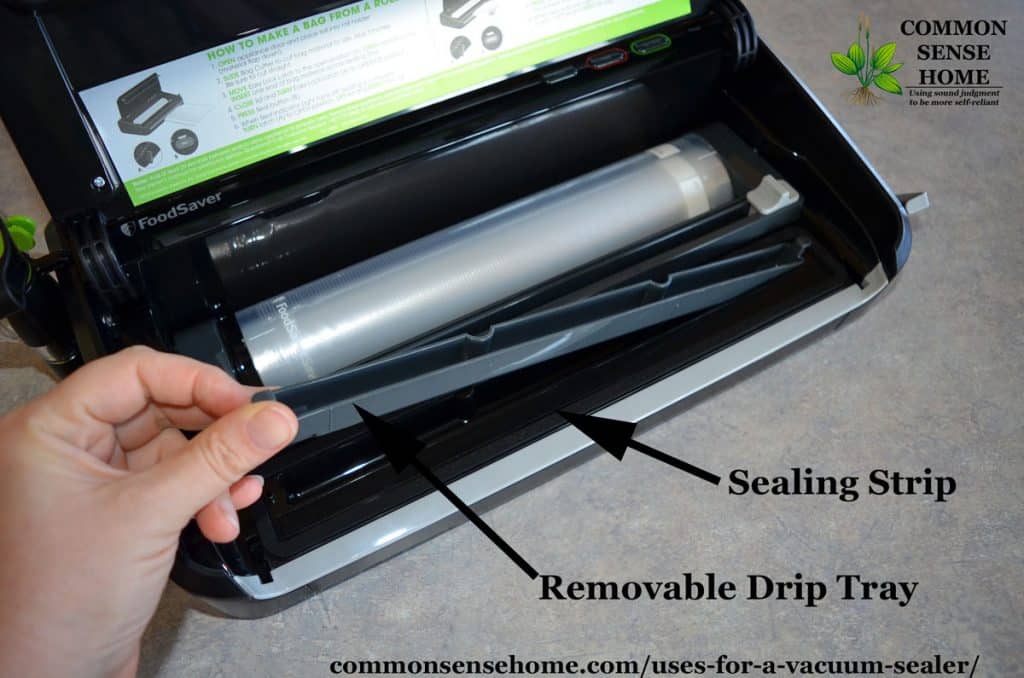
Seal Only Button
The Seal Only button is needed to make your own bags from a roll. It also lets you reseal non-Foodsaver bags, including Mylar, without vacuum sealing.
Notes on FoodSaver Bags
I prefer to buy the rolls of bags and cut them to size. For me, there are fewer seal failures with genuine Foodsaver® brand rolls. I watch for sales online or locally, and stock up. The bags last a long time in storage.
When I tried a “bargain” brand, I had more failures and could not reuse the bags because they would not hold a seal a second time. Not much of a bargain.
If you choose to use a non-FoodSaver brand bag, look for bags that are completely textured. This allows you to cut off an end or a side and still vacuum seal the bag. Some bargain vacuum sealer bags I tried only had a textured strip up the middle of the bags. This is functional for sealing the bag, but you if want to cut off a side and reseal the bag, it won’t work.
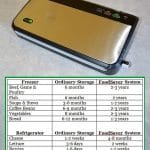
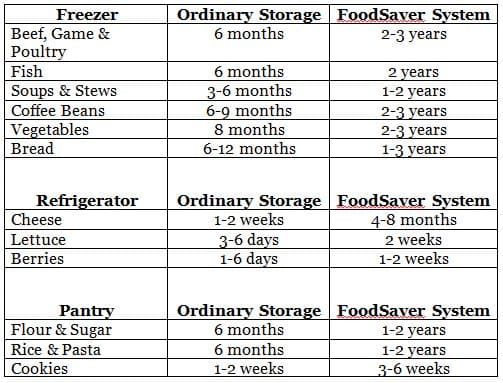
How much longer will vacuum sealed food last?
FoodSaver offers the following food storage guidelines:
Food Storage and More
I hope you’ve found this post helpful if you’re considering buying a vacuum food sealer, or that it’s given you some ideas for using your current machine. Questions or comment? Just leave a note below and I’ll do my best to help.
You may also find some of our other posts useful, such as:
- Preparedness Storage – Finding Room and Keeping it Safe and Sound
- Home Food Preservation – 10 Ways to Preserve Food at Home
- How to Can Food at Home – Quick Guide to Safe Home Canning
- Home Food Drying – 6 Things You Need to Know to Dehydrate Food at Home
- Home Freeze Drying – The Good, The Bad and The Ugly
NOTE – When originally posted in 2014, this review included a giveaway, which has concluded. Congratulations to our winner, Terri H.!
Originally posted in 2014, last updated in 2019.
That looks like an excellent tool to have for the harvest.
I forgot to note that I make cat food for our two kitties. they can’t go outside. old and no teeth. The recipes make quite a bit, and they get bored eating the same one every day. So I make several batches of their favorite flavors. I like to use all the meat I purchase for them at once so no-one makes the mistake of fixing people food with meat they don’t like that the cats like.
I use a 1/3 cup scoop and plop them on a baking tray to freeze (each cat eats one ball a day). Then I take a few of each flavor and seal up a week at a time. Each bag has an assortment of flavors. Happy healthy cats. Happy me with happy cats eating an economical meal. They have some dry to supplement if still hungry, but they are a trim, muscular 10 lbs each.
I had a unit years and years ago and still find bags of yarn and chapstick that are in perfect condition. Now have a newer “automatic” model. works well, a little fiddly, but the end product is as I remember.
Our kids are grown, so a lot of the more thrifty sizes are way too big for us, but we still need to stay in budget as retirement isn’t cheap. I break up the bulk sizes into more manageable amounts for the two of us. The vacuum sealer is essential to eating healthy on a budget for two.
Am considering buying the more budget friendly one to keep in the van for use in traveling.
I like to stock up on small memorable items to use for crafting holiday gifts but don’t have the space to deal with the air trapped in zip bags. For larger items, I use the bags you use a vacuum to remove air and use the vacuum from housekeeping at the time share or hotel before we pack to leave.
I also do some bulk cooking with friends and I seal my share up as soon as I get home, but it would be better to do it fresh to minimize contamination. Maybe some of them will purchase their own units as well.
My husband and I are really starting to get into homesteading and being more prepared. We have wanted a Food Saver for awhile so we can begin freezing and canning foods! We’re also hoping to store dehydrated food that we prepare! We’d love to have one of these since we’ve never been able to get one before!! Thanks for the opportunity!
We are working toward becoming more and more self-sufficient, hunting our own meet (deer and turkey) and growing our own veggies and fruits. For next spring we have a tractor, and are planning a huge garden. We need a vacuum sealer! 🙂
I would use it to store food better. I don’t know any tips because I have not used one.
Thank you very much for the chance to win one!
For those who don’t win and can’t afford one, you can get a hand pump brake bleeder at Harbor Freight for $25, and you can use the canning jar attachments (on Amazon) to vacuum seal jars. Works awesome with three hand pumps. I use that method for my dehydrated food. Won’t work for bags, but I also scrounged a 1970’s heat-only sealer for bags for $1 at a rummage sale. I’ve used that in combination with the hand pump to “approximate” bag sealing, as well. 😀
I use my FoodSaver for freezing goodies from the garden after the harvest, sealing up small items to protect them, to keep jerky fresh when I ship it to my daughter who is currently serving (US Army) overseas and for freezing ‘cold cash’.
My mason jar attachment doesn’t seem to pull a seal on a canning jar, no idea what I do wrong.
But I found that if I put a jar into one of the canisters, it will pull a seal.
Sometimes I have to wiggle the sealer a little bit as I snug it on to the jar to get a good fit, but maybe you have a defective unit.
I like using the attachment to vacuum seal beans and rice in mason jars.
Hi,
I always recycles my old bags since starting to grow my own food. New vacuum sealer will help me a lot.
This vacuum sealer will help me to get ride of old breads plastic bags and everybody will enjoy the view of new and great sealer.
Being single mother will be a great present for one in a life time.
thanks. Best christmas to everybody.
almas nathoo
I would love to vacuum seal produce from my garden. And bulk purchases.
I have worn out two vacuum sealers over the years because they are fantastic. I have also thrown out a lot of food that has been ruined when I haven’t used it. We buy meat in bulk and love to vacuum seal it to keep it in great condition. I also love being able to toss things in cool water to defrost without worrying about the water getting inside.
I’ve never used one before but it sounds like I need to win this one and change my life!
I have been wanting one of these for sooo long! I would definitely use it for camping, and for emergency prep bag, but the biggest use would be freezing our gardens produce, especially peppers (which seem to freezer burn no matter how long I let them dry before bagging).
I would seal and store many things for the freezer!
Great post !! I would love to win the vacuum sealer!!
Personally I’ve never owed one so I don’t have tips, but I would use it for food storage . I know my husband would use it for ‘prepping’ for emergencies items
I prefer freezing over traditional canning for some things. May have to look into one of these.
I buy in bulk whenever I can, and we’ll be starting on our first steps toward homesteading in the spring with a garden and chickens. I’d LOVE to have a vacuum sealer to go with my dehydrator and canning equipment to preserve what we get out of our labor.