Pinecone Soda (Wild Yeast Soda from Pinecones)
This post may contain affiliate links. Read my full disclosure here.
Pinecone soda uses the natural yeast on unripe pinecones and sugar water to create a naturally fermented soda. We’ll share the recipe and tips for ingredients.

This pinecone soda recipe is adapted from Pascal Baudar‘s book, “The Wildcrafting Brewer“. It’s a little messy due to the sticky sap, but a fun wild food experiment.
Table of contents
Where to Find the Pinecones
Getting the green cones might be the toughest part of the recipe. You want unripe pinecones that have plenty of sticky sap. Usually, these will be near the tops of the trees.
Watch for shorter trees, downward sloping branches, or terrain that gives you access to tree tops. A ladder or fruit picking pole to reach cones may also be helpful.
Look for green cones in late spring and early summer. As the summer goes on, cones mature and turn brown. The yeast and sap dry out and won’t work for fermenting.
Rinse off debris if needed, but don’t wash the cones.
How to Make Pinecone Soda
All you need to make your natural soda is:
- Green (unripe) pinecones
- Sugar – granulated white or brown sugar
- Good quality non-chlorinated water
To make the pinecone soda:
Start with a half gallon (~2 liter) glass jar and pour in 3/4 cup (150 g) sugar. Fill the jar with water, and add some unripe pinecones. Place a lid on the jar tight enough to keep dust out, but loose enough for gases to escape.
Each day, tighten the lid and shake the jar 2-3 times per day for about 10 seconds each time. (Loosen the lid again after shaking.) You should see bubbles within 2 to 3 days.
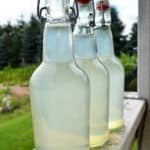
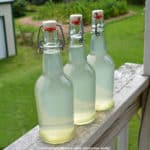
Once you see bubbles, you start working with your soda. Continue shaking each day, and taste test. When you like the flavor, remove the cones, strain, bottle, and refrigerate. Best if consumed within a week or so.
If you’d like to make a mildly alcoholic drink, you can add extra sugar, and let it ferment longer. The sugars eventually convert to alcohol.
For bottling, use bail top bottles or recycled plastic soda bottles. You want a container that is strong enough to hold up to carbonation build up.

Notes on Pinecone Soda Ingredients
Pascal’s preferred pinecone for the drink is pinyon pinecones, with white pine being the runner up. All Pinus genus trees are edible, but not all are as flavorful.
You can use cones from trees in the family Pinaceae, except cedar, cypress, and yew. We review edible conifers (and those to avoid) in the Pinecone Jam article.
Would you like to save this?
I used spruce cones, because that’s what we have readily available. The green cones have a floral flavor with a piney finish. They do not have a strong “Pine-sol” type flavor. I hope to try this again with different types of cones.
For water, his water of choice is natural spring water, which often has trace minerals to feed the wild yeast. We use well water that’s gone through the Berkey water filter.
Do not use tap water with chlorine. Chlorine kills yeast, so your soda will not ferment. If you have chlorinated water, either remove the chlorine or buy some filtered water for brewing.
I like to use organic cane sugar for fermenting, because I think it gives a cleaner flavor profile. If you like, you can experiment with other types of sugar, like maple sugar.
Don’t try to make naturally fermented soda with sugar substitutes. The yeast needs the sugar to eat and multiply and burb out carbon dioxide to make your soda fizzy.
Cleaning up the Sap
Green pinecones have sap, and the sap will get on your hands and equipment. Plan accordingly, and take steps to minimize the mess.
If you like, you can use disposable gloves to handle the cones. The best way to get the sap off of kitchen tools and containers is rubbing alcohol. Sap wears off eventually, but it’s quite sticky in the meantime.
Print Friendly Recipe
PrintPinecone Soda
Pinecone soda uses the natural yeast on unripe pinecones and sugar water to create a naturally fermented soda.
- Prep Time: 10 minutes
- Total Time: 10 minutes
- Yield: 2 quarts 1x
- Category: Beverage
Ingredients
- Green (unripe) pinecones – about a handful
- 3/4 cup (150 g) granulated white or brown sugar
- 2 quarts (about 2 liters) good quality non-chlorinated water
Instructions
Start with a half gallon (~2 liter) glass jar and pour in 3/4 cup (150 g) sugar. Fill the jar with water, and add some unripe pinecones. Place a lid on the jar tight enough to keep dust out, but loose enough for gases to escape.
Each day, tighten the lid and shake the jar 2-3 times per day for about 10 seconds each time. (Loosen the lid again after shaking.) You should see bubbles within 2 to 3 days.
Once you see bubbles, you start working with your soda. Continue shaking each day, and taste test. When you like the flavor, remove the cones, strain, bottle, and refrigerate. Best if consumed within a week or so.
Notes
If you’d like to make a mildly alcoholic drink, you can add extra sugar, and let it ferment longer. The sugars eventually convert to alcohol.
For bottling, use bail top bottles or recycled plastic soda bottles. You want a container that is strong enough to hold up to carbonation build up.

More Wildcrafting Resources
The Herbs & Wildcrafting page lists dozens of article about using wild plants, including:
Wild Yeast Brewing – Books About Wild Beer, Wine, Mead and More – these are some of my favorite books and courses about using wild yeast for fermenting.
Online Botany & Wildcrafting Course at The Herbal Academy – this is a great introduction to using wild plants.
Real Healing Potions – Basic Herbal Medicine Preparations – my sons enjoyed role playing games when they were younger. They were so excited to learn that the plants in the yard can be used to make real medicine.
The Herbal Academy has an assortment of courses on herbs and wildcrafting. There are courses from beginner to advances, and courses on specific interests, such as treating pets or creating natural skin care.
I will try this come spring, but do I need to remove any sticky sap from the cones? Article suggests using alcohol, but that would kill the yeast, it seems. Old guy whose kitchen skills barely pass peanut butter toast.
Hi Robert.
You don’t want to remove the sticky sap from the cones. As you note, that would kill the yeast. The alcohol is for removing sap residue from your kitchen utensils after working with the cones.
Your option for printing do not work. I didn’t want the image or nutrition facts; but when I clicked ‘Print.’ It still showed the image and nutrition facts. I tried everyway and it was still two pages. I tried small print–still looked the same?
Which browser are you using? Each one processes print jobs differently, and sometimes they don’t cooperate with the recipe card software.
I checked in Chrome and Firefox, and in both cases, the images, description, and nutrition did not display when I removed them in the print options. When I switched to “small” text, it only shrunk the print in the section at the top with the prep time and such.
I shortened the recipe name so that part is a little smaller, but it still wants to put the post URL on a second page. To keep it on one page, when you go to print in your browser, select “Pages”, “Custom”, and enter page #1 in Chrome and #2 in Firefox. This should print the page with the recipe only, and skip the page with the URL.
We are going to have to remember this for next Spring! I am curious about whether conifer needles can be brewed? I read that pine needles are rich in Vit. C and are used to make an immune supportive tea. We have lot of balsam fir that is edible, and I give a little to our hens in Winter for a green treat. They will try anything green at that time of year and readily eat a few needles each when offered. I am further cruious about cleaning up the sap residue. I am pretty sensitive and do not feel good around isopropyl alcohol. I usually use gin or vodka as an alternate. Taht gets expensive. Can I get away with swabbing the sap away with alcohol dampened towels, or are we talking generous swishing out? Gets expensive that way!
Conifer needle tea is widely consumed as a winter tonic – at least, it used to be, before we had so many other options available.
For cleaning the sap, I dabbed some alcohol on an old cloth and spot cleaned. I don’t care for alcohol fumes, either.