Emergency Preparedness – Summer Storms, Tornadoes and Hurricanes
This post may contain affiliate links. Read my full disclosure here.
Emergency preparedness is for everyone. The more basic emergency needs that each family or individual can prepare for themselves, the less stress there will be placed on emergency management services. Summer storms, tornadoes and hurricanes often come with damaging winds and rain, and have similar preps even though they occur in different areas of the country.

The United States has more tornadoes each year than any other country, averaging over 1000 per year, but the United Kingdom has the highest number of tornadoes per unit of land area, per foreignpolicy.com.
Everyone should take the time to make these basic disaster preparedness preps. Have an emergency preparedness plan no matter what region you live in. They may just save your life and the lives of those you care about.
Table of contents
Get a free Summer Storm Emergency Checklist in printable PDF format here.
Step One: Have am Emergency Preparedness plan
If you’ve lived in an area for a while, you’re probably aware of what types of natural disasters that may strike. There are also online tools to help you determine the risks in your area. Think through what likely storms or earthquakes or other disasters that may occur. Work out which types of disaster preparedness plan or plans you need to prepare for.
- FEMA (the Federal Emergency Management Agency) offers a website that maps historical flooding.
- NOAA (the National Oceanic and Atmospheric Administration) offers a site that provides images of historical hurricane tracks and one for hurricane preparedness.
- The National Weather Service offers the StormReady site, which covers thunderstorms/tornadoes, hurricanes, floods/flash floods, fire weather and tsunamis.
- The CDC (Center for Disease Control and Prevention) offers tornado emergency planning.
- Don’t forget to trust your eyes and gut. Look at the trees, soil and rocks. If it looks like water was there, it probably was. Are there really old trees shaved off mid-tree? (sign of previous tornadoes). Talk with people who are older and have lived in the area for long period.
Once you’ve identified the threats, you can then plan appropriately.
Example Solutions
For instance, in areas that face high winds, you’ll want to have a “safe room” or sheltered area in your home, or underground. A place where the family can safely gather.
The preferred safe room or “tornado room” is an interior or basement room with strong overhead support.
ICF (Insulated Concrete Form) or concrete safe rooms can be retrofitted into existing homes in basements or at ground level. Avoid windows and open areas. Mobile homes and vehicles are not safe. Low ground that will not flood offers better protection.
For flood prone areas, know your evacuation routes and be wary of driving through open water.
Flood waters often have very strong currents that can sweep even large vehicles off the road. Also, murky waters may conceal a washed out or otherwise damaged road.
AVOID SWIMMING THROUGH FLOOD WATERS UNLESS YOU HAVE NO OTHER CHOICE
Flood waters are dangerous. A quick online search reveals how quickly people can be swept away. Should you choose to remain in your home, decide in advance how you will cope with potential water damage. If you live in a flood plain, get flood insurance. See 20 Things I Wish I Had Before a Flash Flood Emergency for more flood information.
Step Two: Prep Your Emergency Preparedness Essentials
A BOB (Bug Out Bag), EEK (Emergency Evacuation Kit), ALICE (Advanced Lightweight Individual Carrying Equipment), and GOODY (Get Out Of Dodge, Y’all) – call it whatever you want, it’s the basics your family would need to survive for 72 hours.
Build your own personal disaster preparedness kit, it will help you even if you’re sheltering in your home. It’s good to have everything you need in one spot.
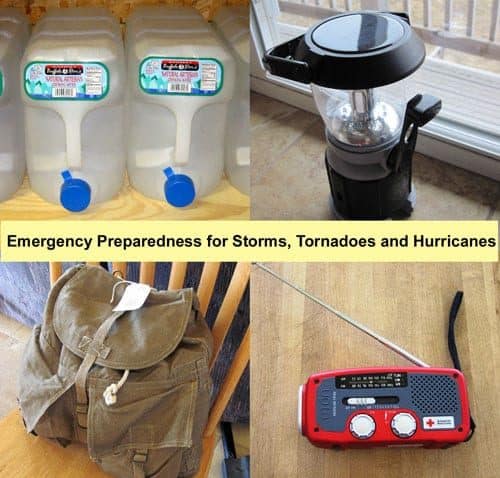
The simplest options are probably lidded buckets and backpacks, but you’ll need to decide what’s the most practical for your family.
Each family member should have basics for themselves in case you get separated, some family members will likely need to carry additional group supplies.
Each family is different, so every emergency preparedness kit will be different, but there are some things we all need. Whether you are making an earthquake preparedness or a hurricane preparedness plan, many of the details will be similar. Stick to the basics to start.
FOOD
Pack foods that are durable, nourishing and calorie dense. In disaster preparedness situations, you’ll want all the calories you can get. Foods that do not require cooking are the easiest to use.
Make sure to seal the food in water-proof packaging. Jerky and granola bars are personal favorites.
Premade foods such as stews or soups, canned and dehydrated fruits, freeze dried foods, chocolate, nuts, coconut oil, drink mixes – plan for foods you know your family will eat. (Make sure to feed them ahead of time just to check. You don’t want a tired, hungry toddler refusing everything in your stash.)
WATER
Plan for 1-2 gallons of water storage per person per day to start. Include purification tablets or other portable filtration methods in your
emergency preparedness kit.
If you need to evacuate, be sure to include potable water in your evacuation supplies.
If you have animals, they will need safe water, too. 3 Emergency Water Filtration Options to Get the Funky Chunks Out features improvised methods that may be suitable for cleaning larger amounts of water for stock use, such as cloth filtration. (Some fabrics work much better than others, some don’t work well at all.)
See Emergency Water Storage and Filtration – What You Need to Know for more detailed information on water storage and filtration.
CLOTHING
Pack at least two full sets of warm, dry, durable clothes for everyone, plus extra underwear and socks is a must. Include appropriate outerwear and footwear, or have them readily accessible in your home. See Emergency Underwear and Socks for more info on the best skivvies for prepping.
Would you like to save this?
BEDDING
Thermal blankets use the least space, but you may wish to include all weather sleeping bags and wool blankets, primarily for comfort.
SHELTER
A heavy duty tarp with heavy grommets (remember, we’re dealing with strong winds) can be used to block out wind and rain. Depending on space, a tent may also be an option. Don’t forget rope to secure the tarp. A 50′ length of sturdy nylon cord is probably the minimum you want to include. Duck tape is handy for a variety of quick fixes.
SANITATION
In severely damaged areas, disease outbreaks following the event can sicken and even kill more people than the initial tragedy (think Haiti). You need to deal with waste.
A five gallon bucket is probably the simplest option, but a camping toilet is compact and potentially more sanitary. See DIY Portable Toilet, Plus Tips to Get Rid of Smells for instructions to make a basic bucket toilet.
I’m thinking of investing in one of those gadgets that makes it convenient for females to pee standing up. Include diapers and feminine hygiene items as needed, and wet wipes for when there’s no running water.
Don’t forget the toilet paper! I remember my father-in-law telling me about how when American troops first invaded Europe in WWII, they brought extra ammo. Later, they packed extra toilet paper. It’s something you don’t want to do without.
FIRST AID KIT
Build or buy a basic first aid kit. Band-aids, large bandages, gauze, ace bandages, an eye wash glass, a first aid manual, pain killers, antibiotic ointment, and liquid bandage (my favorite brand is 3-M, New-Skin stings like crazy) should all be included. Don’t forget any prescriptions medications.
See Preparedness – First Aid Kit and Medical Supplies for a detailed list of first aid preps.
LIGHT/EMERGENCY RADIO
We received an emergency radio as a gift last Christmas, that includes an LED light. It charges with a hand crank or a built in solar panel.
See Emergency Radios (Receive Only and Handheld Transceiver Radios) for more detailed information.
There are a number of options for LED emergency lights, or you can use a propane lantern, which also provides some heat. (Make sure you have fuel and adequate ventilation.) LuminAID inflatable solar lights fold flat for storage and inflate in floating lanterns.
HEAT/COOKING
Small camp stoves or sterno containers can be used to heat food and provide some warmth to the shelter. Don’t forget to check out the post “Emergency Cooking – 10 Ways to Have a Hot Meal When the Power Goes Out“.
PERSONAL
Toothbrush, hairbrush/comb, glasses, cash, purse/wallet, and whatever else makes you feel a little more human and helps you to get by.
Keep important documents (like your insurance policies and bank records) in a secure container that you can easily carry along. Have cash, change and a credit card.
Amber noted in her flood survival post that when the flood hit, they had cash on hand, but some businesses were only taking credit cards because they could not arrange cash pickup.
These guidelines are adapted from the the Crisis Preparedness Handbook.
Get a free Summer Storm Emergency Checklist in printable PDF format here.
Step Three: Prepare You & Your Home for Disaster
If you plan to modify an existing home, roofs and windows are the areas most susceptible to damage. Properly installed heavy duty shutters are much more secure than plywood, which is likely to fly off under high winds.
Add hurricane ties in the attic to stabilize the roof and support structure of the home. Contact a trusted local home contractor with experience in hurricane or tornado preparedness. (Ask around, or contact you local emergency management department).
Prepare for any specific natural disaster that is likely in your area, and you will be ahead of game for a unexpected disaster and at least partially prepared.
We made the decision when we built to be a bit more prepared. We built an ICF (Insulated Concrete Form) house. It was a little more expensive, but we feel that it was well worth the investment. ICF homes have excellent resistance to damage from tornadoes, hurricanes, high winds and other impacts.
ICF safe rooms can be retrofitted into existing homes, or built next to a home. They typically cost several thousand dollars, but if you are in a high risk area, it could literally save your life.
May you and your loved ones stay safe and protected.

Related Articles

This article is by Laurie Neverman. She has a BS in Math/Physics and MS in Mechanical Engineering with an emphasis in renewable energy. Laurie and her family live in a “concrete bunker” (ICF home) with a permaculture food forest, greenhouses, and three types of solar. They “walk the talk” of preparedness by living a more self-reliant lifestyle.


