Root Cellars 101 – How to Build & Use One Successfully
This post may contain affiliate links. Read my full disclosure here.
A root cellar is one of the simplest and most reliable ways to keep food cool without electricity. Long before modern refrigeration, families used natural cooling to store local food through long winters. I don’t know about your area, but we’ve had a lot more power outages in recent years. It makes me appreciate this storage option even more.
When properly designed, a root cellar maintains the right balance of temperature and humidity. This helps to slow microbial growth, reduce food spoilage, and keep produce fresh for months.
Whether you want to build a root cellar from scratch or improve an existing storage area, we can help you out. This guide covers everything from vent pipe placement to the best crops to store to ways to save money on your build.
The images in this article are from our root cellar, which is under our front porch. It’s accessible from the basement, but sits outside the envelop of the home. We use it to store vegetables, home canned goods, wine, and more.
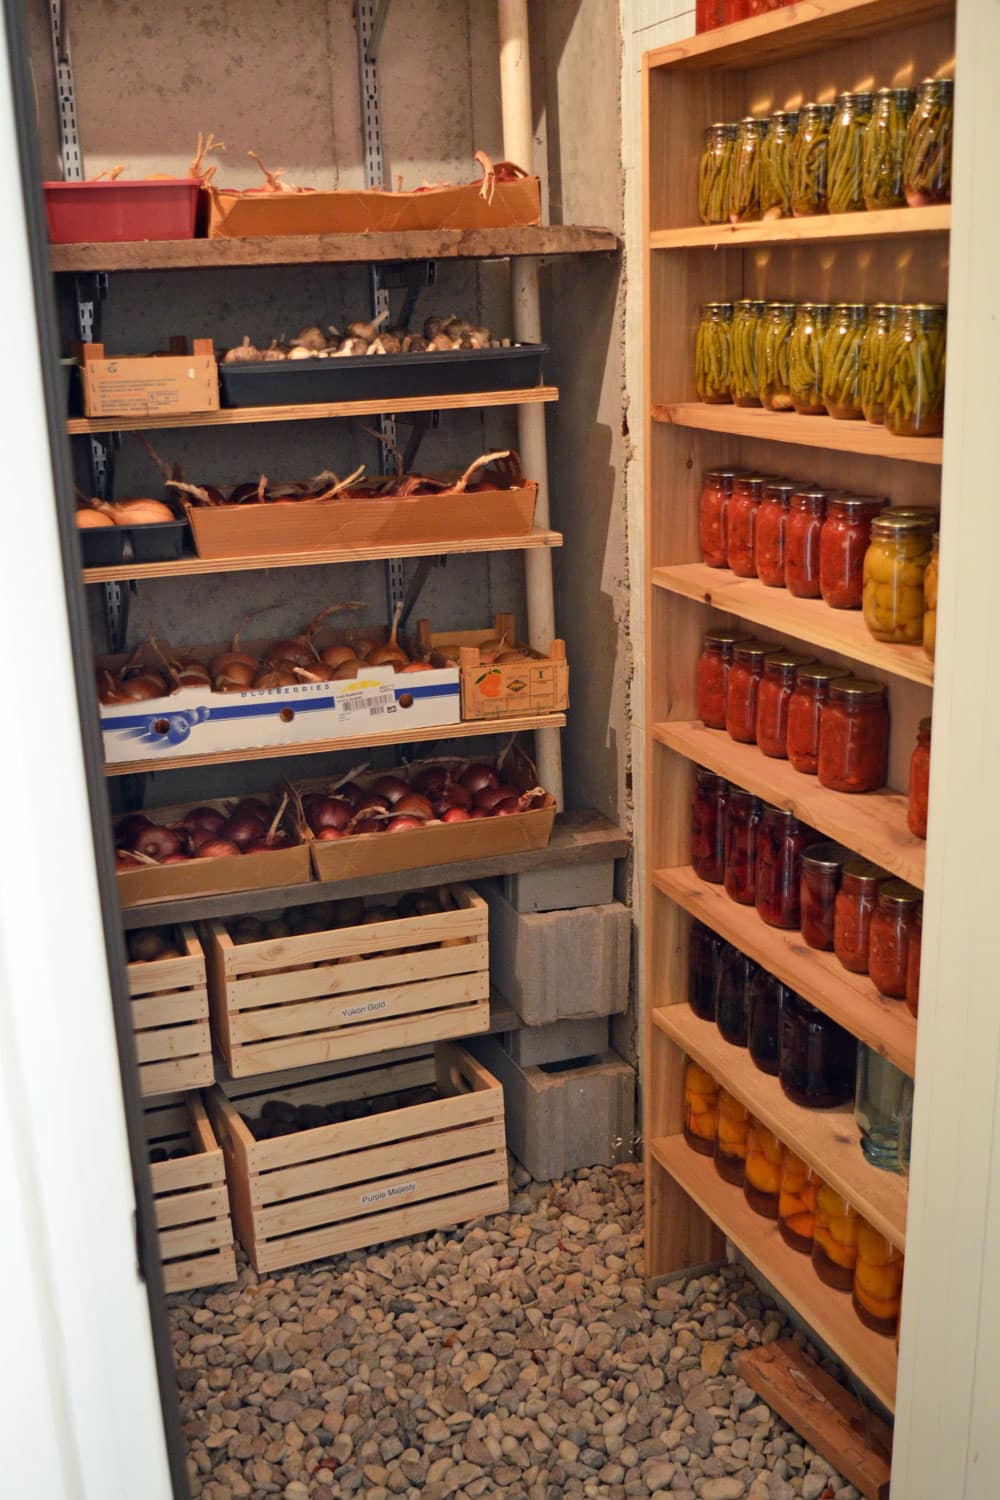
Table of Contents
What is a Root Cellar?
A traditional root cellar is an underground storage space for vegetables and fruits. They sometimes include storage for canned goods or other foods. Root cellars take advantage of cool, moist underground conditions to store food without electricity.
5 “Must Haves” for Building a Root Cellar
There are five major elements that a root cellar requires:
- Ventilation: Some fruits and vegetables give off ethylene gas, which can cause other produce to spoil. Also, a tightly sealed cellar increases mold risk. Make sure fresh air can get in, stale air can get out, and air can circulate around the produce.
- Earth-shelter: Soil insulates and maintains a cooler temperature. A packed earth floor or gravel floor is better than concrete for keeping moisture (humidity) levels higher. Avoid tree roots.
- Humidity: A high humidity level of 80-95% keeps produce from drying out. This may cause canning jar lids to rust, so be sure to check lids and rotate stock if you store canned goods in the root cellar. Build in well-drained soil, and avoid flood prone areas.
- Darkness: Light can trigger sprouting, so if you have a window in your root cellar, keep it covered, and don’t leave the lights on.
- Shelving/Storage bins: Wood shelving and bins are naturally antibacterial. Wood also conducts heat more slowly than metal, and doesn’t rust. Avoid treated wood, and stick to those that are naturally rot resistant.
How much does it cost to build a root cellar?
The cost of building a root cellar varies widely. If you build a underground sandbag root cellar or remodel a basement corner yourself, it can be as little as $500. Most will cost $2500+.
If you’re looking for the cheapest option, remodeling existing space is usually the least expensive. Doing most or all of your own labor also keeps costs down.
You can reduce the cost by considering the space as both a safe room (storm shelter) and a root cellar. That might get you some funding from FEMA or state programs. See more in our related article: Safe Rooms Checklist. This applies to new home construction and retrofits.
10 Tips for Root Cellar Fruit and Vegetable Storage
Key storage tips to remember:
- Late-maturing crops store better than early maturing crops. Specific varieties also store better than others, and produce from healthier plants last longer.
- Check fruit and vegetable condition at storage time. If you note any damage on produce, use those items first. Regularly inspect produce during storage, too.
- Cure the vegetables that need it before storage. Vegetables that require curing include onions, garlic, winter squash, sweet potatoes, and potatoes.
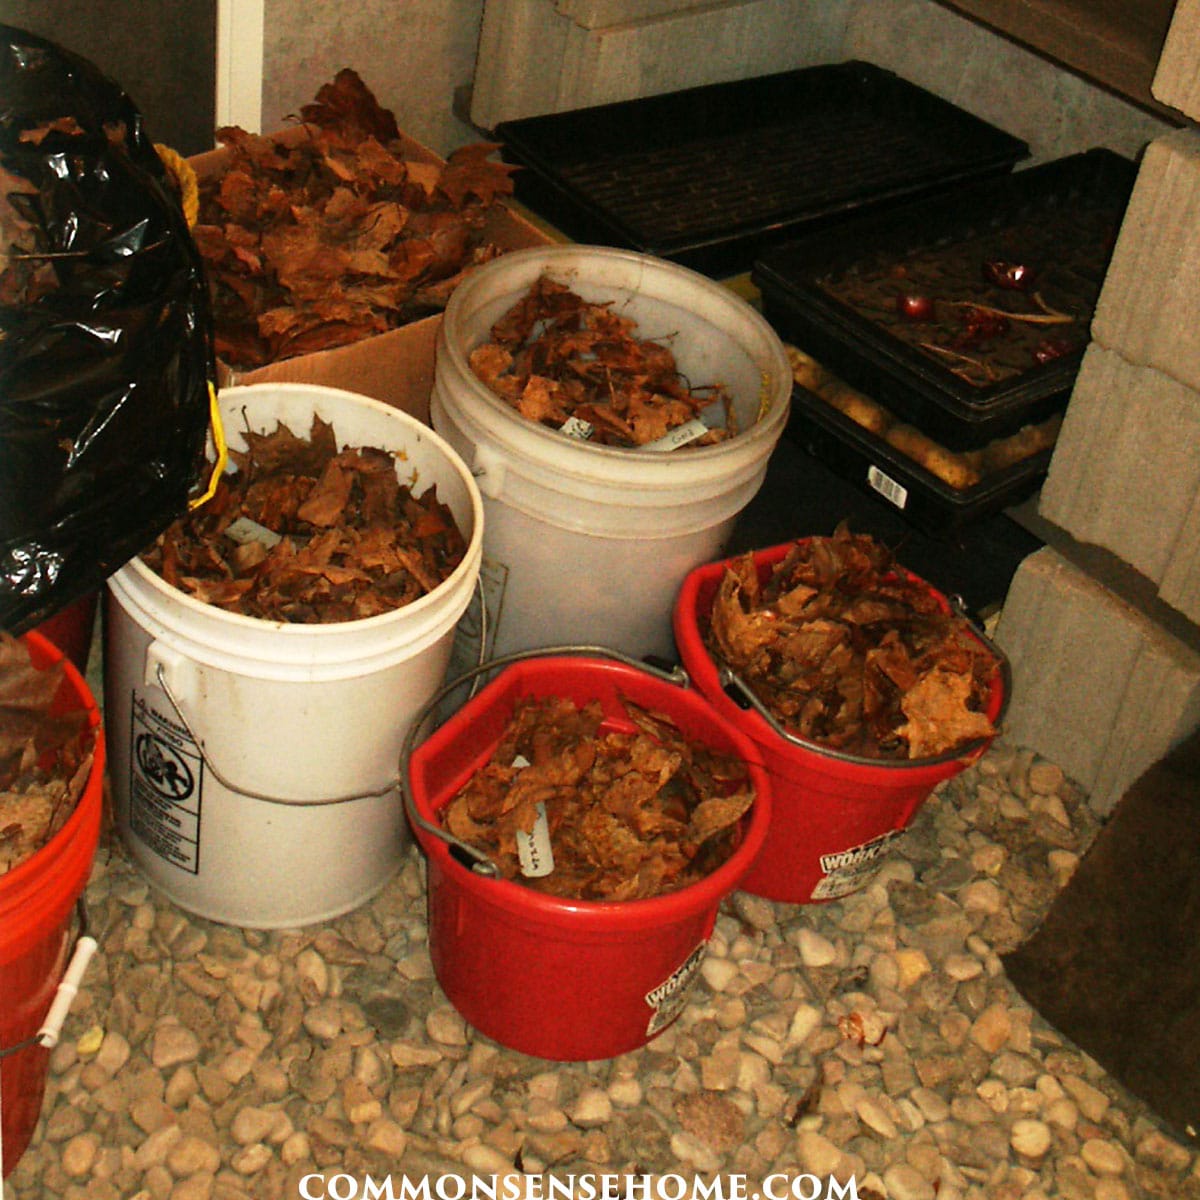
- Wipe excess dirt off of root vegetables and store them in lightly dampened leaves or straw. Use fresh leaves each year to prevent potential pathogen buildup. Fresh sand and sawdust will also work, but are messier.
- It’s okay to wash produce, but make sure dry up excess moisture (and cure if needed) before storage to avoid rot.
- Less-than-ideal conditions shorten storage life. Try to get as close as possible to target temps and moisture levels. Use different areas of your storage for crops that are a best fit, such as storing carrots lower (colder) and winter squash higher (warmer).
- Store fruits that give off ethylene gas away from those easily spoiled by ethylene gas. You can also wrap fruit that produces excess ethylene in newspaper to contain the gas.
- Oher fruits and vegetable may absorb odors from strong smelling vegetables, like turnips and cabbage. Store them away from other food and where the odor cannot waft into the house.
- Do not allow fruits and vegetables to freeze. They will get mushy and rot.
- Track temperature and humidity to measure your root cellar performance. Keep the door closed as much as possible to keep the cool moist are inside. Letting heat in or very cold dry air in will reduce the storage life of your fruits and vegetables.
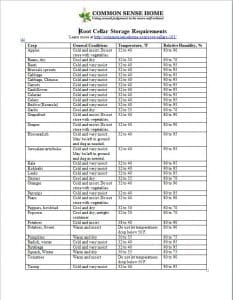
A Quick Guide: Fruit and Vegetable Storage Chart
This chart gives preferred temperature and moisture ranges for root cellar storage of a variety of fruits and vegetables. Adapted from the University of Missouri Extension Office.
Click HERE or on image below to download Printable PDF version of Root Cellar Storage Requirements.
See also:
How to Store Potatoes Long Term
Types of Root Cellars and Natural Cold Storage Options
Natural cold storage options include (click on any item in the list to jump to more information below):
- Basement or Under Porch Root Cellar – accessible from inside the home
- Traditional Root Cellar – buried below ground, accessible from outside
- Earth Berm – at ground level or partially above ground
- Above Ground Root Cellar – bermed, spring cooled or other above ground root cellars
- Barrel in the ground
You can’t build an underground root cellar if the water table is too high, or soil is too shallow.
How to Build a Root Cellar in the South
Root cellars don’t work as well in warmer climates, because the ground isn’t as cool. In the Above Ground Root Cellar article, my friend Paula shares her southern food production and storage tips. Southern gardeners have the advantage of being able to grow food year round.
The article “Build Your Own Walk In Cooler with a CoolBot Controller and A/C Unit” shares how to build low cost cold storage.
Retrofitting a Root Cellar in an Existing Home
The easiest option for building a root cellar is to section off a part of the basement for your fruit and vegetable storage. Old dirt floor basements without heat are great for maintaining proper temperature and humidity levels. (Make sure to insulate between the house and root cellar.)
Select an area with an existing window if possible, and use the window for ventilation. Fill the window with exterior grade plywood, and cut the necessary vent holes through the plywood. The plywood also blocks direct light.
North facing corners work well. They allow you to leave two exterior walls uninsulated, and only insulate the interior walls and ceiling. A north facing wall won’t gain heat from the sun. Use materials that tolerate moisture exposure.
Insulating between the house and root cellar is necessary so you don’t heat the root cellar from above. You also avoid losing house heat into the root cellar.
Your basement root cellar should have no standard heating or cooling. Insulate any ductwork or piping that runs through the ceiling above your root cellar (if any). Make sure vents or hot water pipes are well insulated so they don’t bleed heat into your root cellar.
Add a Root Cellar to a New Home
Many new homes have a small concrete exterior porch. Typically this area has 4ft footings and dirt backfill. You need to put a foundation wall under it anyway, so why not put this area to good use?
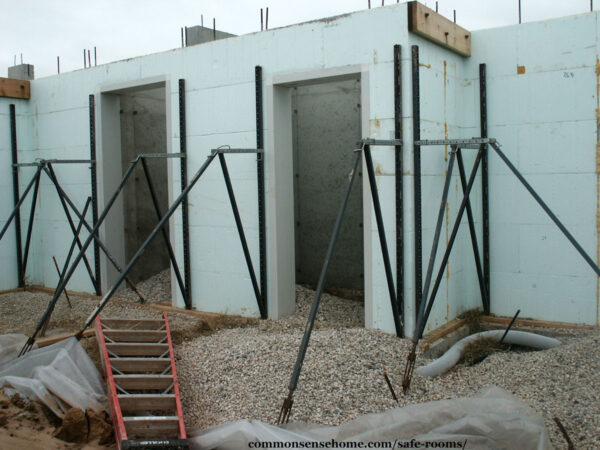
To convert this to a root cellar, have the builder put in full footings. Add an insulated exterior grade access door from the basement and two 4 inch vent holes. Add concrete slab on top as normal, and a light inside so you can inspect your storage.
Insulate the walls in contact with the basement, but do not insulate the outside walls exposed to soil. You want to maintain heat transfer between the soil and the root cellar.
Our porch root cellar measures about 6’x8′. It provides plenty of room for our stash of root veggies, plus gives a nice sized porch above. Because the root cellar is outside the footprint of the home, it maintains cooler temperatures more easily.
Building a Root Cellar Outside the Home
For an exterior root cellar, similar rules apply – have good ventilation, keep it earth sheltered and dark. Use a north facing door if possible, to avoid sun beating in and heating your cellar up.
Try for at least one to two feet of soil covering the root cellar. The more soil there is insulating the root cellar, the closer you get to ground temperature.
You may be able to repurpose a new septic tank or large pre-cast culvert. There are some root cellar kits on the market, such as these precast kits.
Whatever you build, use rot resistant materials that can stand the weight of wet soil. Don’t use shipping containers. They are not built to withstand weight on their sides.
Traditional Root Cellar
This is what most of us think of when we hear the phrase “root cellar”. There are insulated doors that lead down into the earth. These cellars go down or into the side of a hill.
Walls are concrete, cinder block, or more creative materials like old tires. You need to make sure the roof and walls are well supported to avoid collapse. Engage an architect or engineer to ensure your safety.
Earth Berm Root Cellar
Above ground root cellars are usually partly sunken with earth mounded on 3 sides and the door avoiding the direct sun. See the Above Ground Root Cellars post for more information.
Would you like to save this?
Barrel in the ground for (Zones 6-9)
This is a winter storage option. The size and depth depends on the zone you live in. (For more information on zones see: Plant Hardiness Zones & Microclimate.)
Take a large container, with holes drilled in the bottom and top. Bury it level with the soil with a bale of hay as an insulating cover. This will work into zone 7 and possibly into zone 6 depending on cover and conditions.
Barrel in the ground for (Zones 3-6)
Buy one 55gal large heavy duty garbage can, and a 32gal smaller garbage can that fits inside the larger one. Both the larger garbage can and the smaller one need holes in the bottom.
The inside can needs a cover with vents / screen. Cover exterior holes with screens to keep rodents out. It also needs significant insulation above it (over it). Bales of hay, or piles of leaves can insulate it.
Prepare a hole that is deeper than the large garbage can, with rocks and gravel in the bottom to create a simple French drain. Another trick is to dig a very deep, large hole next to the garbage can hole and fill that hole with rocks. The deeper hole acts as a drain for your shallower garbage can root cellar.
Once you have the large garbage can in the ground and secure, lower the smaller one into the larger barrel. Store food in the small barrel.
When you need access, grab from the top or pull out the smaller barrel. This makes it easier to reach food the bottom. There are many variations on this type of in ground storage.
How to Optimize your Root Cellar
To help you get started, we’ll “dig a little deeper” into our root cellar components. These are the keys to successful fruit and vegetable storage.
Root Cellar Temperature
Ideally, we want our root cellar temperature to be similar to refrigerator temperature, around 40 °F (4.4°C). In practice, the temperature varies by location, season, and other factors. Cooler is usually better, as long as it stays above freezing.
The temperature of the soil at 4ft deep is fairly stable. But that temperature varies with latitude and location. Any running underground water will also affect soil temps. The hydrology map will give you an estimated soil temp.
In extreme cold conditions, it’s possible for parts of a root cellar to freeze. The biggest risk is near the vents or exterior door. If you are expecting a short blast of extreme cold, move food storage away from the vents and door. You may even want to plug the vents temporarily.
This shouldn’t be a concern until temperatures drop below zero, or there are high winds driving cold air into the vents.

This soil temp database will likely be more accurate. Your root cellar is likely to be slightly warmer than either estimate, on average. Winter will be cooler than summer, which is what makes them useful for storage crops.
Root Cellar Ventilation
Improper ventilation is one of most common mistakes that people make when designing/installing a root cellar. They build their underground food storage airtight to keep things nice and cold, and everything spoils.
We need ventilation because some foods give off ethylene gas, which speeds ripening (and rotting). A root cellar that is too airtight may also build up excess humidity, leading to mold and mildew.
How should you ventilate your root cellar? Use two vents, about 3-4 inches in diameter. Place the vents so that one is near the top of the root cellar to exhaust stale air and ethylene gas. Run the other vent down to near the floor, to drop in fresh air.
Ideally, these vents are on opposite walls to improve air flow, but ours are next to each other and work reasonably well.
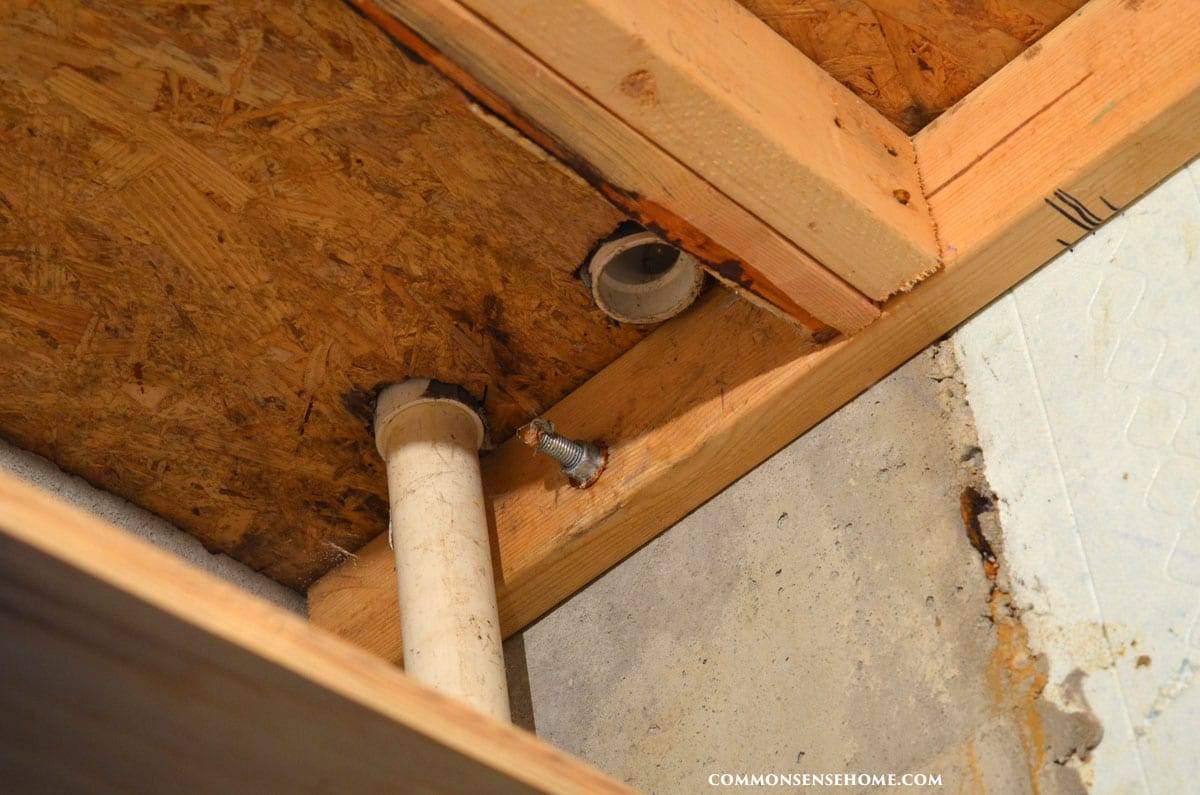
Four inch PVC vent pipes should be adequate for to up to around an 6ft by 8ft room. A larger room like a 8ft by 10ft should have even larger vent pipes or more of them. Make sure to put mesh screen on the outside of the vent pipe to keep mice and other small animals out. Angle or curve vent pipes so rain, snow or debris can’t fall into your root cellar.
How to Prevent Ethylene Gas Spoilage
When fruits such as apples and pears ripen, they give off ethylene gas. Ethylene gas decreases the storage life of some produce. Ethylene gas can cause sprouting, decay, mold, yellowing, shrinking, toughness, softness, bitterness and other damage.
To combat spoilage from ethylene gas, segregate the excess gas producers from crops that get damaged by the gas. Keep your fruits and mushrooms away from your greens and root vegetables. This is a good idea for your refrigerator produce bins, too.
Because our root cellar is fairly small, we usually keep our fruit in the insulated garage or front porch. Storage varieties hold for months in cool conditions.

Root Cellar Lighting
Light exposure is the enemy of food storage. Every time I see people lining up their canning jars or spices on open shelves, I cringe. It looks beautiful, but light bleaches out the color and the nutrient value of foods.
In the root cellar, light exposure may lead to sprouting and green potatoes. If you’re venting through a window, cover the rest of the window. If you have a light in your root cellar so you can see your food storage better, don’t leave the light on when you’re not using it.
A hunk of burlap drawn over bins of potatoes or fruit will allow ventilation while still blocking the light. A single high lumen incandescent or LED light should provide adequate lighting (unless your room is really huge). If for some reason your storage gets too cold, you can use an incandescent light to introduce a little heat.
Monitoring Humidity and Temperature
A high humidity level of 80-95% keeps produce from drying out. The soil provides some humidity.
Keeping track of temperature and humidity is important. You can track humidity with a hygrometer, and temperature with a thermometer like a Digital Hygrometer Indoor Thermometer.
Electronic monitoring is an option if you want more precise records. The Govee Thermometer & Hygrometer has a simple display and can sync via Bluetooth.
Keep Things Moist But Not Wet
Checking the fruit and vegetable storage chart, you’ll see that most store best with fairly high humidity. If you have a dirt or gravel floor in your root cellar, you’re in luck. Natural ground moisture helps to regulate humidity.
If you notice that your produce is shriveling, your root cellar is probably too dry. Take a tip from the grocery stores, and try a little misting action with a spray bottle. Avoid standing water, as that can lead to potential mold growth.
In dry environments, a shallow pan, a tray, or a shallow bucket of water can increase humidity. Be careful with this option, as it can attract pests or result in bacteria or mold growth.
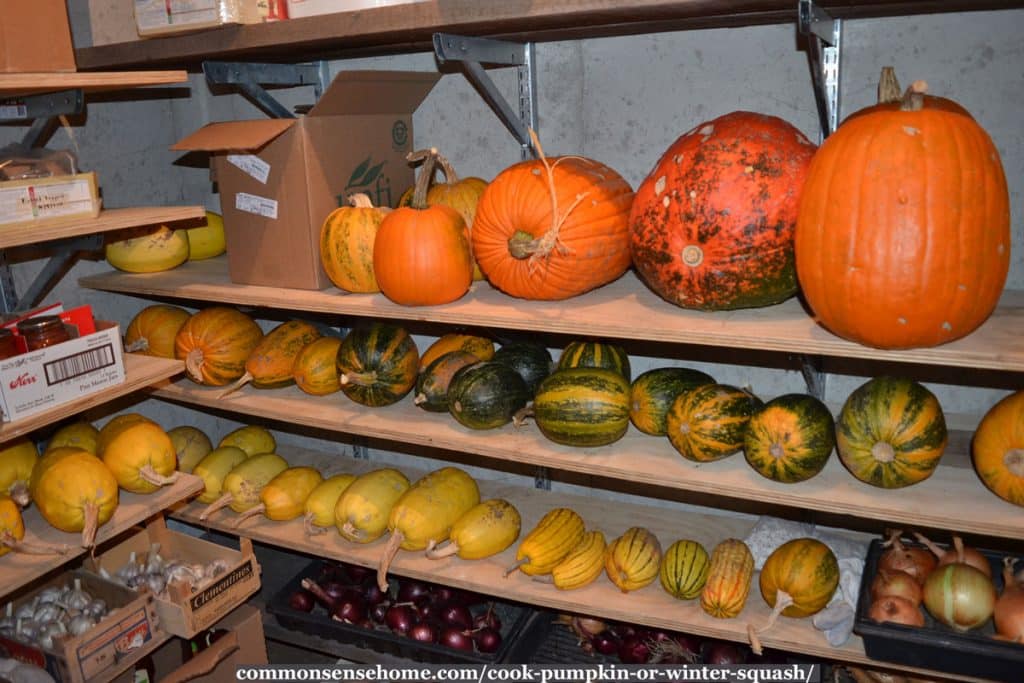
Ideal Root Cellar Shelving
Shelving should allow airflow and add storage area. Keep a gap between the shelving or storage bins and wall to encourage air flow. Keep produce that likes cooler temps lower and food that like warmer temps higher.
Recommended Root Cellar Books
The classic root cellar guide is the book Root Cellaring: Natural Cold Storage of Fruits & Vegetables by Mike and Nancy Bubel.
The book contains detailed explanations of no electricity vegetable and fruits storage with specific temperature and humidity recommendations for each variety. There are also good photos and diagrams, which I really like.
The Complete Root Cellar Book is more recently published, and also received good reviews. Recipes from the Root Cellar helps you use your storage crops in the kitchen.


Related Articles
- Long Shelf Life Foods – What Lasts Best (with Chart)
- Preparedness Storage – Finding Room and Keeping it Safe and Sound
- Home Food Preservation – 11 Ways to Preserve Food at Home

This article is written by Laurie Neverman. Laurie and her family have 35 acres in northeast Wisconsin where they grow a food forest and annual gardens. Along with her passion for growing nutrient dense food, she also enjoys ancient history, adorable ducks, and lifelong learning.
Originally posted in 2010, last updated in 2026.
Hello, I’ve found your article and the comments to be incredibly helpful in learning about the structure of both old and modern root cellars. I currently live in an old (1896) city home, with a dirt floor basement. It was shut-up for quite a long time, with water seepage causing mold and even moss growing on some of the walls. We have attempted to treat the mustiness of the area, and added a dehumidifier about a year ago. I am interested in taking a portion of the space and converting it back into what was I’m sure a root cellar/storage area long ago. Given the history of mold, I am hesitant to store any food in the space currently. Do you have any suggestions for how to approach reclaiming the space for food storage? Thank you for continuing to respond to these comments years after the original post! 🙂
Mold is a problem, moss in general is not. Airflow is the trick. It is very likely the original design allowed airflow into and out of the basement (low feed) like in the diagram in the article. Venting and fresh air are critical. The dehumidifier will help but not eliminate the problem as the walls are likely continuing to add moisture. It was likely sealed up completely during remodeling reducing airflow and not allowing humidity to balance with outside air.
If you really want to try to use the space, you are going to need to be very careful. I might consider boxing off an area. Insulate above and walls into the rest of the house but leave the floor exposed, and vent it well to the exterior creating the convection). Depending on the space and your location you might want 4″, 6″ or even 8″ screened venting (so no bugs or critters get in). But I cant recommend that because of the mold risk, especially with food storage. If you decided to do anything with the space you should get it mold tested (or get kits) and test regularly. Mold can pop up FAST. Mold is stubborn and its not easy to tell the difference between relatively safe and very dangerous mold.
So I’m building a 5×8 root cellar in my basement and was curious what to use for the walls and ceiling. Would Durock unfinished be appropriate. I would of course have 6mil vapor barrier and use foam sealant around the floor perimeter. Just curious what others have used. Green board makes me very nervous as I’ve seen continued high humidity lead to mold.
Thanks,
Alex
Since our is outside the building envelope, we have raw ICF form exteriors and unfinished concrete, with a moisture resistant particle board cap and concrete porch floor for the ceiling. Generally speaking, any moisture resistant materials should work, but I’d be a little leery about greenboard, too.
Hi there,
I see beautiful things going on here about a cellar. I am currently building one at my house in – ground in my backyard and I have a question?! Would that be a good idea to store my wine into?.
Any help will be appreciate it.
Thank you
Giani
Sure, as long the structure is well built and properly ventilated, a root cellar can double as a wine cellar. We have some wine stored in ours right now.
Thank you Laurie for your advice.
Yes all walls are built properly and they are all retaining walls, floor is concrete 12” tick and in the center a 4×4 square that will be paved and drain in the center. I have 4 vents coming down for cold air in and 3 vents in the ceiling for hot air going out. I am building a storage on top of it. Hope everything works out well.
Thank you again!
Giani
You’re welcome. Enjoy your new storage areas.
You might not be able to help me, but I thought I’d ask. I have a client that would like to have a root cellar built on her property, separate from the house. Her architect drew up a design that was partially underground, and partially above ground, with concrete walls and floors. The owner hated the idea and said she wanted as little concrete as possible. She would like “a hole in the ground with a dirt floor and wood walls.” We have contractors who can do the actual work, but we have no idea how to go about designing this and how little of concrete we can use to build it. Any ideas at all would be a huge help. Thanks.
If the woman wants a hole in the ground with a dirt floor and wood walls, you could build her one, but she probably won’t like the price tag or look of it. I’d opt for the concrete myself, due to durability, but I know some people have their minds set on a specific thing and there’s no telling them any different.
The same rules apply no matter what your building material – proper ventilation, earth shelter, dark, humid and some sort of storage.
If you’re opting for wood, choose something that is naturally rot resistant to extend the lifespan of the cellar. (Avoid any chemicals you wouldn’t want in contact with wood.)
Make sure your roof and sidewalls are sturdy enough to hold the weight of the earth on top of them and snow accumulation (or rain accumulation, if the soil becomes saturated). The old earthen cellars were made with very thick wood – which isn’t readily or cheaply available now.
Any exposed areas should be well insulated to minimize heat transfer from the air. You don’t need to insulate the walls and roof that are fully underground, but watch near edges so don’t have heat bleeding in.
Make sure you check out the lay of the land and plan for drainage. You probably want to use dimpled black plastic foundation cover on the exterior of the building, or something similar to route moisture away from your wood. The old timers would heavily coat the exterior with tar.
We had an approx. sized 12 by 8 foot outbuilding on our farm that was always around 40 to 50 degrees. It was made of brick facing east west. It had two windows facings north and south on the sides. It was between the house and two out buildings. Large trees sheltered from direct sun light. A cistern laid behind it. When we pulled up the cement floor to see how it was constructed about 120 years ago, we found the entire floor was covered with leather shoes/boots and empty glass medicine and beer bottles. That was it. And it was always cold even on 90 degree days. You had to take two steps down into it to reach the floor. We always kept a sweater/outer coat inside the building to keep warm when in it.
It sounds like you may have been blessed with an old fashioned spring house, where the cool water underneath it helped to keep the building cool. I wonder if back in the day, the leather and bottle arrangement was designed to hold and trap the spring water?
My home was built with a collar under a 4×12 concrete porch underneath the roof, the cellar has 4 block walls with poured floor and ceiling.
Problem is it’s on the Southside of the house and never gets cool until late December and if 70° by late May depending on the weather.
Any affordable ways to keep it cooler all year?
I garden and want to store more vegetables and being on a tight budget I want to buy 50lbs of potatoes but a 20lb bag won’t keep for long and grow eyes and spoil before using them up.
I plan on putting a door in the middle of my cellar(36″ wide, perfect for 32″door and frame)and have my home canned food in one side and potatoes ect in the other half
Without knowing your yard layout – and space, here are some suggestions. Add shading to the southeast corner. This could be a large tree (or trees) farther away. Smaller fruit trees again blocking (shading) the area that gets too much heat. Other blocks could be adding an outbuilding that is storage/chickens that would permanently shade that location, add rows of mid-ground cover like grape trellis, high flowers, raspberries, or other vining flowers or fruits. Basically get something to shade. Also ensuring ventilation during low temps will help (pump in cool air with 6″ pvc with screens to keep pests out) one vent low and one high to allow convection (make them so you can cap them during the heat). You can also insulate the inside of the root cellar to keep the heat out on the “hot wall” or all walls (but be careful to ensure ventilation if you do a lot of insulation). Alternately if you have the money, you could consider a cooling system using an air conditioner similar to the walkin cooler design https://commonsensehome.com/build-walk-in-cooler/ (it would be a bit tricky as you would need to create positive and negative air vents/ducts).
Two questions: (1) How would wire closet shelving (plastic over steel) perform in the cellar? I wouldn’t think rust would be too much of a problem since they are coated; and they would provide significant ventilation around the food. (2) In segmenting the cellar into two rooms (1 fruit/1 vegetable), would a concrete floor for the fruit segment reduce the humidity enough? Also, what about separate vents?
I wouldn’t expect the closet shelving to rust out right away. I’m sure you’d see some corrosion over time, but it would likely be years before it became a problem.
There are a lot of variables for each installation, especially when it comes to local climate, so it’s impossible to say for sure. I do know that fruits used to be stored in earth floor cellars, so I don’t think a concrete floor is necessary. If you want to segment into two rooms, I think separate vents would be a good idea.
We just built a root cellar into the hill bordering our carport concrete wall. All walls are concrete with 2 feet of dirt on the concrete roof. Only two sides are just concrete. The floor is dirt (crush). This winter, the coldest in the root cellar has been -2 Celsius (28.4 F) when it was our coldest outside at -17 Celsius (1.4 F). My question is should we still insulate with rigid foam the two interior walls that have no earth around them outside? We have not tried a summer yet (it gets very warm here) as it was built this last fall. Would insulating make it warmer or keep it a cooler/consistent temperature in the root cellar? The door is smaller and there is no direct sun on those walls. Long story for a question of to insulation or not to insulate. It does have a six inch vent out of the roof and a 6 inch vent into the carport about a foot and a half up from the ground.
If you’re hitting temps below freezing in the cellar, insulation is a good idea. You should insulate on the outside of the outside, not the inside. Ideally, you want to cover the structure in dimpled foundation membrane to channel water away from the structure instead of into it (and prevent mold), and then layer the insulation over the top of the membrane. You’ll need some sort of protection for the insulation. That might be enough to keep it from freezing, but be aware that cold air temps can penetrate up to four feet into the ground, so you’re likely getting some exterior temperature bleed through the roof.
A few years ago my father purchased his “retirement” home. A semi updated farm home on a small lake in MN. My question has to do with a room locathed in the basement, well honestly its located outside the basement walls. It looks like a previous owner busted through the exterior wall to make a closet and has lined the walls with cedar. I don’t think there is anything between cedar and dirt. I also know that there currently is no venting and I don’t know about humidity levels. My question is if the parameters were to meet the standards listed, would the cedar be a benefit or detriment to the storage of raw food?
That is a challenge. You need to confirm the exterior (dirt, cinder-block etc) you also need to see if you can figure out what is under the flooring and how the ceiling is built.
Add a thermostat that can track temp over time so you can see if the space freezes or temp swings too much. Assuming there isn’t any major problems, you would need to add insulation to the door and the entire wall adjoining the home, to keep the root cellar cool (isolated from the house). Check the thermostat again
Also you would need to add ventilation somehow; probably two 4″ PCV pipes for vent from above. Dig down penetrate ceiling put pipes through and then heavily seal around the penetration. One pipe goes down to the floor the 2nd up near the ceiling (well secured screens on either end for rodents)
If the walls are dirt and floor is dirt and siding is just cedar that is probably ok. If the cedar has weathered, or if the cedar is still raw it may impact the “smell” to some stored foods till it dries some. some moisture is good, too much is bad, too dry is bad, no airflow is bad, too much is bad – which is why the 4 to 6″ pipes get fresh air but not too much.
We have shelving made from cedar decking material as our shelves for canned goods. The larger shelves are ripped plywood. Shelving matters, so draw it out.
All the best in your project.
I simply cannot wait until I am able to build a root cellar. Next winter, we will be trying the barrel in the ground, as I intend on storing some root veggies through the winter as feed for the animals. Sure would be nice to have a root cellar though!
The one question I haven’t been able to find an answer for is relating to the venting pipes. We have both venting pipes in, one to the floor and one flush to the ceiling of the root cellar. However, I am unsure how far out of the ground to extend the vent pipes. Does it matter if they are extended to the same height, or should one extend farther than the other? We do have a heavy snow load most years – up to 5 feet cumulative or more depending on some thawing in between snow falls. I was thinking we’d keep them 5 feet out of the ground and watch that snow doesn’t build up above the level of the vent pipe.
It’s okay if the pipes end near each other. The most important thing is to ensure that clear air flow is maintained, so your longer pipes and checking to make sure that they stay clear sounds like a workable solution.
Hi! We live off grid in SE Iowa. We are wanting to add a front porch/root cellar like yours to the north side of our house. I haven’t been able to find in the bubel’s book whether the concrete roof/porch floor should be any thicker than usual since it won’t be covered in dirt. How thick is your cellar roof? Also do you think it would be detrimental to put an insulated hatch in the middle of the porch floor, or would it be best to punch a doorway through the basement wall (although that process would terrify me). Also my husband really wants a concrete floor to prevent burrowing creatures. Did you install any wire mess under your rocks/ have you had any issues with animals? Thank you for your post.
You builder should be able to tell you the specs on the concrete. Use of a prestressed slab can help overcome the inherent weakness of concrete in tension. Ours is just under 4 inches thick.
You could put a hatch in through the porch floor, but the access would be more awkward and you’d need to do extra reinforcing in the slab. If you have a contractor with a clue, putting access through the basement should not be a problem. Get someone with good references.
We’ve never had any issues with anything burrowing up from the floor. Critters simply don’t normally dig that deep, at least, not anything around here. The only issue we had was when a mouse got in through a vent pipe, but that was solved by putting mesh over the vents.
A couple of questions, you picture canned food in your root cellar. I understood that the dampness in the cellar would cause the lids to rust prematurely and they needed to be stored somewhere drier. Do you have a problem with this? I read somewhere that peat moss is a good storage material, rather than leaves or straw, have you ever experimented with it? It’s something I’d have to buy, but I think it can be reused.
On canned food in the root cellar – our root cellar tends to be a little drier than ideal. Not so great for storing veggies that need moisture, helpful for storing jars. We have a canning pantry as well, but needed more space. Even in my mom’s basement (which would get very wet in spring) and my grandmother’s basement (which we used to use as a root cellar because it was natural stone and stayed cooler and damper), the jars kept quite well for many years. My nephew ate some old canned goods that my grandmother had stored when they were cleaning out the basement that had to be at least 10 years old. The lids were a little rusty, but the seals were still intact. (I generally would not recommend this, but he didn’t get sick. He said the food was mushy but otherwise fine.) In our case, we rotate the jars every 1-2 years, and I have yet to see any signs of rust on lids.
On the peat moss – given the controversy with peat bogs being overharvested, I prefer to stick with local materials. I’ve also noticed that during storage, bits of material from the root veggies are left behind in the storage medium, so I wouldn’t recommend reusing it from year to year. I suspect the bits of moss would stick to every crevice of the veggies, too – not unlike sawdust.
Great post!
My husband and I are thinking of building a root cellar in our attached garage. Is there helpful information in the books you shared for that specific process or do you know of other resources that would help us in that endeavour. Thanks!
I know Nancy Buebal’s books has ideas for turning just about any spots into storage. The others I haven’t read, but they are well rated and I suspect that they would also be helpful. Depending on where you live, you may also want to check out the post, “Build Your Own Walk In Cooler with a CoolBot Controller and A/C Unit“. Since you’re building above ground, you won’t have the natural thermal mass and lower ground temps to tap into. With the Coolbot and standard AC unit, you can still get very affordable cooling.
I was okay with all the info UNTIL I got to the list where Endive (Escarole) was listed. FOLKS these are 2 different plants! Do your research! Endive is sometimes called Chicory, but NEVER EVER is it Escarole. Both are in the lettuce family. However Endive (Chicory) can be used in coffee, but Escarole is not. Escarole is used w/beans or in soup.
Begging your pardon, but other sources would indicate otherwise. For instance – http://www.nutrition-and-you.com/endive.html :
The post continues at some length, but you get the general idea.
One thing I’ve learned about plants – it’s incredibly common for different people to use the same name to describe different species (which is why I always use the Latin names as well as common names in my wildcrafting posts).
i have root cellar in the basement of the old houes we bought 3 years ago, so I feel blessed- now I just need to eliminate the little mice that find their way in and decimated my apples last year!
I am writing to tell you that i lost my entire potato crop this year: First, it was reduced by about 60% due to vole damage. I was amazed, as last year was a huge harvest and no vole damage although I saw evidence of their tunnels. But then, I was curing them on the porch before I brought them inside, and we had an unusually cold night here in the mountains, and it did go below freezing. I thought they were okay. But now I have a bucket of mush where once were potatoes. I am heart broken! My purples and blues are all gone!!
That reminds me of the winter we tried to store the potatoes in my in-law’s boat house because we were building this house. They looked okay, but when we cooked them, they were unpleasantly sweet.
How do you gain access to your root cellar and can you elaborate more on how you build the structure its self.
There’s an exterior grade door between the root cellar, which is outside the building envelop, and the rest of the house. The structure itself is simply reinforced poured concrete.
Hi, I am trying to build my homestead. I have a tornado shelter that I hope will double a root cellar (it’s large enough to stand comfortably in, and has built in shelves. It does get rather moist in there though. I notices your comment on how a good root cellar is moist and cool, so I am hoping that’s good. There is a drainage hole in the floor to allow any water that gets in when it rains or something out, and an air vent on the top that the wind does go through.
As for the rain comment, the door to the cellar does not overhang any of the shelves, when it rains sometimes water seeps in around the side of the door where the hinges are, the shelves themselves have never actually gotten wet.
Also, what is the best way to store apples long-term? I know that cold storage is good, but I thought the coolness of the cellar was good for that, why do you store yours in the garage? How long before they start to shrivel?
Thank you.
Since my garage is cool (I live in Wisconsin), keeping apples stashed there in a cooler basically acts as a root cellar extension. Because our root cellar vents are a little smaller than I would prefer (and it would be a real hassle to try and punch a bigger hole in the concrete), I keep the apples separate because they produce a lot of ethylene gas, which can cause sprouting and spoilage of other root cellar items. (This is why the chart says, “Do not store with veggies”.) Optimal storage conditions are listed in the chart. The commercial apple orchards I know around here use large coolers with precise moisture and temperature control to extend shelf life.
Our garage is attached and just a few steps from my kitchen, so it’s also convenient for me to store the apples there. I use it as cool storage all winter long for a number of items, like kombucha and other beverages. To access my root cellar I need to trot down the stairs and a doorway or hallway or two. My apples usually keep until at least March if stored at the end of October, if they last that long. If they start to get soft, there’s always applesauce or fruit leather or dried apples or pie…
Love your site and info. Being single mom with 3 kids, homeschooled, and keeping a backyard garden, (300 sq. ft). Preserving, drying everything I can
Urban farming my son calls it.
I wish I could build a root cellar, below or above ground. Haven’t the manpower or knowhow or $ to do. But I learn from you and do what I can do! Thank you so much!
You’re welcome. Remember, even the little things add up over time.
You say in your article that “onions, garlic and potatoes” like “drier conditions” but then the list of conditions says potatoes like “cold and moist.” Can you please clarify?
You’re right, I should correct that. Thanks for mentioning the disagreement. When I first wrote the article, I was thinking about my mom’s basement, which would get super wet at times. This was bad for storage. Potatoes do need a certain amount of moisture – more than the onions and garlic – or they’ll wrinkle up, so I should take them out of the mention with onions and garlic. They can’t be too wet, or they will rot.