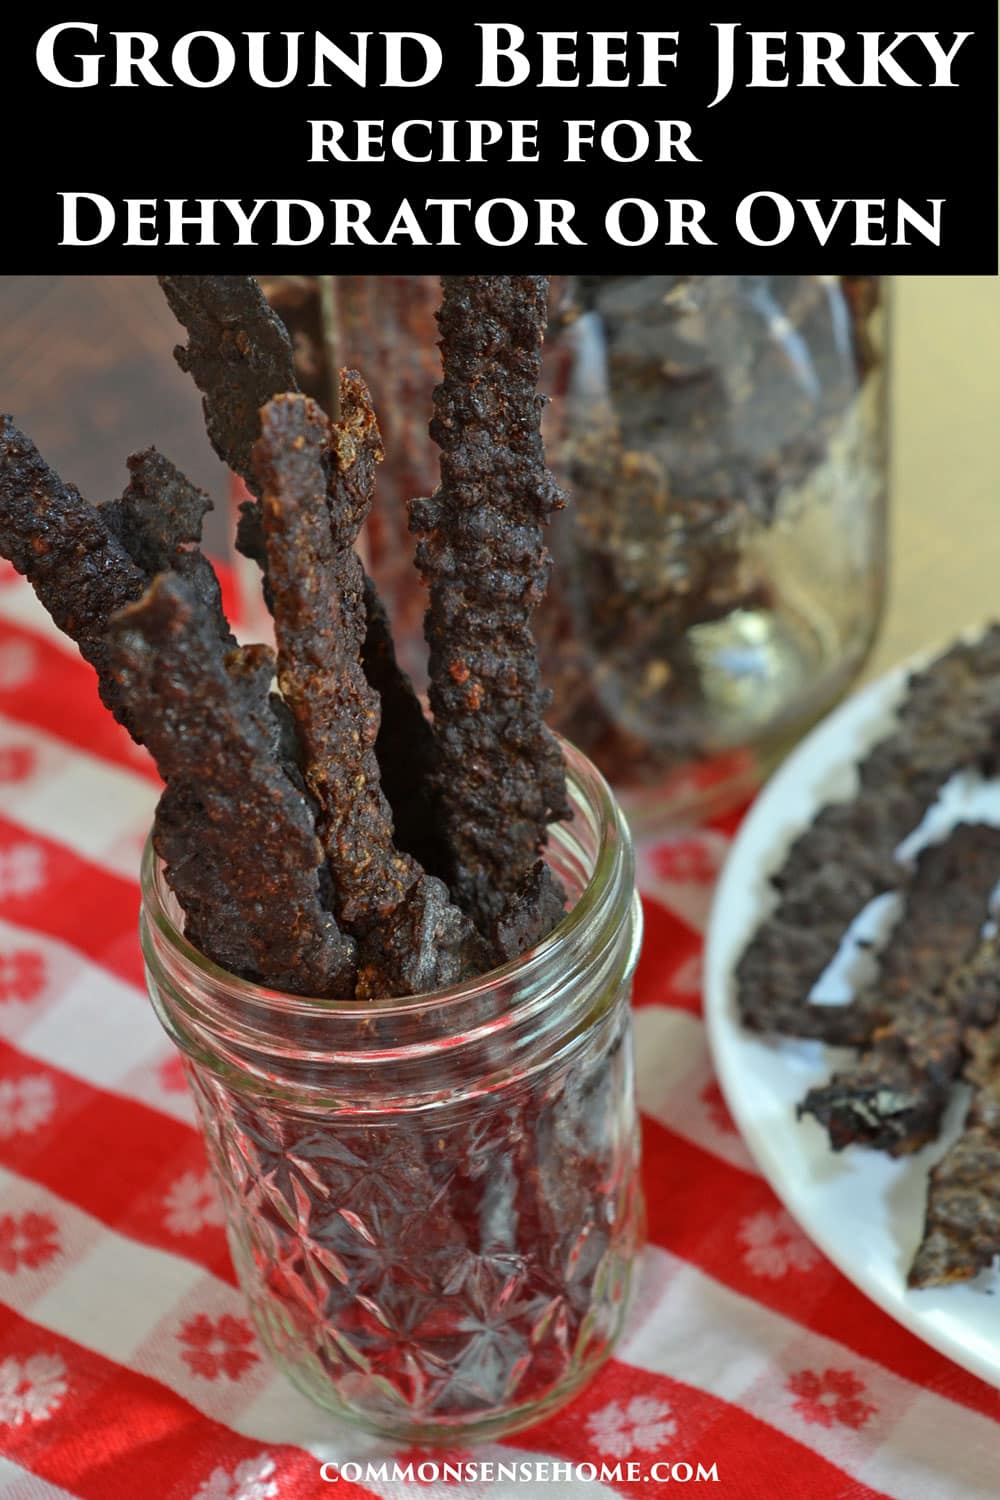
Homemade Ground Beef Jerky Recipe (For Dehydrator or Oven)
This post may contain affiliate links. Read my full disclosure here.
Ground beef jerky is easy to make and less expensive than store-bought jerky. You can make it with a dehydrator or dry it in the oven. Use your choice of ground meat – lean beef or venison – whichever you have available.
My jerky gun came with seasoning and cure packets. Unfortunately, these were full of ingredients I’m trying to avoid in commercial jerkies (MSG, hydrolyzed soy protein, nitrates, etc.). (Those little packets are expensive, too, if you purchase them separately.)
This recipe uses soy sauce and sea salt for preserving instead of curing salt. It doesn’t contain nitrites or nitrates.
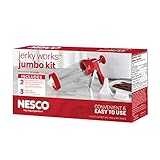
Do you need a jerky gun to make jerky with ground beef? Nope! You can make jerky without a dehydrator or a jerky gun, but the jerky gun is handy and entertaining.
We have a basic Nesco jerky gun. For those who want to make big batches of jerky, try the LEM jerky cannon.
Why Use Ground Beef for Homemade Jerky Instead of Beef Strips?
I prefer ground beef jerky for three main reasons:
- It’s cheaper. I can get ground beef or venison much cheaper than a roast.
- It’s easier to make. Working the jerky gun or rolling the meat out thinly goes quickly. Wrestling to cut strips out of a piece of meat with bone and connective tissue intact is tough.
- It’s easier to chew. Eating a piece of regular muscle jerky can sometimes be like chewing on an old shoe, especially when there’s a lot of connective tissue. Ground beef jerky has the meaty, salty jerky taste we love, without getting stuck in your teeth.
This recipe is adapted from Mary Bell’s Complete Dehydrator Cookbook – “All American Marinated Beef Jerky”. Mary makes hers with beef strips, but it worked well as a ground beef jerky recipe, too.
How to Reduce Sodium in Beef Jerky
For the soy sauce, I prefer grain free organic tamari. Most US non-organic soy is genetically modified, and may have glyphosate residue. Non-organic wheat may be sprayed with glyphosate prior to harvest.
I use San-J, which has 940 mg of sodium per tablespoon. In comparison, La Choy has 1330 mg. A tablespoon of regular table salt has 6976 mg of sodium(2325 mg per teaspoon).
If you use a saltier soy sauce, it’s easy to overdo the salt in the recipe. Stick with a soy sauce that has less sodium. If you want to skip the teaspoon of sea salt, store the finished jerky in the fridge or freezer. Salt is a preservative.
If your finished jerky is still too salty, you can soak it for 15-20 minutes to remove surface salt, then dry it again. Store the de-salted jerky in the refrigerator or freezer. Another option is to use the salty jerky for flavoring another dish, so the saltiness is diluted.
Homemade Ground Beef Jerky Recipe
Ingredients
- 1/2 cup soy sauce
- 1 teaspoon liquid smoke
- 1/2 teaspoon onion powder
- 1/2 teaspoon garlic powder or 1 teaspoon minced garlic
- 1 teaspoon sea salt
- 1 pound lean ground beef or venison, at least 93% lean
Directions
In a glass bowl, combine all ingredients and let sit (refrigerated) for at least two hours. I mixed this up at bedtime and let it sit until after lunch the next day, and it wasn’t too strong.
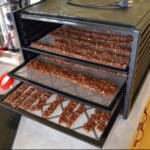
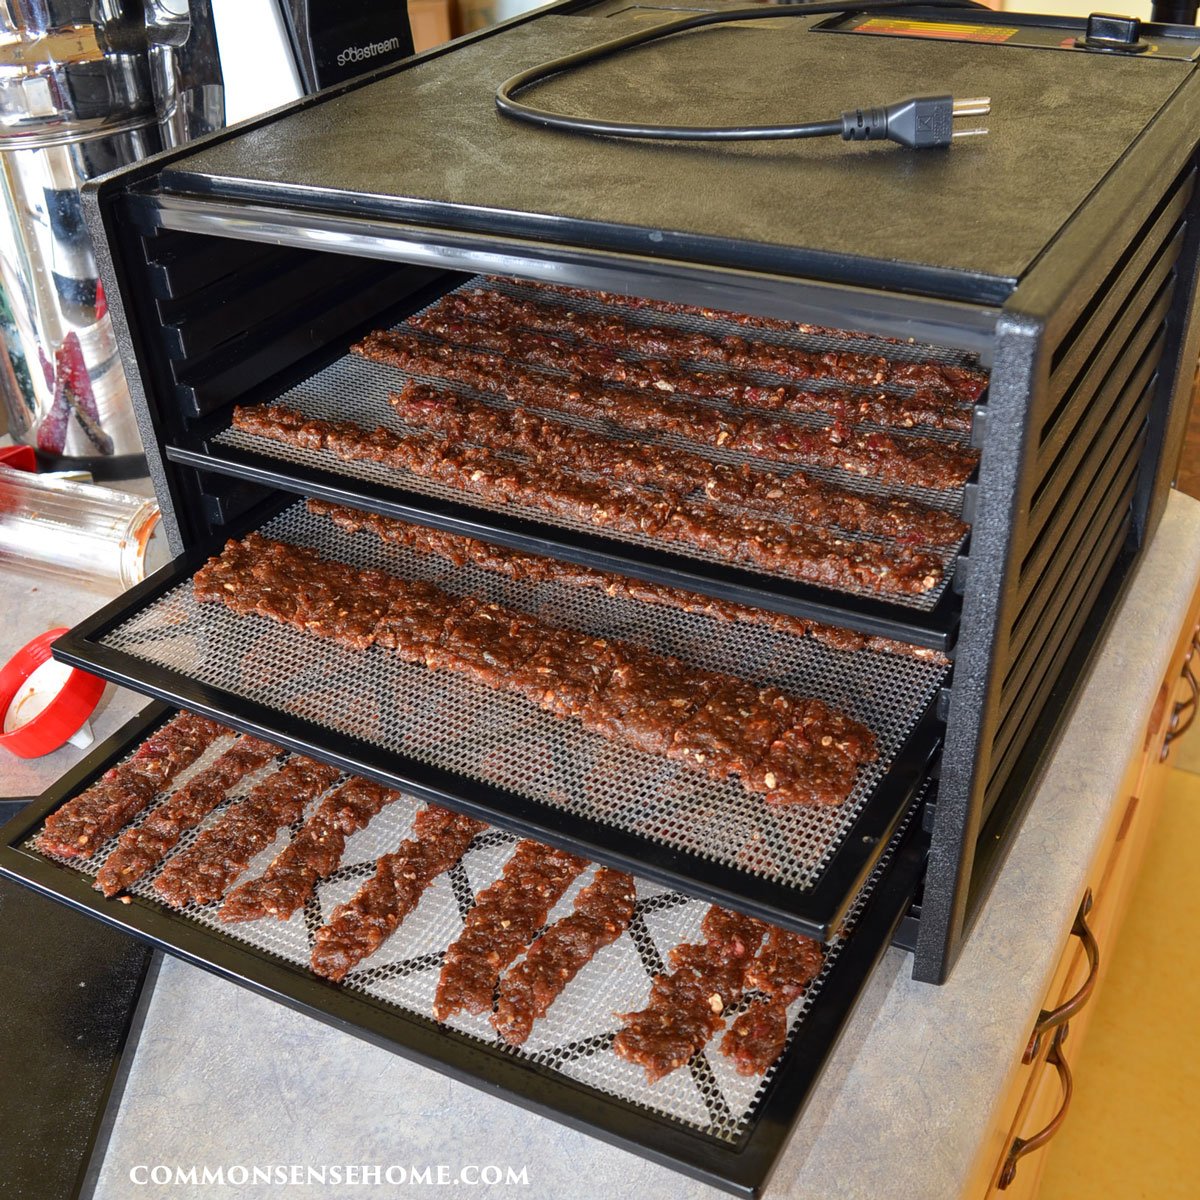
Load the mixture in the jerky gun and use the gun to load your dehydrator trays. I do recommend using the mesh inserts or fruit leather trays for your dehydrator. This mixture is fairly soft because of the liquid ingredients, which makes it easier to fire through the gun.
If you don’t have a jerky gun, use a rolling pin to roll the mixture out very thinly (1/8 inch thick). Score lines to form long strips of jerky.
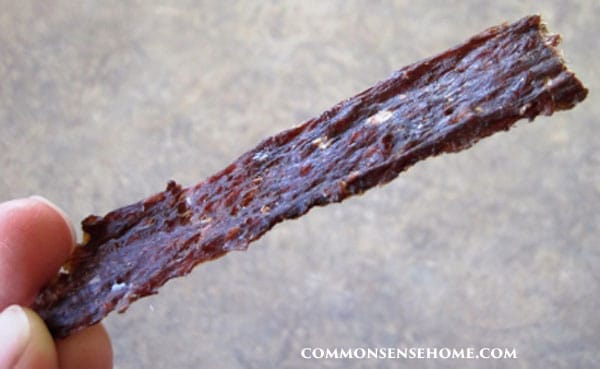
Dry at 145° – 165°F (63° – 74° C) for 4 to 12 hours. The jerky should be hard but still flexible and contain no pockets of moisture. For extra safety, heat finished jerky in a 275° F (135° C) oven for 10 minutes.
Jerky will last in an airtight container at room temperature for 1 – 2 months. For longer storage, place in an airtight container in the refrigerator or freezer. Vacuum sealing extends shelf life.
How Much Homemade Jerky Do You Get from One Pound of Raw Meat?
The weight of the jerky decreases by about two-thirds during the drying time. So for every pound of raw meat you use, you’ll get around one-third pound of finished homemade jerky.
How Can I Be Sure My Jerky is Safe to Eat?
The University of Wisconsin suggests the following two options for safe jerky making at home:
- Dry meat at 145° – 155°F for at least 4 hours followed by heating in a preheated 275°F oven for 10 minutes. Drying meat at a temperature below 145°F produces a product that looks done before it is heated enough to destroy pathogens, and before it has lost enough moisture to be shelf-stable.
Only a few dehydrators currently on the market will maintain the necessary temperature of 145° – 155°F. The Gardenmaster by Nesco/American Harvest and the Excalibur are two such units.
Each of these units has a large heating element, strong air flow, and adjustable temperature setting. Dry for at least 4 hours (6 hours is preferable) and remove jerky from the dehydrator.
Place dried strips on a baking sheet, close together but not touching or overlapping. Heat in a pre-heated 275°F oven for 10 minutes to an internal temperature of 160°F. Strips thicker than ¼” (when raw) may require longer to reach 160°F.
In our research, strips removed from the oven were sizzling hot. Remove oven-heated samples from the oven, cool to room temperature, and package. Always include the post‐drying oven‐heating treatment as a safety precaution.
- Steam or roast meat strips in marinade to an internal temperature of 160°F before drying. Heat poultry to 165°F (internal temperature) before drying. The USDA Meat and Poultry Hotline currently recommends this method for making safe jerky.
The pre‐heating step assures that any bacteria present will be destroyed before drying. This allows a lower dehydrator temperature (130° to 140°F) to be used. After boiling, dehydrate meat for 4 to 6 hours. No post-dehydration oven-heating is necessary.
Since it can be impossible to accurately measure the internal temperature of a thin strip of meat, consumers can boil meat in marinade (or water) for 5 minutes before drying. Unfortunately, this USDA recommended method produces a dried, crumbly product. It would be judged inferior by Wisconsin standards for chewy, flexible jerky.
Holding meat above 145°F for over an hour pasteurizes the meat. Pathogens start dying at temperatures above 130°F, but the lower the temp, the longer they take to kill.
Would you like to save this?
We get our beef or venison from a single animal, so I use the dehydrator above 145°F and call it good. If you had ground beef from unknown animals, I’d suggest some time in the oven to finish it.
Do I Need a Dehydrator to Make Jerky?
It’s possible to make jerky without a dehydrator. Here’s how to make jerky in the oven.
Roll out the jerky on a piece of parchment paper and place it on a baking sheet (or use a jerky gun). Dry the homemade jerky at your oven’s lowest temperature with the door slightly open for 2 hours. Our oven’s minimum temperature is 170°F (77°C).
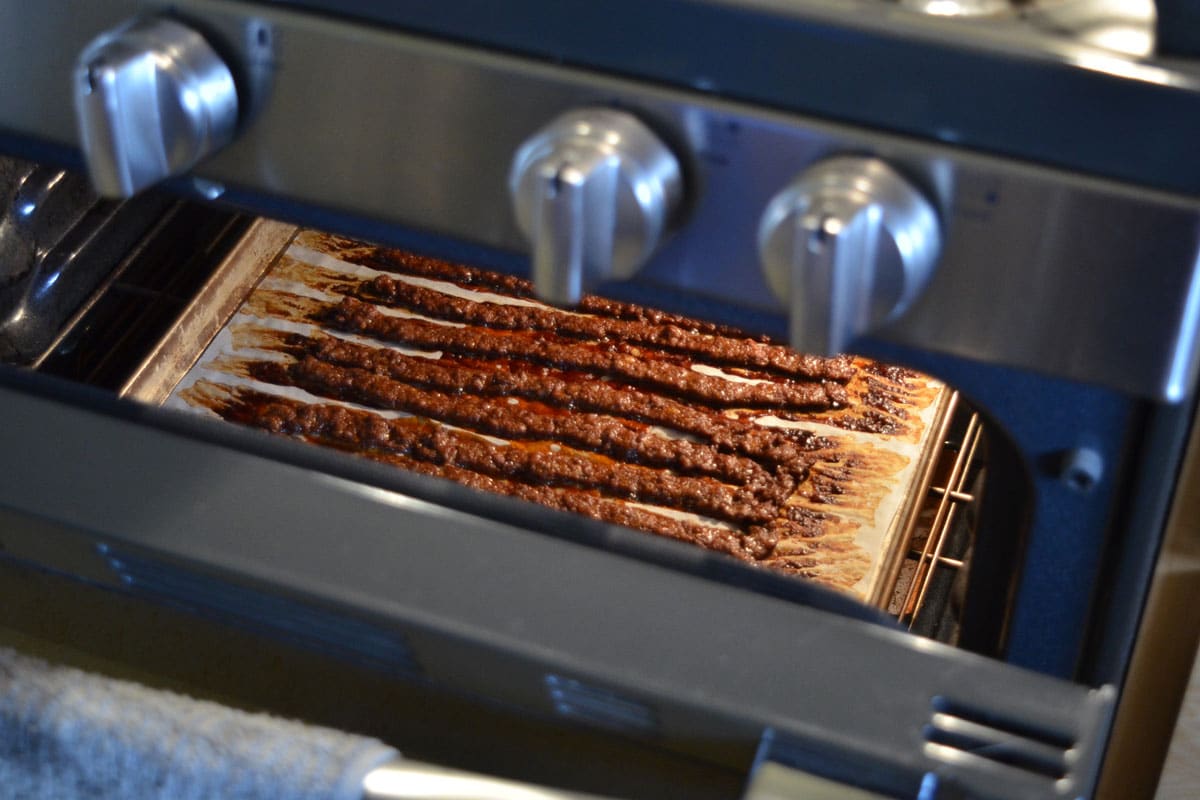
Flip the jerky and rotate the baking sheet. Bake for 1-2 hours more, until jerky is dry but flexible. Oven drying jerky shrinks it up faster and plumper, and creates more of a salty crust.
Using the Excalibur Dehydrator and Jerky Gun
With the Excalibur dehydrator, a batch of jerky is done in about 4-6 hours, depending on the humidity level. Drying overnight gets the jerky a little too dry for my taste. It’s still good, but a little too crumbly.
The last time we made jerky, my eldest mixed up the jerky marinade and meat the evening before drying. My youngest loaded up the Excalibur the next morning.
Make sure to pack the ground meat tightly into the tube to avoid air pockets. The jerky gun shoots strips about an inch wide when you use the “double barrel” attachment. The gun also has option of a single wide strip or a tube shape.
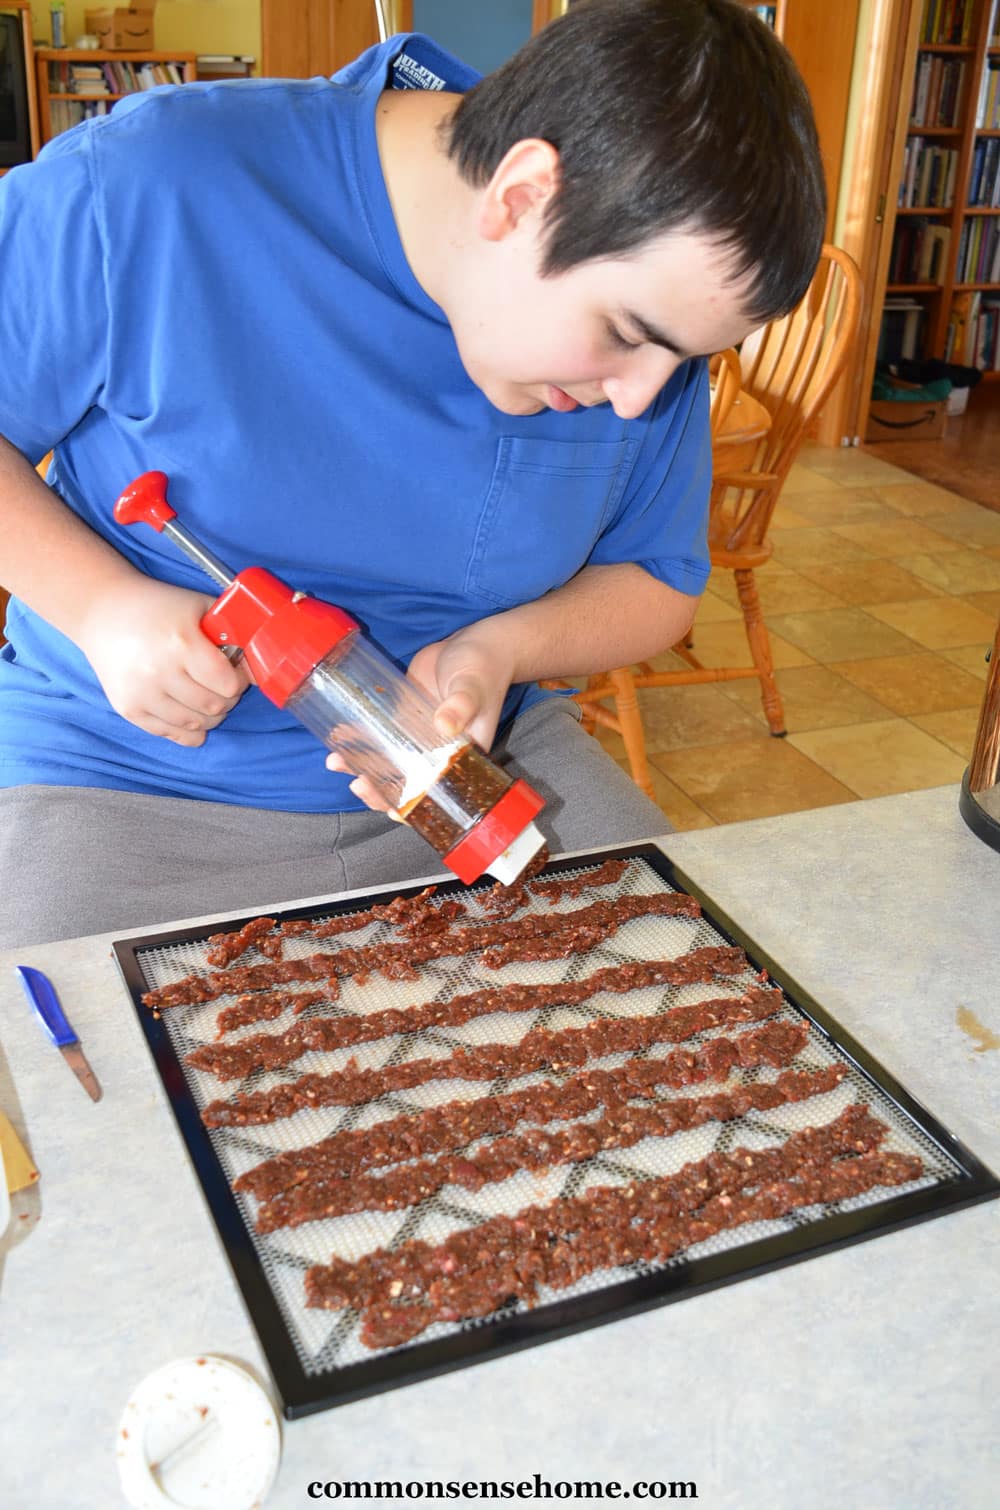
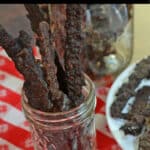
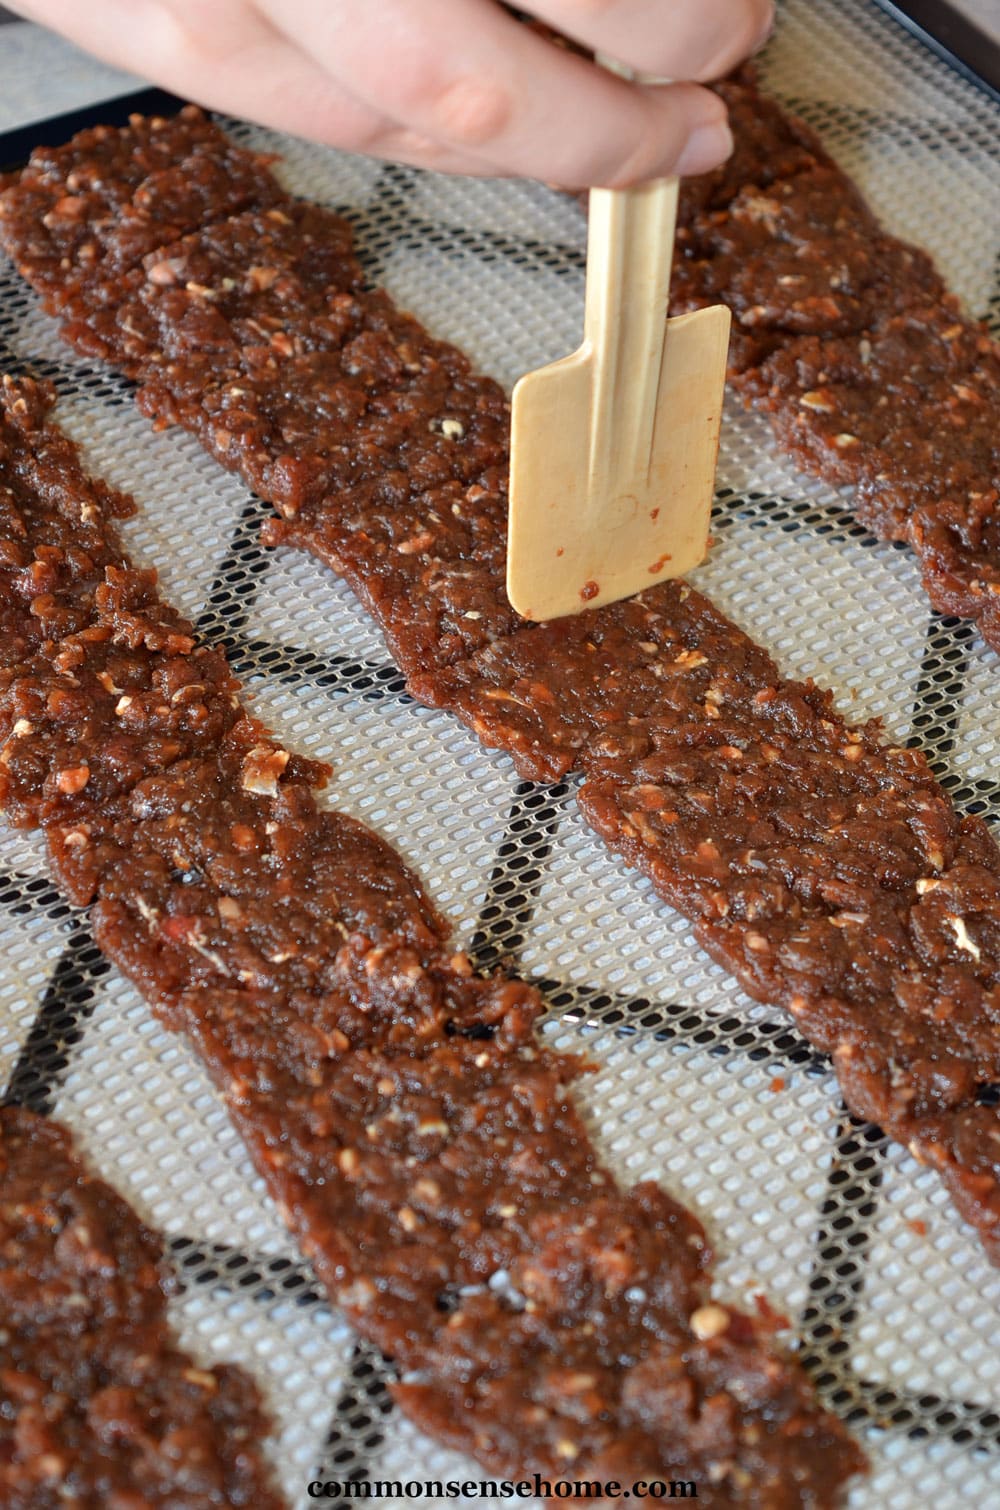
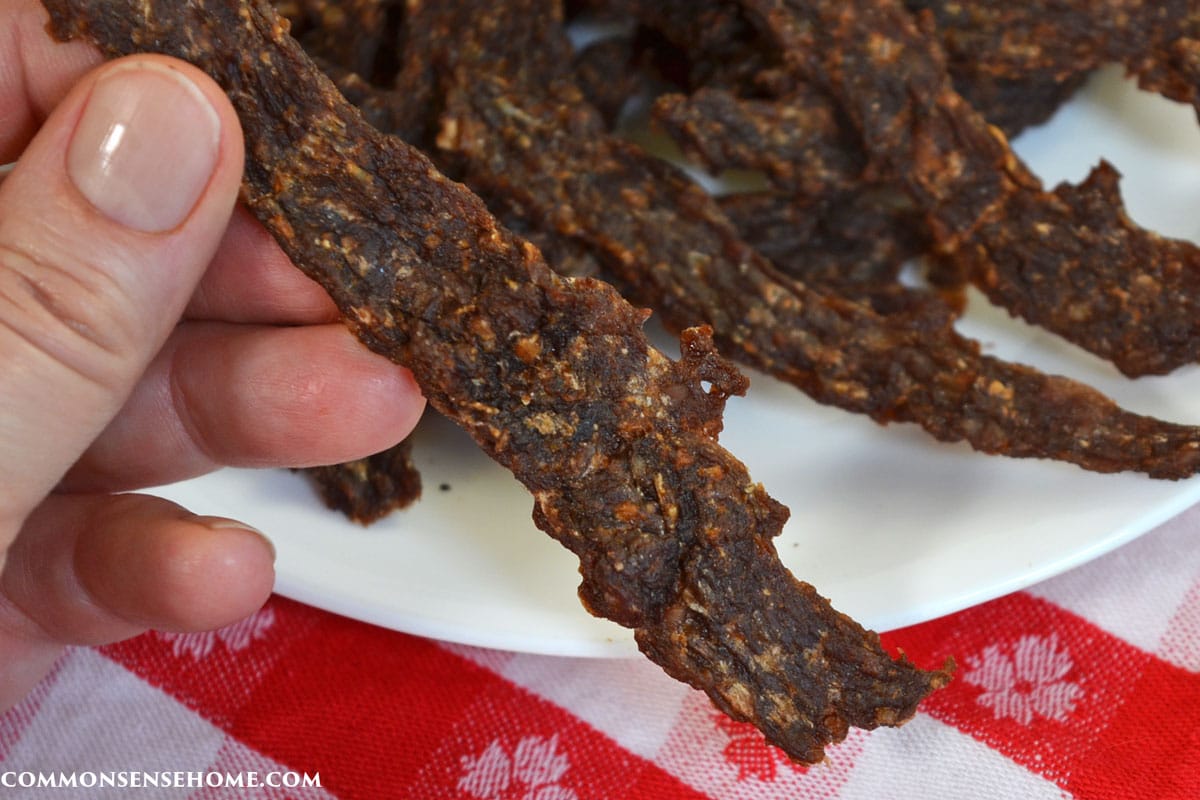
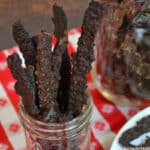
We made wide strips and scored them with a thin spatula. This makes them easier to break apart once dry. (You can use this same scoring technique for jerky made with a rolling pin.)
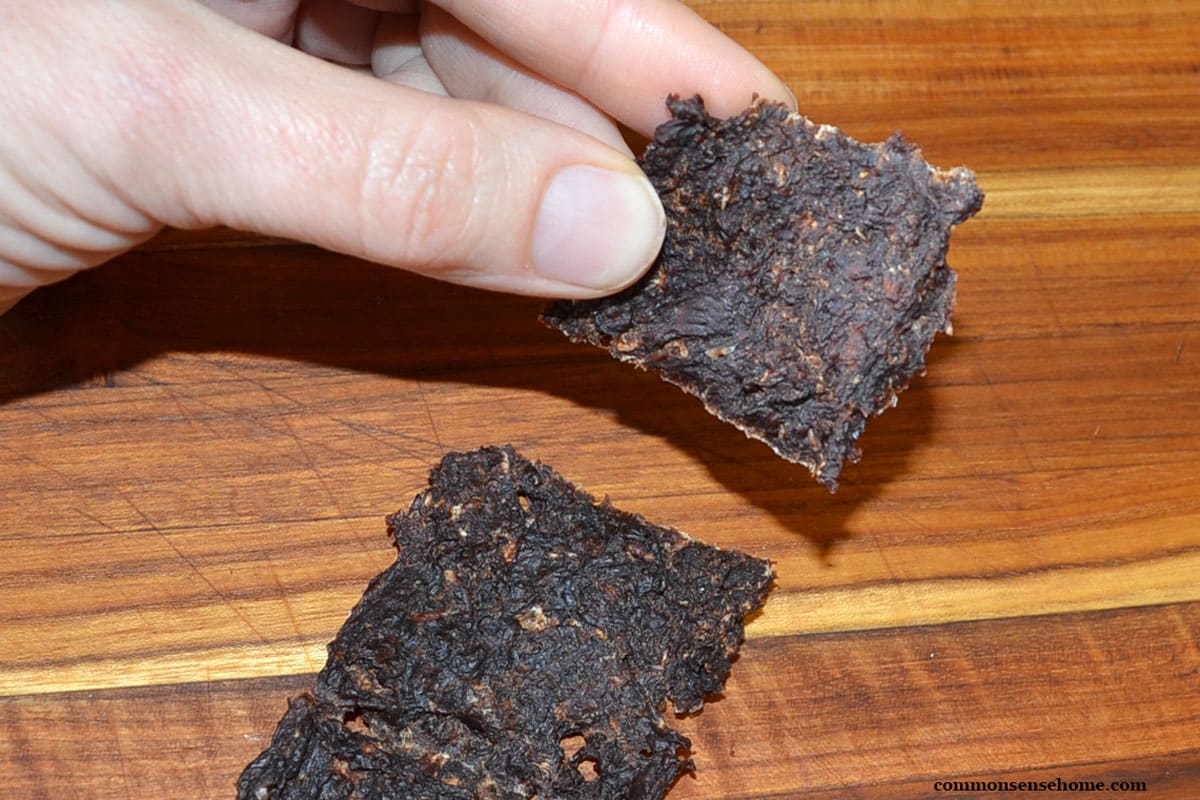
This has become one of my favorite snack foods since we’ve been working to reduce our carbohydrate and grain intake. It’s relatively quick and easy to make, and the gun was pretty inexpensive.

Homemade Jerky without Soy Sauce (Gluten Free, Soy Free Option)
For those who avoid soy and/or gluten, substitute liquid coconut aminos for the soy sauce. Coconut aminos have a similar flavor profile, and are gluten free and soy free.
Beef Jerky Recipe with Ground Beef
Easy and economical jerky recipe that’s great for lean beef or venison.
- Prep Time: 10 minutes
- Drying Time: 4 hours
- Total Time: 4 hours 10 minutes
Ingredients
- 1/2 cup soy sauce
- 1 teaspoon liquid smoke
- 1/2 teaspoon onion powder
- 1/2 teaspoon garlic powder or 1 teaspoon minced garlic
- 1 teaspoon sea salt
- 1 pound lean ground beef or venison, at least 93% lean
Instructions
- In a glass bowl, combine all ingredients and let sit (refrigerated) for at least two hours. I mixed this up at bedtime and let it sit until after lunch the next day, and it wasn’t too strong.
- Load the mixture in the jerky gun and use the gun to load your dehydrator trays. I do recommend using the mesh inserts or fruit leather trays for your dehydrator. This mixture is fairly soft because of the added liquid, which makes it easier to fire through the gun.
- If you don’t have a jerky gun, roll the mixture out very thinly (1/8 inch thick) and score lines where you would like the pieces to break apart.
- Dry at 145° – 165° F (63° – 74° C) for 4 to 12 hours, until jerky is hard but still flexible and contains no pockets of moisture. For extra safety, heat finished jerky in a 275° F (135° C) oven for 10 minutes.
For oven drying:
Roll out the jerky on a piece of parchment paper and place it on a baking sheet (or use a jerky gun). Dry the homemade jerky at your oven’s lowest temperature with the door slightly open for 2 hours. Our oven’s minimum temperature is 170°F (77°C).
Flip the jerky and rotate the baking sheet. Bake for 1-2 hours more, until jerky is dry but flexible. Oven drying jerky shrinks it up faster and plumper, and creates more of a salty crust.
Notes
Jerky will last in an airtight container at room temperature for 1 – 2 months. For longer storage, place in an airtight container in the refrigerator or freezer. Vacuum sealing extends shelf life.
Do you have a favorite jerky recipe? Have you tried making jerky with ground beef? Has anyone tried making jerky out of organ meats? I’d love to hear from you.
Recommended Dehydrators
- Nesco Gardenmaster Dehydrator
- 9 Tray Excalibur Dehydrator – This is the unit we have.
More Snack Recipes
More Food Storage
Home Food Drying – 6 Things you Need to Know
Food to Stock Up On (For Daily Use or Emergencies)
Dehydrator vs Freeze Dryer – What’s the Difference?

This article is written by Laurie Neverman. Laurie grew up in the kitchen, learning baking and home cooking from her momma. At age 15, she and her mom and two sisters created Irene’s Custom Cakes & Catering, which was her summer job through most of high school and college.
Last updated in 2024.
Hi! I KNOW there are tons of questions and comments. I hope you won’t laugh…
I, too, can’t wait to try this recipe. I’ve made ground beef jerkey in the past and loved it. BUT, I used the package of “chemicals”….and, needless to say, do not want to do it this way again. SO, here’s my question: Does the post baking realllllly work? To destroy the bacteria, etc.? So, I can really be safe?
I know, I’m a fraidy cat…..I just want some reassurance from those who’ve done this and lived to tell about it! LOL Thanks so much!!
Since I get my meat from a single source processed at a small local butcher, I haven’t taken the time to do it. (And I’m still here typing, so that’s a good sign.) That said, if you look at the basics of pasteurization, it should be effective. From “Pasteurization methods and temperatures” at The Engineering Toolbox:
Vat Pasteurization = 30 minutes at 145 F (63 C) (so by default, you’re already vat pasteurizing in the dehydrator)
High temperature short time Pasteurization (HTST) = 15 seconds at 161 F (72 C)
Higher Heat Shorter Time Pasteurization (HHST) = 1 second at 191 F (89 C)
These numbers are for milk, and meat is more dense, so you stick it in the oven a while to make sure it’s completely heated through. Bah-dah-bing, bah-dah-boom – done!
Thanks so much! One last question: When removing the jerky from the dehydrator to cook in the oven, can I put the stips onto a parchment paper lined cookie sheet? Do I need to flip once about half way through the time?
Thanks again! I just love your blog!
A parchment paper lined cookie sheet would work very well for the oven time. Flipping is fine, but probably not essential. The pieces are thin, and you’re putting them on a sheet of metal, so heat transfer shouldn’t take very long.
You’re welcome. Glad you enjoy the site.
Laurie, thank you so much for your recipe! I’ve been reading through your comment responses and am amazed at all the science stuff you know behind the way jerky works.
I was worried about not using cure but after your recipe and explanations I think I’ll be fine, as long as I store it in the fridge, correct?
Also for my first batch I used the round tip for sticks. I have a Nesco fd -37 that dehydrates at 160degree. It’s been in for about 6 hours. Now. When I bend the jerky to test for doneness by bending it with the “right” (right meaning the side that was facing up) side up, it doesn’t crack , but when I flip it over and bend it the other way it does. Is it because of the rivets on the tray beneath the jerky? How do I know if it’s done if it won’t break one way, but will the other? I hope that made sense and I do apologize if it doesn’t.
I just don’t want to run a batch of jerky or get sick lol. By the time you get this I’ll probably have it figured out, but wanted to hear what you had to say. Thanks for the awesome recipe and info!
Yes, you should be fine storing in the fridge. That’s even recommended for commercial jerkies now, once you open the package. The salt and dryness inhibit bacterial growth.
I haven’t used the tube end for the jerky maker. I’d break a stick open and see what it looks like inside. Uniform dryness throughout, and you’re probably good to go. Spongy spots = let it dry longer.
Thanks Laurie, you said about what I expected. I’ll probably do what you suggested and take the jerky out a day or two ahead. Sounds safest. Just wanted to be sure I was thinking along the right lines.
Let me know how it goes, and keep an eye out for any obvious signs of spoilage.
Laurie, I am on a very low sodium diet due to kidney damage from a MRSA infection. My son loves jerky and I would like to be able to eat it also. I’d like to try your recipe with a very low salt content. I would like to freeze some of it and keep some handy in the fridge. With a much lower salt content, how long do you estimate it would be safe in the fridge if I use the oven heating following the dehydrating? I know you can’t say exactly, but I’m wondering if you would be willing to give a guesstimate. I’m assuming the dehydrating would make the time at least a bit longer than just regularly cooked meat. Thanks for the recipe. It is what I’ve been hoping to find so I could resume making jerky for my son (but he really doesn’t need all that salt either). Appreciate any guidance you can give. Love your site!
I don’t have any way to reliably test microbial action, so I’d be guessing at any numbers. Lack of free water does inhibit microbial growth, but exactly how much is the question. If I had to guess, I’d think two weeks in the fridge with 1/4 the salt would safe, assuming you did sterilize it in the oven. Any longer than that, and I’d say freezer and take out what you need for a day or two. Odds are even longer might be safer (after all, refrigeration is a modern invention), but I can’t say with absolute certainty.
I am glad to find this recipe! My mom used to make something like this with a food dryer 30 years ago–I just picked up a dryer at an auction and want to try it again! Would a cookie press work in place of the jerky gun you mention?
I have to comment–you say in “About Me” that you believe in straight talk. That’s great–me too! But if so, why add this, “Most soy in the US that is not organically grown is genetically modified, and non-organic wheat may be sprayed with glyphosate prior to harvest.” in your notes? As someone who has been a farm wife/farmer for well over 40 years, I know all about “organic” and “glyphosate” and giving people the impression there is something “wrong” or “dangerous” about not being the former or having the later is definitely not straight talk. I won’t go into the science here, but I ask that you get more information, and NOT from the “food babe”, about the topic. The sheer volume of “whoooo” on these topics continues to astound (and depress) me.
Well Cathy, I’m glad you like the recipe, but we’ll have to agree to disagree on the safety of glyphosate – although we can both agree that Food Babe is pretty much full of hot air.
As you know from my bio, I too, have lived in farm country most of my life.
Glyphosate works as a chelating agent, binding up nutrients and making them unavailable to plants, thereby acting as a weedkiller. In a similar fashion, it also makes nutrients unavailable to bacteria, and was, in fact, originally patented as an antibiotic. (Would people be up in arms if they found out that an antibiotic was being sprayed on their food just prior to harvest, when we all know that antibiotic resistant infections have become a serious issue in recent years? The residue is staying on the crops, too, as evidenced by the recent study that found high levels of glyphosate in many popular foods.)
Bacteria, mycorrhiza fungi and other microorganisms are critical to healthy soil. Anything that disrupts this food web has a negative impact on soil health. Organic certification is not a perfect solution, but I do feel that it is somewhat “less bad” than current conventional practices.
Also, the reliance on chemicals has spurred the evolution of super weeds, which are resistant the glyphosate – which then leads to the development of even more toxic chemicals. Conventional farmers are utterly dependent on those outside inputs to have a successful crop. This makes our food supply extremely vulnerable. And, I may be mistaken, but looking around at the acres and acres or farmland in our area and watching it blow out of the plowed fields headed for Lake Michigan, it doesn’t seem like the status quo is doing much to protect and improve the soil.
Ideally, I’d like our food production to shift to more perennial food crops, which, properly managed, protect and improve the soil. They also have the potential to produce more calories and more nutritious calories from the same amount of acreage. Further, being able to get multiple crops with minimal outside inputs provides protection to the farmer, should one crop fail. (See Restoration Agriculture for more on this topic.)
Sorry if this is too “whoooo”…
Almost forgot – the cookie press might work, depending on the type you have. The meat tends to clump more than cookie dough and may jam in the press.
I have done ground turkey and used less soy sauce. It turned out great. I used to buy the Nessco Jersey packets but can never find it in the store. Made your recipe and it was yummy. I got the low sodium soy sauce because regular is always way to salty. Thanks for sharing with us.
My family makes jerky using ground meat and we used make jerky using sliced meat. We just made a batch of jerky using the packaged seasoning w/cure mix from Cabelas.
We bought a Cabelas Jerky Blaster gun a few years ago and had bought a Dehydrator many years before that. We used to use Liquid Smoke and I like the flavor that gives to the sliced meat jerky. But the last few times we made jerky we used the Seasoning/Cure mixes. The seasoning/Cure we used this time we bought from Cabelas came in a 3 pack to season 15 lbs of meat. each pack seasons 5 lbs of ground meat. We originally bought 80% lean ground beef, but the package says the leaner the better and recommends 90% or higher lean meat. So we went back to the store and bought 93% lean ground beef. We followed the directions on the packets and loaded up the dehydrator! But we were left with a little bit of meat left. So we followed the directions on the seasoning packet and the jerky blaster for the oven method and loaded up 2 trays for the oven!! I set the oven temp to 175F or 185F, I forget. Left the jerky in for 2 hours pulled it out and flipped them. Then checked them about 1 or 1 1/2 hour later. Checked to see if the jerky was done, then left in for another 1/2 hour. SO it was about 4 hours total. Then took them out to cool to room temp, and then pat dry and stored them in the fridge. They were OH so chewy!! Just the way I love them!!! But the ones we did in the dehydrator are like “Rawhide chew treats” for dogs!! LMAO They are so DAMN Tough to chew!! I have suck on them for a while to chew them or pretend I am a Puppy Dog and gnaw on them until I get it to a small enough piece that I can stick in my mouth ans suck on to soften up and chew!! But the bright side they are OH SO TASTY!! The Downside gnawing on them makes my teeth hurt!! lol
Another upside – hard to overeat them when they’re that chewy. 😉
Many years ago I used to make jerky. I got a new dehydrator not long ago and found to my disappointment that I lost my beloved recipe. One thing I loved about it was that it was NOT spicey. I don’t do spicy at all. I was relieved to find your recipe and it fit the bill perfectly. The one change I made that I remember from my original recipe is that I use half lean ground beef and half ground turkey. I get my ground turkey from a farmer’s market that has wonderful turkey from free range, humane, organically fed turkeys so I feel good using the products. Using the ground turkey cuts down on fat and calories too, even though my beef is 90% lean. Give it a try! Oh, and I had a gun that I had never used. Oh my word that made a difference from 20+ years ago when I used to make jerky!!! I will definitely be making a LOT more!
Glad you enjoyed the recipe.
My husband made a large batch of ground deer and turkey jerky. It is crumbly. We have made it before but didn’t have this problem. What caused this?
Those both tend to be lean meats. Maybe your mix was a little too lean and got overdried? I haven’t run into this problem, so I’m not sure. On a meat smoking forum, they discuss adding honey to keep it from crumbling:
You can go to a butcher shop and buy “Cow Rounds”, (The butt cheek of a cow) Absolutely NO fat….or less than 3% anyway. I’ve used it for jerky for years.
Hi. I am new to the jerky revolution. lol I have been making it only for several months and only the past month for the ground beef. It is fabulous and both the jerky eating men in my life (husband and his brother)agree. I was uncomfortable with the packaged cures and flavoring and had been trying recipes I got online. Yours is by far the tastiest of them all. I have tried it with and without the liquid smoke and it is much better with. I thank you for sharing your recipe. Also I have to say since I bought the jerky gun it is so much easier to make the ground beef jerky and even at my age it is so much fun. Thanks again.
So glad that you like the recipe! I agree that the liquid smoke really bumps up the flavor.
thank yoooooooooooooooooooooooooooooou
Beef is so expensive. Can you use pork or chicken? I have the Nesco and the jerky gun. I haven’t tried drying meats, yet, but we sure do put up a lot of herbs.
I’d be hesitant to use pork because of possibility of trichinosis. If you tried it with chicken, I think I’d try the extra step in the oven, taking it up to 160F.
Laurie…I just love your website! Thanks for all of the great posts! I’m new at dehydrating, and was wondering what the best type of beef is to use for making jerky…not including ground beef or venison. Many thanks!
You want a lean cut of meat without a lot of marbeling. Fat in the jerky will lead to quicker spoilage, and is just messy to work with. If you can find a roast on sale, that would work well.
Another issue is connective tissue. Too much connective tissue makes for stunningly chewy jerky. Great for chew toys, not so great when your jaw gets sore after 10 minutes of chewing one bite. The great part about ground meat is that use can use less expensive cuts, but they’re easier to chew because of the grinding. I’d rather cook a nice roast as a roast.
Happy Thanksgiving!
I have been making my own jerky for alomg, long time using ground meats. Store bought ground turkey alone or even mixed with lean beef or venison. I freeze all of the ground meats first for at least 7 days. I use low sodium soy and no extra salt at all. Jerky will freeze nicely as well and can be kept for several months in the freezer.
Yes, if you’re opting for lower sodium, the freezer is a great idea to help keep it fresh and safe.
Watch out for liquid smoke. Study this and you won’t like what you find. Of course, you probably get the same stuff at the same dose if you BBQ a meal, or smoke ribs or chicken. Listing it as an ingredient bothers me……
If you don’t like it, don’t use it. It’s just for flavoring, not a preservative.
Thank You Very Good And very Informative
I seen this receipt and had to make it . So I went out bought me a gun and made a batch. It turned real good so the grand kids tell me lol. It lasted one day. All gone they loved it, only one of my grandchrildren said it needed some more heat. Thanks so much for the post , can’t wait to do a double batch.
Just add a little cayenne in the next batch for the heat lover. 😉
Love the idea minus the soy sauce. Organic or not, soy is soy and jerky is hard to stop eating ha ha!!! With deer season here I think I’ll try this with our venison and use organic coconut aminos instead of soy. There is sea salt already in the aminos and has great flavor we use all the time with stir fry. Thank you for the healthier recipe!.
Very cool! I’ve never heard of a “jerky gun” before. Now I want one. 🙂
They’re great! So much easier than rolling the jerky out by hand, and a certain amount of entertainment value. 😉