
Snow Fence Installation – How It Works and Where to Put It

This post may contain affiliate links. Read my full disclosure here.



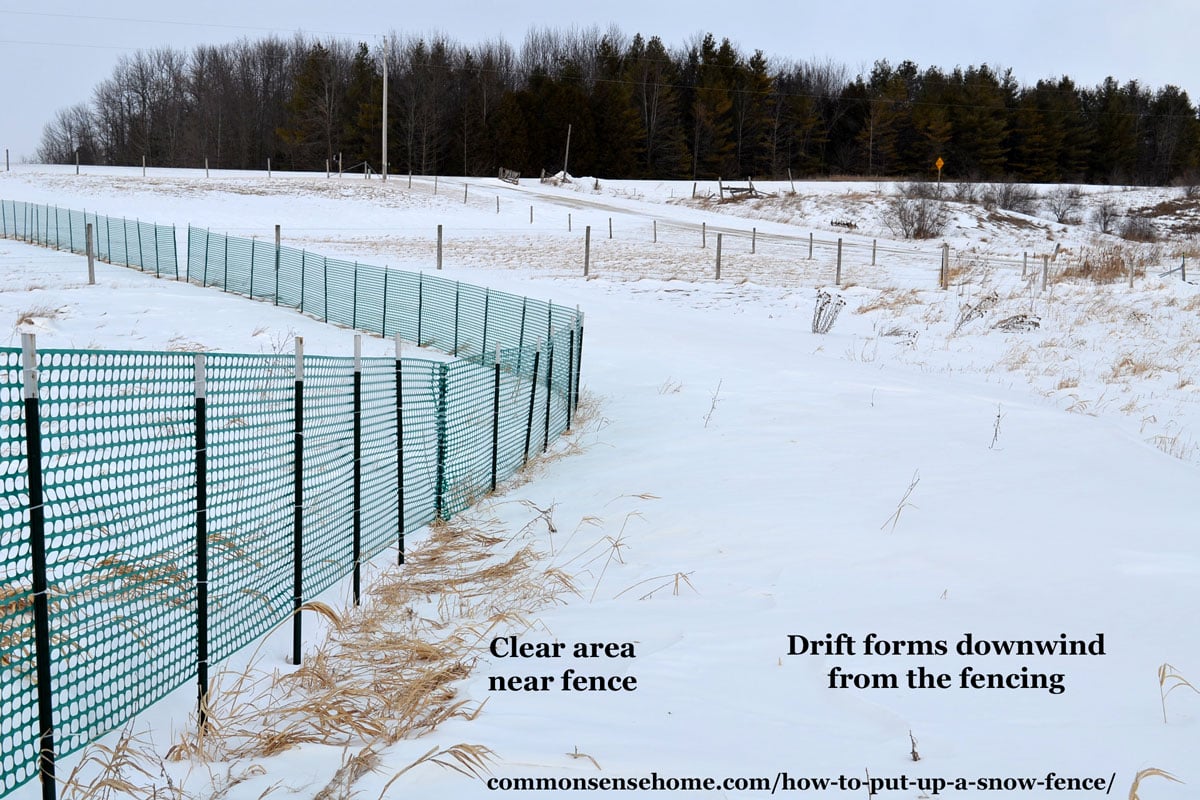
A snow fence doesn’t stop snow. It controls where drifting snow gets deposited.
Put the fence in the right location, and blowing snow piles up harmlessly in a field or yard instead of drifting across your driveway. Put it too close to the area you’re trying to protect, and you may make the drifting worse.
We’ve used several hundred feet of seasonal snow fencing on our windy northeast Wisconsin property for years. The biggest lesson we’ve learned is that placement matters more than almost anything else.
In this article, I’ll explain how snow fence works, how far to place a it from a driveway, how we install ours, and what we’ve learned from years of use.
Would you like to save this?
Table of Contents
Snow Fence Quick Start
If you just need the basics:
- Place the snow fence upwind of the driveway, road, walkway, or other area you want to protect.
- Allow plenty of room for the drift to form. A common guideline for a 50% porous fence on relatively flat ground is around 35 times the height of the fence.
- Use porous fencing, not a solid barrier. Snow fencing is designed to slow the wind rather than stop it completely.
- Leave a gap under the fence. For a four-foot fence, we leave roughly 5 to 6 inches between the ground and the bottom of the fencing.
- Use sturdy posts. Wind and drifting snow put considerable pressure on the fence. We suggest a quantity of 7 to 11 posts (depending on spacing) for 50 ft of fencing.
- Attach the fencing to the windward side of the posts. This lets the wind push the fencing against the posts instead of pulling it away from them.
- Watch the snow after installation. Your actual drift patterns are one of the best guides for fine-tuning placement.
Every property is different. Buildings, hills, trees, existing vegetation, wind direction, fence height, and the amount of blowing snow all affect where the snow eventually lands.
Why We Started Using a Snow Fence
Snow fences have been part of my winters for as long as I can remember. When I was growing up on our family farm, my grandmother had a long wooden fence that was put up each fall to protect the driveway from drifting snow.
Eventually, my brother planted trees to replace Grandma’s fence. The trees grew into a permanent living windbreak.
When we built our own home, we planted windbreak trees, too. Trees take time to grow, so until ours were large enough to do the job, we needed another option. Also, part of our driveway lies next to our neighbor’s field, so there’s no room for trees there.
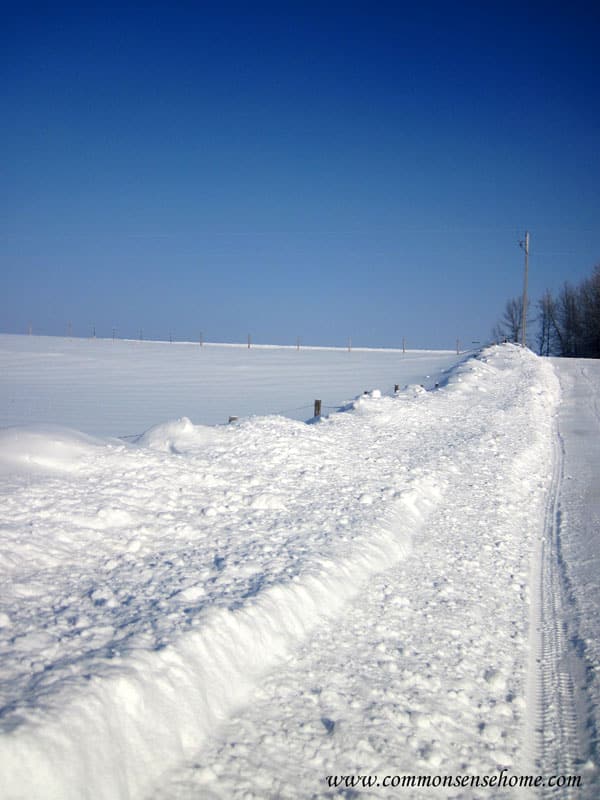
Our home sits in an exposed location surrounded by open farm fields. When winter winds get moving, there’s plenty of snow available to blow across the landscape and pile up wherever the wind slows down.
We got tired of having our driveway constantly blocked one snowy winter, and decided to invest in fencing the next year.
What is a Snow Fence?
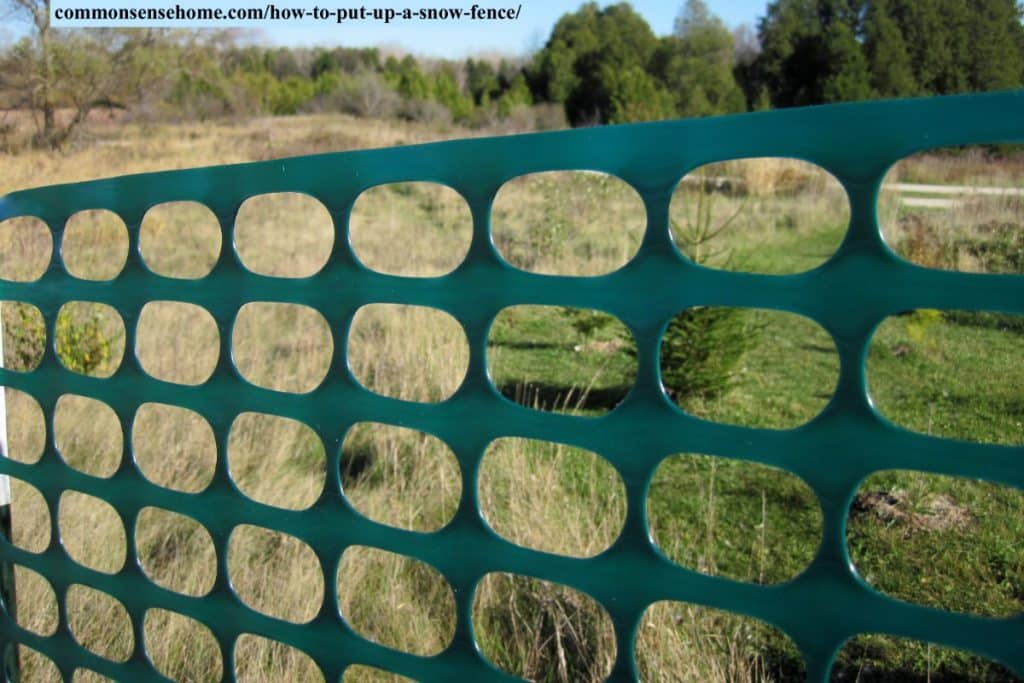
A snow fence is a porous barrier designed to control blowing and drifting snow.
Traditional snow fences were often made from wooden slats held together with wire. Today, plastic mesh is common because it’s lightweight, relatively inexpensive, and easy to roll up for storage.
Permanent fences, shrubs, and rows of trees can also act as snow fences when they’re designed and placed correctly. The important point is that an effective snow fence is not solid.
How Does a Snow Fence Work?
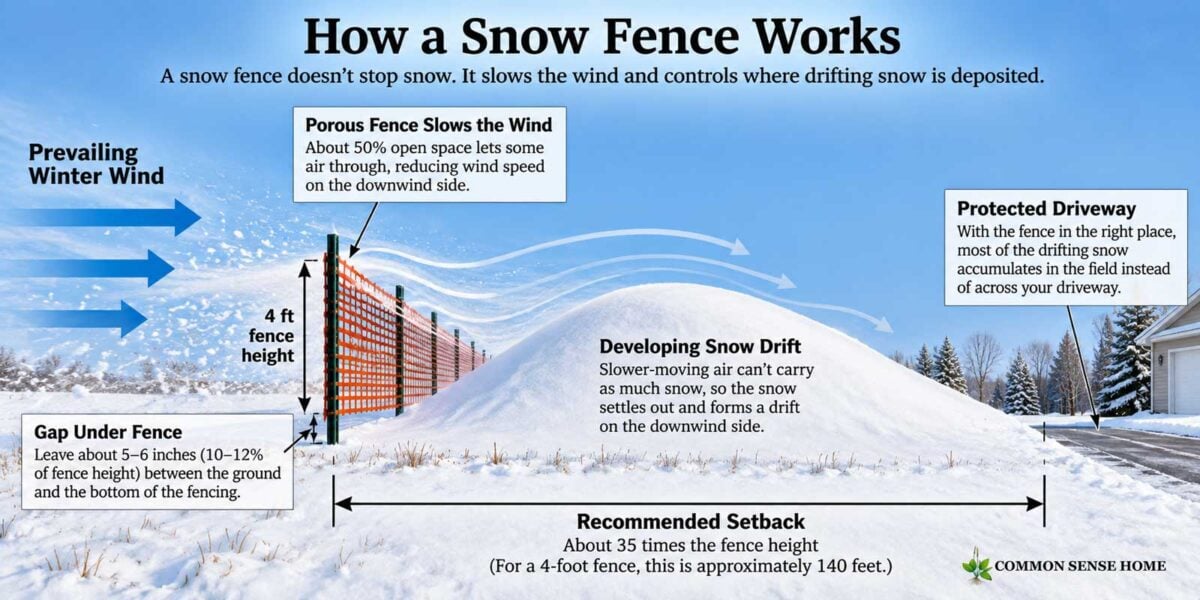
A snow fence works by slowing the wind. As wind passes through and over the fence, wind speed drops on the downwind side. Slower-moving air can’t carry as much snow, so the snow settles out and forms a drift.
This is why putting up a solid wall isn’t necessarily better.
Snow fencing is typically around 50% porous, meaning roughly half of the surface is open space. This allows some wind to pass through it while still reducing its speed enough to encourage snow deposition.
Think of the fence as telling the snow:
“Drop your load here instead of fifty yards farther down the driveway.”
That’s also why snow fence placement is so important. You aren’t eliminating the drift. You’re choosing a better place for it to form. In some areas, farmers purposely stack the drifts so they melt and flow into a water basin in spring.
Where Should You Put a Snow Fence?
The fence should be upwind of the area you want to protect.
Start by identifying the direction your strongest snow-carrying winter winds normally come from. Don’t assume your winter winds behave exactly like winds during the rest of the year. Look at your property.
- Where do drifts normally form?
- Which side of buildings stays scoured clean?
- Where does snow collect behind trees, shrubs, fences, or other obstacles?
Those patterns give you clues about how wind moves across your site.
How Far Should a Snow Fence Be From a Driveway?
One commonly used guideline is to place it about 35 times the fence height away from the area you want to protect.
That gives you approximately:
| Snow Fence Height | Approximate 35H Setback |
|---|---|
| 3 feet | 105 feet |
| 4 feet | 140 feet |
| 5 feet | 175 feet |
| 6 feet | 210 feet |
This doesn’t mean every four-foot snow fence must be exactly 140 feet from a driveway. The formula is a starting point.
Terrain, vegetation, fence porosity, wind direction, snowfall, and the amount of snow blowing across the site all influence the size and location of the drift.
When we first installed our fence, we experimented with different distances. Over time, we watched where the snow actually accumulated and adjusted sections of fencing to better match our site.
The snow will show you whether your fence is in the right place.
If the drift reaches the driveway, you probably need more setback, more snow-storage capacity, or a different fence configuration.
Don’t Forget the Ends
Snow doesn’t always travel perpendicular to the fence. Wind direction changes during storms, and snow can sweep around the ends of a short fence.
Extend the fence beyond the area you’re trying to protect (if possible) so it still provides coverage when the wind comes in at an angle. I know sometimes space is tight and there’s limited room for fencing.
How to Install a Snow Fence
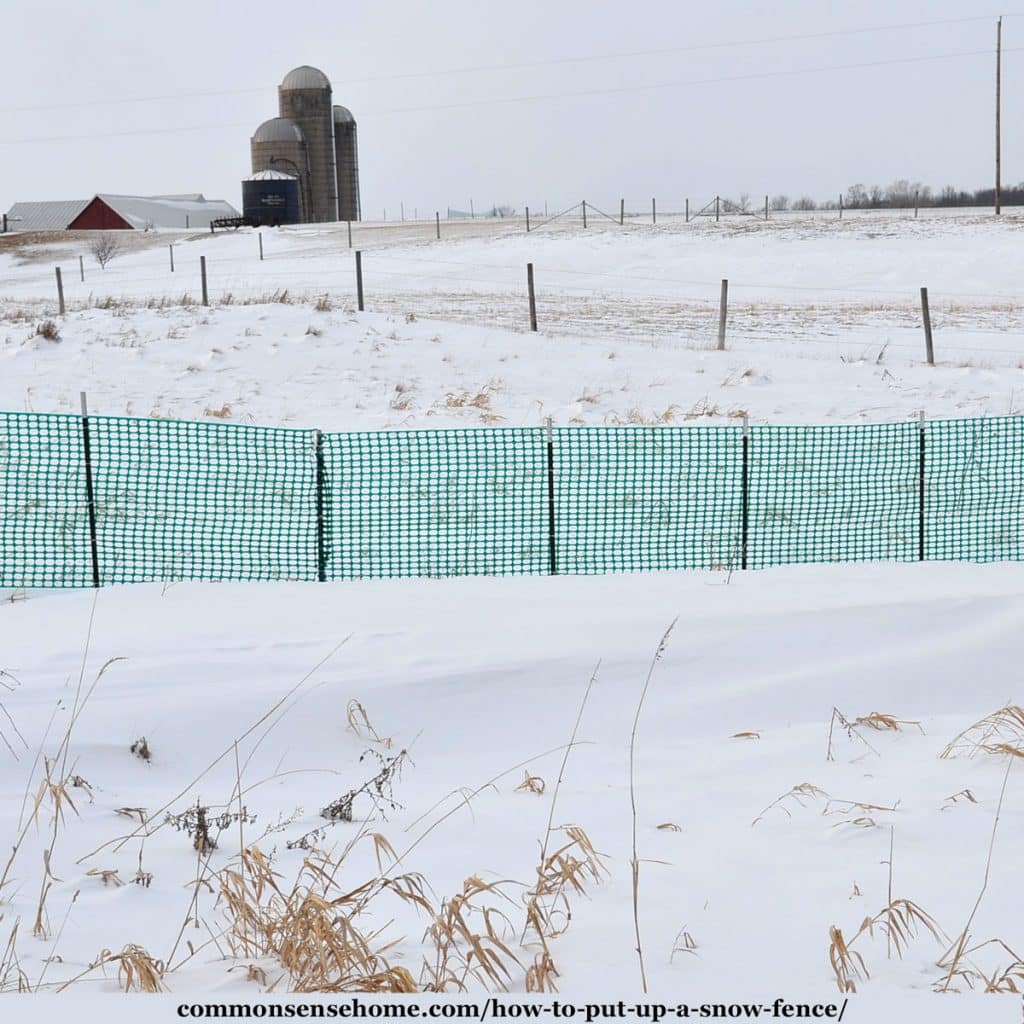
Our installation is fairly simple. We use plastic snow fencing attached to metal T-posts.
Materials
You’ll need:
- Snow fencing
- Sturdy fence posts
- Fence ties, wire, or heavy-duty zip ties rated for outdoor use (3-4 per post)
- Post driver
- Tape measure
- Gloves
We prefer sturdy T-posts because our site gets strong winter winds. Lightweight posts may work in more sheltered locations, but wind and snow can put a surprising amount of pressure on a fence.
1. Mark the Fence Location
Once you’ve identified the prevailing winter wind direction, mark the line where you want the fence. Remember that you’re really choosing where you want the snow drift to form.
Make sure there’s enough open space between the fence and the driveway or other protected area for snow to accumulate.
2. Set the Posts
Drive the posts deeply enough to stay secure through winter winds and frost. We generally space our posts about five feet apart because our location is exposed and windy. A more sheltered location may allow wider spacing, but I’d rather use a few extra posts than find the fence flattened after the first major storm.
Install the fence before the ground freezes. Driving T-posts into frozen Wisconsin soil is not my idea of a good time. We use 7 foot post driven approximately 1.5 feet deep for 4 foot tall fencing.
3. Leave a Gap Under the Fence
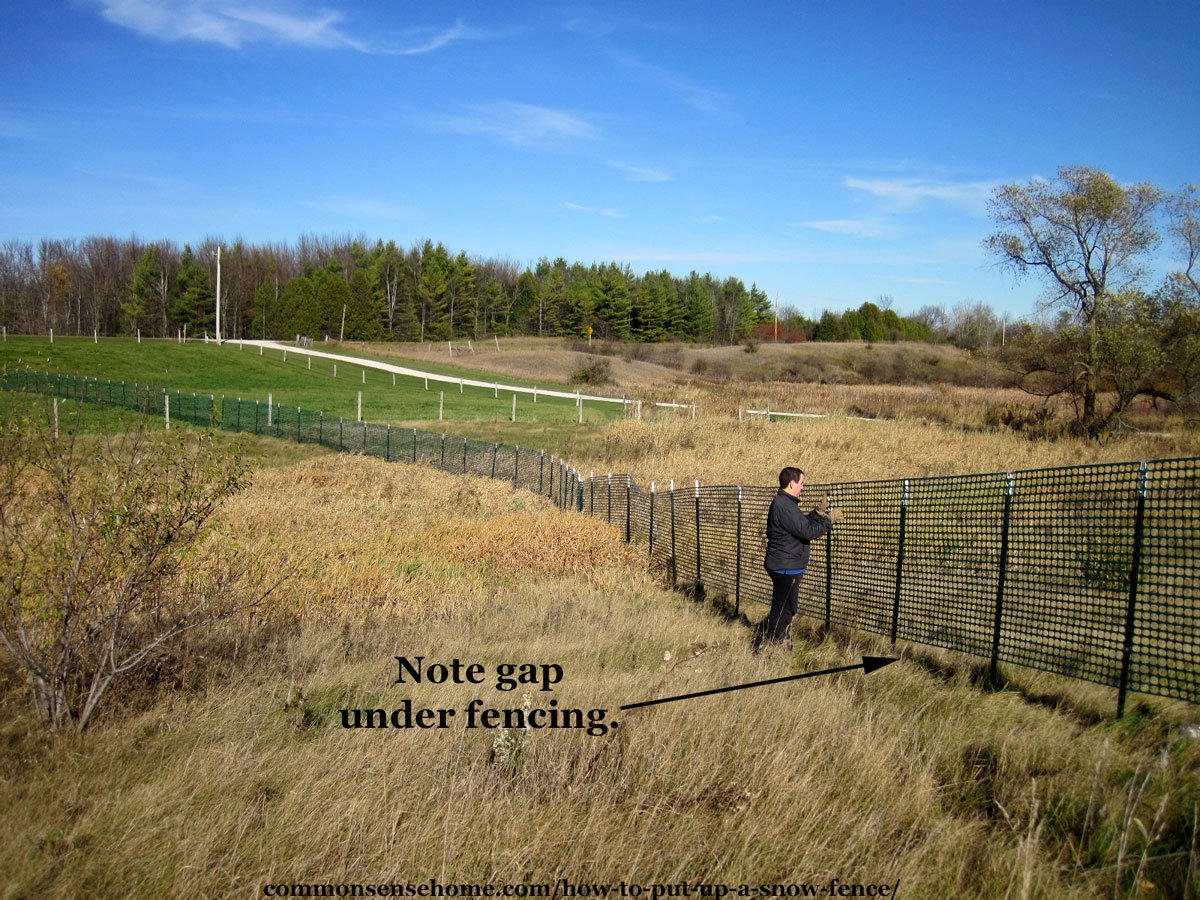
Don’t install the bottom of the snow fencing directly against the ground. We generally leave about 5 to 6 inches of open space under a four-foot fence. This allows air to move under the fence and helps create the airflow pattern needed to deposit snow farther downwind.
Keep tall grass and weeds in mind, too. If vegetation fills the gap, it changes how air moves through the fence. Mowing the fence line before installation makes the job easier.
4. Put the Fencing on the Windward Side of the Posts
Attach the snow fencing to the side of the posts facing the prevailing wind. That way, wind pressure pushes the fencing against the posts. If the fencing is installed on the opposite side, every strong gust pulls against the fasteners instead.
5. Stretch and Secure the Fence
Unroll the fencing along the posts and pull it reasonably snug. You don’t need to stretch plastic fencing like a guitar string, but you don’t want large loose sections flapping in the wind. Secure the fence at several points on each post.
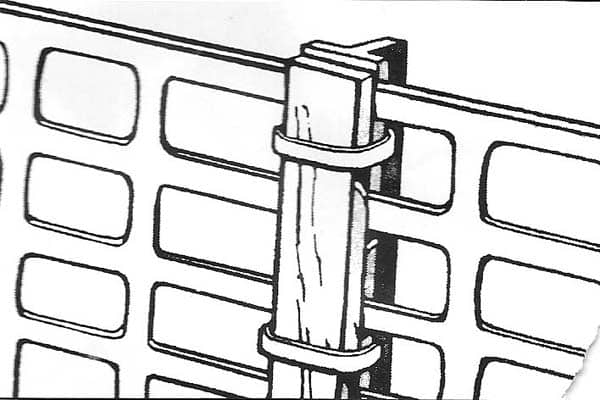
In high wind areas, it is highly recommended that the fence be sandwiched between the flat side of the metal posts and a 1″x 2″ wood slat. (See below.)
6. Check the Fence After the First Major Storm
Once you get a good drifting snow, take a walk outside and look at what happened.
- Where did the snow pile up?
- How far does the drift extend downwind?
- Is snow still reaching the driveway?
- Is one section of fence doing more work than another?
This information is more useful than blindly following a formula because it shows how snow actually behaves on your property. Take photos if you can (or drone footage). They’re handy when you’re setting the fence up again next year.
Does a Snow Fence Really Work?
Yes—when it’s placed correctly. We’ve seen a dramatic difference between areas protected by our snow fence and areas without fencing. Instead of snow sweeping across the open field and dropping into the driveway, much of it accumulates behind the fence.
In our case, we clearly see the drifting on the downwind side of the fence. The video below is from February 2019. (Please make sure adblockers are disabled so video displays correctly.)
The fence doesn’t eliminate snow removal. We still live in Wisconsin. It simply puts a lot more of the snow somewhere we’d rather have it. And when the wind is howling and the driveway stays mostly open instead of filling with a deep drift, that’s a worthwhile improvement.
Taking Down and Storing a Snow Fence
The fence comes down each spring once the main risk of heavy snow is past. We use a wire clipper to remove the zip ties, and gather them up for disposal. Then we roll the fencing and store it for the summer. We remove the posts and knock the dirt off.
We don’t leave the snow fence up all season, because the materials would degrade sooner due to sunlight and general weathering. Part of the fence goes through the neighbor’s hay field, so he needs access during the growing season.
Snow Fence Alternatives
A temporary snow fence isn’t the only way to control drifting. Depending on your property, other options include:
- Wooden slat snow fencing
- Permanent porous fencing
- Shrubs
- Evergreen trees
- Mixed tree and shrub windbreaks
- Existing hedgerows
- Strategic landscaping and earthworks
Permanent plantings take longer to establish, but they can provide benefits beyond snow control, including wind protection, wildlife habitat, privacy, and reduced heat loss around buildings.
From Snow Fence to Living Windbreak
A temporary snow fence can actually help with permanent planning because it lets you experiment before committing to trees that may be there for the next fifty years.
Watch where the snow moves. Notice which areas stay sheltered. Pay attention to wind direction. Then use those observations when planning permanent windbreaks.
Learn more about windbreak design.
This approach applies to more than snow fencing. Good homestead design starts with paying attention to what the land is already telling you.
Make Your Home More Winter Resilient
Keeping snow off the driveway is only one part of making winter easier. If you live where cold, snow, ice, and winter power outages are part of life, a little preparation ahead of time can save a lot of trouble later.
You may also find these helpful:
- Winter Preparedness Checklist – Simple steps to get your home, vehicles, supplies, and family ready before severe winter weather arrives.
- How to Stay Warm During a Power Outage – Practical ways to conserve heat and stay safe when the power goes out.
- How to Prevent Frozen Pipes – Protect your plumbing before temperatures plunge.
Winter preparedness doesn’t have to mean preparing for some dramatic disaster. Sometimes it simply means not having to shovel the same stretch of driveway three times after one windy snowstorm.
Build Resilience One Practical Step at a Time
Snow fencing is a good example of the way we approach preparedness at Common Sense Home. You don’t need to anticipate every possible emergency or change everything at once.
Look at the problems you’re most likely to face. Start with practical improvements that make everyday life easier. Pay attention to what works, and build from there.
That’s how resilience grows—from ordinary skills, useful supplies, thoughtful design, and small actions repeated over time.
If you’d like help deciding where to start, download our Common Sense Preparedness Quick Start Checklist for practical steps you can take this week.
Get the Common Sense Preparedness Quick Start Checklist.
And for a more complete approach to food, water, home and shelter, hygiene and waste, and developing a prepared state of mind, see Common Sense Preparedness: Building Resilience for Uncertain Times.
Have any questions? Leave a comment below.
About the Author

Laurie Neverman has a BS in Math/Physics and an MS in Mechanical Engineering. She and her family have spent more than 20 years building and adapting their northeast Wisconsin homestead for cold, windy winters. Their home and property incorporate passive solar design, wood heat, renewable energy systems, backup power, windbreak plantings, and several hundred feet of seasonal snow fencing.
Laurie is the author of Common Sense Preparedness: Building Resilience for Uncertain Times and the creator of Common Sense Home, where she shares practical ways to build a more resilient and abundant life.
Originally posted in 2015, last updated in 2026.
Our driveway is on the south side of our home. The neighbors to to the north of us never has much snow our driveway has drifts
And we are alway cleaning up. How far away does the snow fence have to be to help us.
HELP PLEASE
Where does your wind come from? For a snow fence to work, it needs to be some distance from the area you are trying to protect. 60 feet is recommended, but after seeing how the drifts build up behind ours, I’d say 30 feet upwind would be a minimum distance.
What if you only have a couple feet to play with off the drive and not 35′ or so?
Then unfortunately a snow fence is not likely to work very well, since it would slow and drop the snow in the area you want to keep clear – unless you could somehow make a deal with the neighbors for better placement.
Thanks Laurie
That is the plan…just thought there might be a ‘traditional’ tried and true way.
Anna
I really appreciate all the advice given here, but have a question on technique for handling the wooden stake fencing. Do you have a method for joining two rolls of wooden snow fencing in a neat and tidy way? The wire is so stiff to work with. I actually live in on a “Snow Free” west coast island, but am creating an art installation with red wooden stake snow fencing.
Thank you
Anna
ps my website will give you an idea of what I am doing
We’re not terribly focused on cosmetics here, given that the fence goes up and down every season. I’d probably overlap the end slats at the seam and wire or clamp them together.
I had the reddish wooden slat fence right next to my driveway and it CAUSED drifting. The Iowa DOT report says 35 times the height of the fence should be the distance away from the road/drive. That is what I am doing this year! The report also covers distances required when using multiple fence foes or if your wind direction is directly into your driveway (use an offset angle).
Yes, right next to your driveway would be a bad thing. That’s why this post very clearly details how far the fence should be placed away from your driveway.
LAURIE, I AM TAKING CARE OF MOM’S INDIANA HOME AND THE N/S DRIVEWAY IS A PROBLEM FROM THE WEST WINDS AND DRIFTING SNOW. I AM PAYING $25.00 PER CLEANING. LAST YEAR WAS COSTLY. DRIVE WAY IS 3 CARS WIDE AND MAYBE 6 TO 7 CARS LONG. BUT I DON’T UNDERSTAND UPWIND AND DOWNWIND. I HAVE NO TROUBLE SHOVELING BUT ONCE THE DRIFTS START I HAVE TO CALL IN THE PLOW TRUCK. HELP.
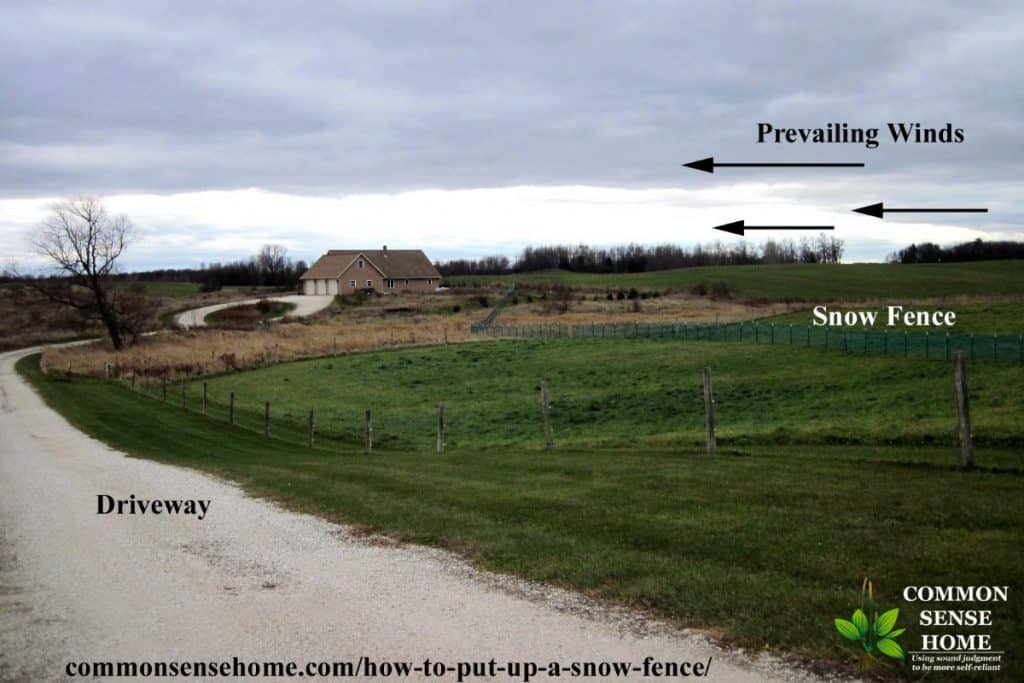
Look at the third photo in the post. See the arrows at the top right? The winds blow primarily from the west to the east, so the fence is placed west of the driveway so the winds will encounter the fence before they encounter the driveway.
So – which direction do your driveway blocking winds come from? Put the fence that direction from your driveway to block them before they get to the driveway.
Thanks so much for this! I am too old to be doing all that shoveling.
I hope this helps!
Hi Laurie,
I was very happy to find your web site and really appreciated the pictures. All of this agreed with other data from fence/webbing manufacturers.
My issue is more compressed. I don’t have 60′ to work with. I have a 1/2 acre lot with a south-end E-W-running drive and a 4’+ boulder retaining wall right on the south edge. In a blizzard, north winds prevail and I end up with 18-30″ drift/fill across the entire drive, effectively trapping the vehicles in the garage. When my blower is on the fritz (like this morning), my back suffers.
I might have 20-25′ to work with, before my front lawn slopes downhill steeply to the north. I have read that lowering the fence height would draw the drift in. So if I use an 18″ fence the resulting drift might just reach the drive at that kind of spacing, yes? But at that low height, would enough really be collected to avoid snow still drifting in the drive? I could live with 6-8″ drifts.
Am I basically out of luck with these compressed dimensions for applying some science to my problem? Either way, better blower maintenance is a must, apparently.
Thanks,
James
As you can see from the photos, the biggest build up will be close to the fence, so even 20-25′ *should* help keep some of the snow off your driveway. Personally, I’d probably opt for the 4 foot fence – 18″ seems way too short to bother with – and keep it at ground level to start the drift right next to the fence.
We put up wooden slat snow fence for many years on the farm, and when we got bigger tractors and buckets we discontinued. Now we are retired and no longer have the big equipment and just today I put a short plastic one to prevent the snow from swirling around the house in front of the garage. I made a slat sandwich at each post. The slats are the width of the t-post, 4 ft long with a 1/4 in groove and the depth of the notches on the post. I did not use zip ties, but recycled plastic baling twine wrapped in barber pole fashion. A bit time consuming but so is putting up snow fence.
Nothing wrong with working with what you have on hand. Thanks for sharing your experience.
Thanks for the info. My T posts have multiple rounded metal studs protruding from the side facing the plastic fencing. How would one fasten the wood slats as they would fall to one side or the other unless notched?
JW
We have bumpy t-posts, too, which is another reason we opted to skip the slats. Husband suggests that if you wanted to use the slats, you could attach on the opposite side at an angle – ugly, but at least you could get contact along the entire edge. He and the boys also attached the zip ties at an angle across the thick part of the fence, thinking that it might take more to tear. I didn’t do that last year.
What are your suggestions for putting two fences parallel to each other in high drift areas? Worth the effort and how far should spacing be between them? I also have an area that creates a “triangle -like” tunnel between a house, shed, and garden shed. Sometimes the snow piles here 10′ tall or more. Any suggestions on placement for this situation? GREAT information!
You’ll probably have to experiment with placement to see what works best with your layout. Maybe 30′ between, so you’re catching the first drift where it’s starting to taper?
Kim, the Strategic Highway Research Council link that Laurie references in the article has a lot of info. A couple of the things they discuss are using parallel fencing and deflecting the snow in “odd” areas
Thanks, John.
I have never thought about putting up a snow fence before, however, you suggest that this is a good option because it helps you redirect the snow piles and reduce the need for plowing. Thus, you can make the roadways around your home and community a lot more safe and potentially help reduce wrecks and injuries. Overall, it seems like this would be a smart option, so I will consider putting up around my home. Thank you for sharing!
While I don’t have the long driveway, (yet) my house sits in the middle of a bunch of fields, with absolutly no trees. I was considering this as a way to address the wind hitting my house, trying to cut my heating issues (old farm house… No insulation…). I got lucky (sorta) when I bought the house, and found a bunch of old wood-slat snow fencing. Is this a terrible idea? Do I need the full 60 feet from the house? Because there’s a road there… Sorry to seem clueless, but I kinda am
I don’t know how much it will help, but it shouldn’t hurt anything. It sounds to me like you’re more worried about blocking wind, and it wouldn’t be a problem if some snow stacked against the house because it could provide insulation. If that’s the case, less than 60 feet shouldn’t be a problem.
Awesome, thanks. Been looking around for the last few months, on and off, about if it might help etc, this is the clearest article I’ve read, and the only one anyone responded to me on. Appreciate it
Yeah, went I went hunting, I noticed the information was pretty skimpy and not well organized, too. I’ve seen them around, but never given much thought to best placement and the science behind the air flow. I need to update the post with some photos from last winter. It wasn’t a heavy snow winter like the year before, but I could still tell that the snow stacked up downwind from the fence. I had a heck of a time getting a decent shot of the white on white.
My wife and I bought our first “out of town” house in April of 2014. Last winter not only killed our snowblower but almost both of our backs as well. This year I’m planning to put up a snow fence but had no idea how to even begin it properly. Thank you for the great info in your post, I feel much more comfortable tackling this now, I also know that I don’t want the fence right next to my drive (as a friend had suggested).
Glad to be of help, Rob.
This type of fencing can be enormously helpful in snowy places, but I wasn’t sure about how difficult it was to install. I have been looking into this for a while without finding much incentive to actually act on my desire to build one. However, your article was very informative and clearly instructive; I think I will finally do this! Thank you for all of your helpful tips and professional advice.
After twenty years I have found that greater than 60′ is fine here in northern Michigan. Any closer and the post-fence drift eventually makes it to the drive. On bad years it still might make it. If you are planting spruces and such to take over the fence duties, plant them that far back too. I didn’t twenty years due to ignorance and now they’re too close, but still work OK. Where did you find the green snow fence? I’m sick of the ‘construction zone orange’. White would be even better.
I found the green snow fence at Menards. You’re not the only one who’s tired of the orange. We had someone pull in when I was working outside last fall and ask where we got it from, too.
Thanks for your article, Laurie. I have a couple of questions.
1. I noticed that you used the plastic netting for snow fencing. Are you able to discuss the difference between the netting and the traditional red stake wooden snow fencing? Would the wooden fencing need to be off the ground? I’ve not seen that fencing installed off the ground before.
2. 140 feet feels like a long ways away from my driveway. I’m thinking somewhere in the 50′ to 60′ range as my “problem spot” is a downhill sloping away from where the fencing would be.
Any observations you might have would be appreciated.
Bill
The weight of the wood fencing would make it extremely difficult to install off the ground. I do remember my grandmother’s wooden snow fence becoming buried in some winters when we had deep snow. Elevating the fence allows it to accommodate a deeper snow load more effectively.
We have wide open spaces with a big pasture just upwind of our driveway and strong winds, so placing the fence farther out seemed a better fit for us, but depending on your space, I’m sure the 60′ spacing would work fine.
Thanks, Laurie. I have plenty of room so will plan to run out to the 140 feet. Living in a high end subdivision, wooden fencing will be what we install, and I’ll have to work with it to get it off the ground about 5 inches. My biggest challenge will be placement as I’m trying to prevent drifting in an area that slopes away from the fencing. I have a feeling we’ll do our best at positioning this year and then adjust as needed next year. Thanks for sharing your insights. I’ll be back to see further discussions with other readers.
Getting the fence up off the ground makes the most difference when you have really deep snow, since it keep the fence from getting buried. Grandma always had her wooden snow fence right on the ground, and it still worked pretty well most years.
Thanks for the information! I need a snow fence around my property, but I’ve never installed one myself before. It’s good to know that I should use T-posts instead of U-posts. I usually use U-posts for my fences, but they’re not exactly load bearing fences. It makes a lot of sense to use T-posts for a snow fence to make it more load bearing.
I grew up in Utah, similar to your experience, our winters generally lasted for almost six months. I remember having fun as a kid and building snowmen, having snowball fights, all of that stuff. I was surprised when my family moved in my freshman year of college. The new house they moved to got easily twice as much snow as our old house ever got. I think it definitely would have been nice to know how to do this. If we would have been able to control the snow at least a little bit it would have been helpful. I guess I’ll just have to keep it in mind for the future.
We live next to a big open park. After a good windy snow my neighbors will have driveway showing. We on the other hand will have feet of snow drifted over ours. Years ago I discovered the benefits of a snow fence. Ours was installed just after Halloween running east-west almost along our lot line. It is approximately 35′ away from the drive and does a fantastic job. Saves me tons of time and a sore back because I do most of the snow removal.
Thanks for sharing your experience, Denise.
Your article of how to put a snow fence up is useless to my situation. I have a real problem, I have a 700 foot driveway and a good 300 feet or more is exposed to and open west field that blows east. My driveway sits east of field in a south to north direction. My driveway is approx. 10 feet wide and the width of my property where my driveway sits on is 36 feet. The west strip of land is 14 feet to 16 feet. Can a 4 foot snow fence effectively work on my driveway? If not what can I do? .
With that narrow of a strip of land, the physics of the snow fence won’t work. Is there any chance the neighbor who owns the field next to the driveway would let you put up a fence for the winter? This is what we do for the section of the driveway that is landlocked by our neighbor’s field. He runs cattle in there, but not once the snow falls. We put the posts up in fall, but with the warm start to winter, the cattle stayed in the pasture until the week before Christmas. We end up putting the fencing on as a storm blew in the Monday after Christmas. Not fun, but we got it up in time.
Otherwise, you’re going to need a snow removal option. If you don’t have a vehicle that can have a plow mounted, maybe you can make a deal with a neighbor who does. We hire our neighbor with the pasture to do our driveway when he’s doing his, since we have a van but no truck.
Laurie,
Your article on snow-fencing is a good one. I would add a couple of nuances that may be useful to your readers.
Your effective distance for the placement of fencing is good. 35 times the height of the fence is pretty widely accepted. The dynamics of snow fencing however is often misrepresented, and is worth mentioning. There are two zones associated with snow fencing. There is an area of deposit and a area of scouring. The trick for effective fence placement is to get the scour zone on your driveway. That scour zone starts at the 35 times the height of the fence (dependent on wind velocity). This is where the wind is now increasing, and in so doing it scours the snow off your driveway or road. For anyone wanting a more detailed and potentially boring explanation keep reading.
Snow being moved by wind is governed by the same factors as sediment in a stream or river. The faster the wind or water moves the more load it can carry. The load in the case of drifting is the snow. The faster the air moves (the wind blows) the more snow it is carrying. As the wind slows when it encounters a snow fence some of the load (snow) is dropped out. This creates the drift or what is called the pillow behind a snow fence. The capacity to transport a load has decreased so it deposits snow. The less understood part of this dynamic is what happens next. As the wind velocity begins to resume after the snow fence, the load capacity of the wind also increases. As the wind increases after having deposited it’s snow load it then begins to pick up snow, in effect scouring your driveway of snow. This scour zone is actually removing the snow from the driveway or road making for a “happy camper”. Now you are an expert on snow dynamics!
Thanks, Rich.