Harvest Right Freeze Dryer – Cost Analysis
This post may contain affiliate links. Read my full disclosure here.
Exactly how does a Harvest Right Freeze Dryer work, and what’s the most efficient way to freeze dry food at home? In this post, I share a review of how the Harvest Right Freeze Dryer works, breaking out the electricity use for each phase of the freeze drying cycle. Then we look at the electricity cost per load, and moisture content of different foods. I wrap up with my suggestions for optimizing load size in your Harvest Right Freeze Dryer.
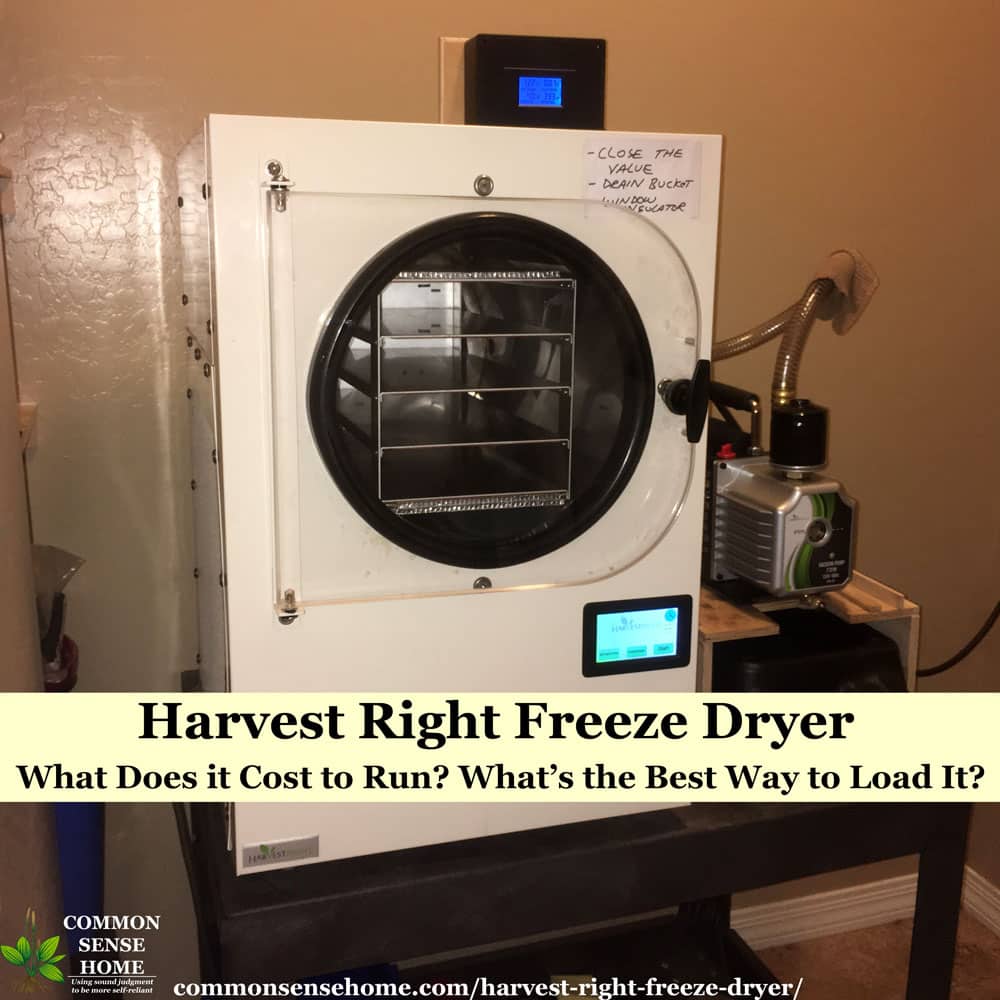
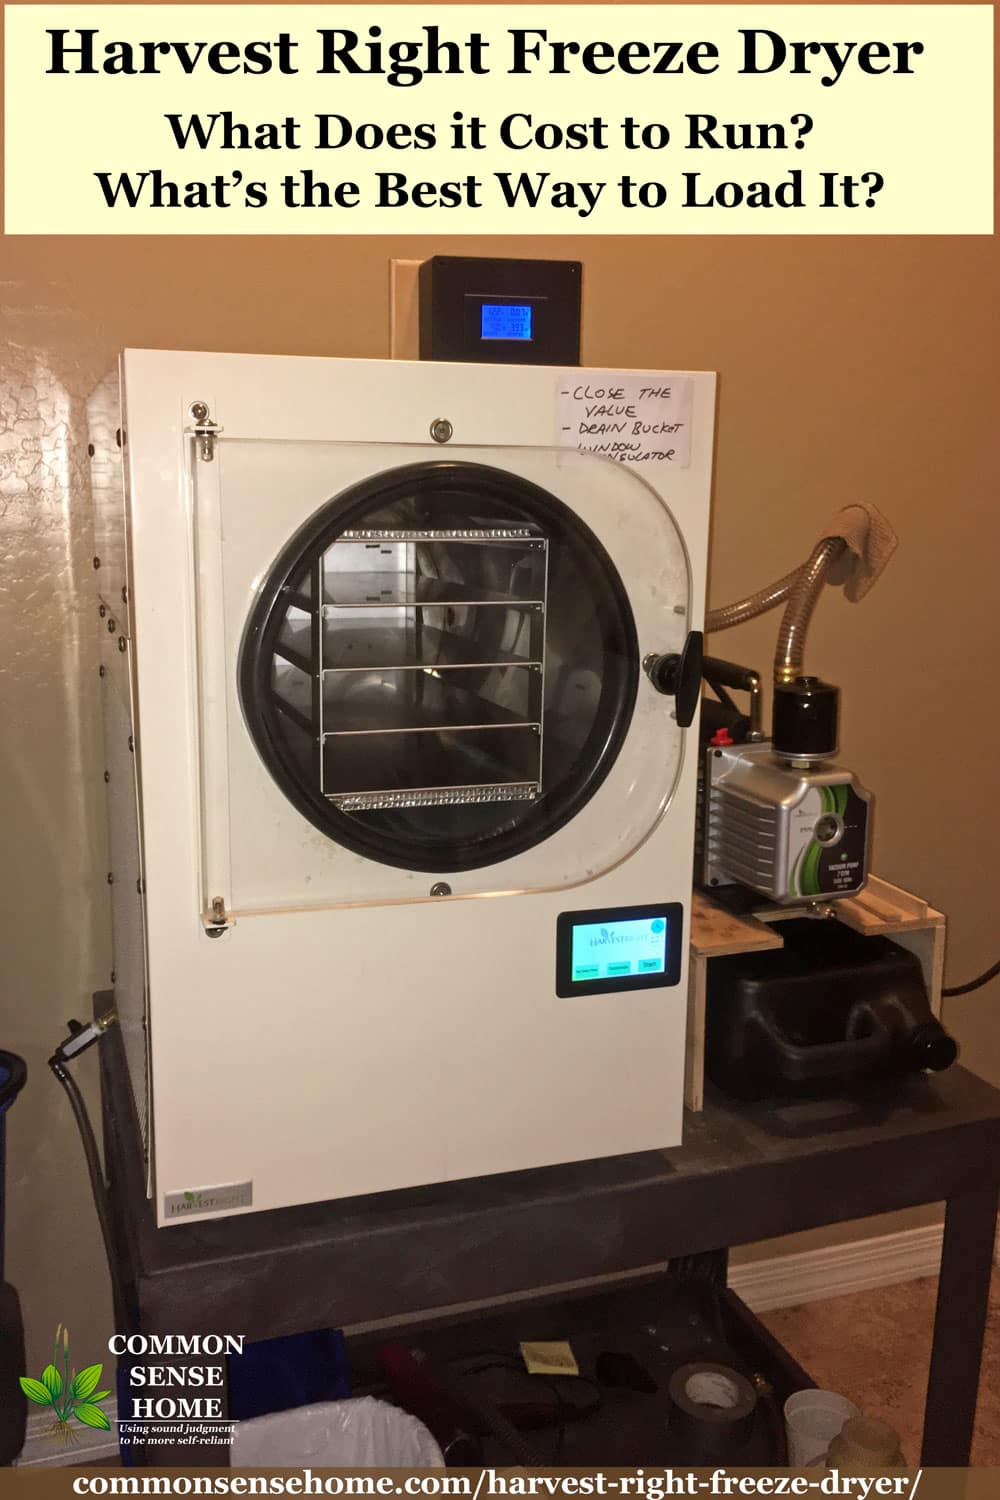
Some Background on my Harvest Right Freeze Dryer and Home Freeze Drying Setup
I purchased my Harvest Right Freeze Dryer in November, 2016. It is the middle sized unit as that was the only model offered at the time. I started with a JB Industries Eliminator Vacuum Pump, and have just switched to the new Harvest Right Pump. As of this writing, I have processed 101 loads of food through the freeze dryer with the JB pump.
The features of my setup include:
- It is located in our laundry room because of the noise. My wife would prefer in the garage, but I do woodworking there and it would get covered in sawdust.
- There is a “non-GFCI” dedicated 20 amp electrical outlet. Based on the data I’ve collected, I wouldn’t recommend a standard household 15 amp circuit. My dryer pulls over 16 amps at certain times during operation.
- To figure out electricity costs for freeze drying a load of food, I hooked up a power meter. The meter allows me to monitor voltage, AC current draw, power (watts) and electrical energy used (kW-hrs).
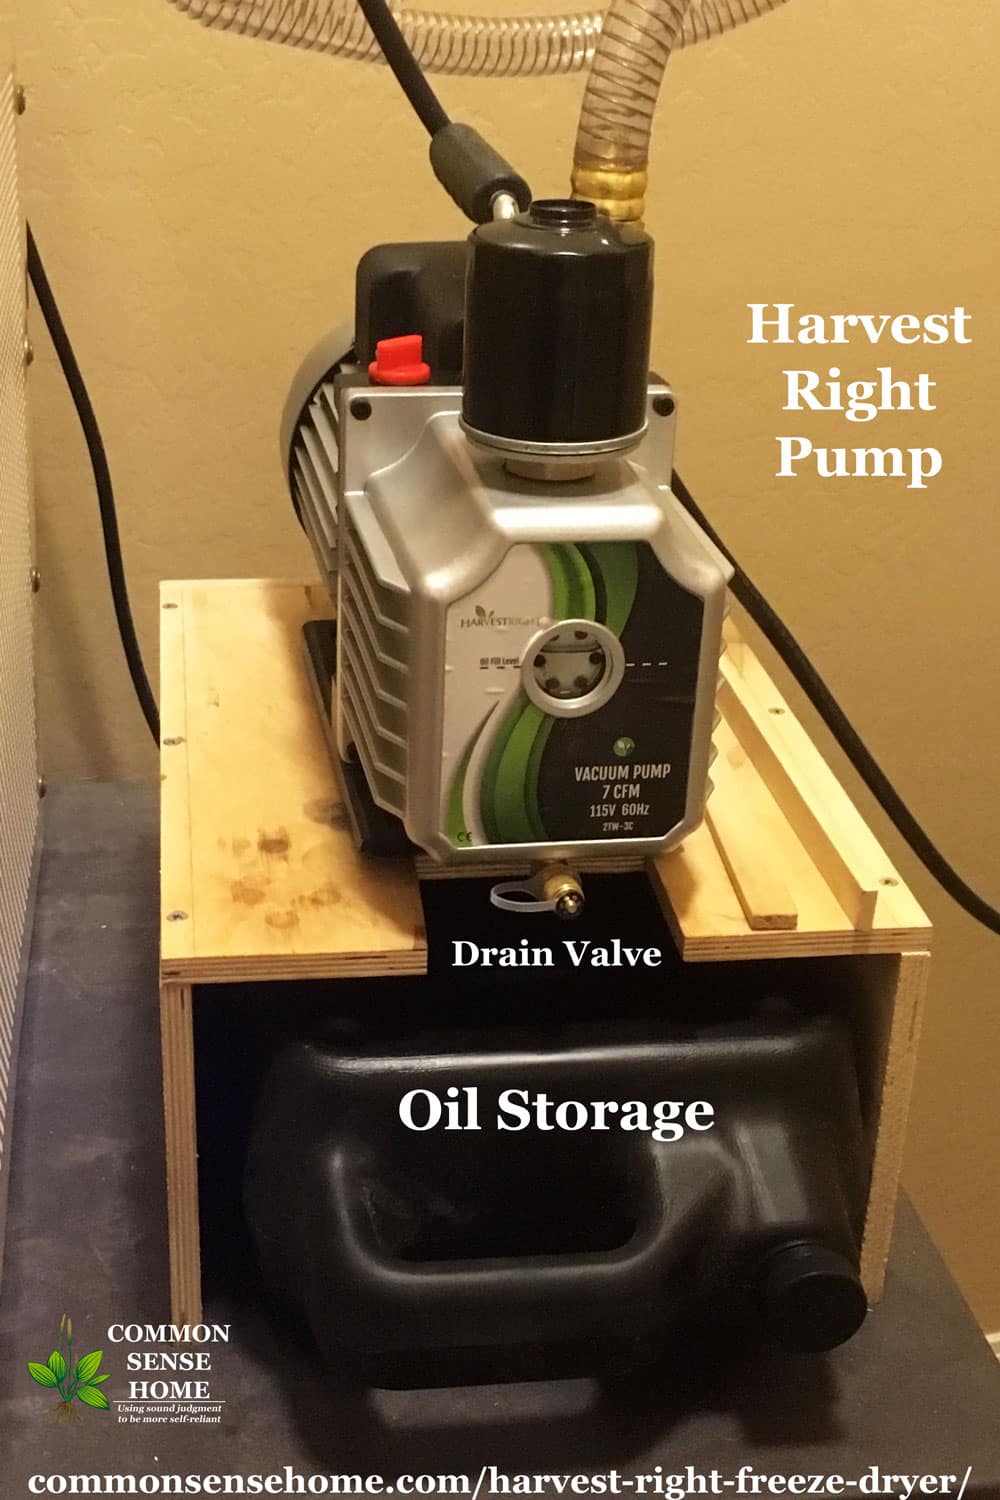
- I built a small wooden stand for the vacuum pump to sit on. This makes it easy to get to the pump drain valve, so I never have to move the pump. It also reduces stress on the vacuum hose from the dryer to the pump.
- I place a JB Industries oil collection tank (Model DV-T1) under the pump stand. When a load finishes, I drain the oil from the vacuum pump immediately. I remove the water from the oil and filter the oil after each batch. I have done this from the very first load and Harvest Right now recommends doing this.
- The dryer and the vacuum pump sit on a 25” x 37” plastic utility cart. The cart makes it easy to move around, if needed, plus it provides storage.
Review of Basic Harvest Right Freeze Dryer Operation Phases
The Harvest Right Freeze Dryer uses three different processing phases: freezing, drying and final drying.
1. Freezing
During the freeze cycle, the freeze dryer refrigeration cycle cools the vacuum chamber and the food to -40°F (also -40°C). (One day I plan to put a thermocouple in the dryer and check it, just for curiosity.)
The factory default for this phase is 9 hours. Harvest Right says you can reduce this to 7 hours, if the food is already frozen when placed in the dryer. I have never changed this process time in any of the loads of food that I have run.
2. Drying
When the freeze cycle is completed, the dryer turns on the vacuum pump. The front panel displays the pressure in the vacuum chamber in units of mtorr. (For reference purposes 1 psi is equal to 51715 mtorr.) The dryer does not display the actual vacuum level until the dryer pressure has dropped below 2500 mtorr (0.05 psia). It takes my dryer 4 minutes and 25 seconds to drop below 2500 mtorr. This time has been very consistent, within a few seconds difference for each load. The dryer continues reducing the chamber pressure until it reaches 500 mtorr (0.01 psia).
Sublimation
When the freeze dryer reaches 500 mtorr, it turns on heaters under the food trays. Ice at these pressures does not melt, but goes directly to vapor. This is called sublimation. The heaters cause the food to give off more vapor, which collects on the chamber walls as ice. The freeze dryer removes moisture from the food by turning it into a vapor. It then traps that vapor on the chamber walls as ice.
When the heaters are turned on at 500 mtorr, the vacuum pressure will continue to go down for awhile. Then it begins to rise, as the vapor produced by the heating of the food overcomes the ability of the vacuum pump to maintain vacuum level. When the chamber pressure reaches 600 mtorr, the heaters are turned off. However, the food is still warm and continues to give off more vapor. This causes pressure to continue to rise.
Depending on the type and amount of food in the freeze dryer, the pressure will increase to 750 – 800 mtorr. The food cools off (because the heaters are off) and the vacuum pump starts reducing chamber pressure again. When the chamber pressure reaches 500 mtorr, the heaters come back on and the cycle repeats itself. With a large load of food, my dryer initially has the heaters on for about 4 and a half minutes and the heaters off for about 20 minutes. This means that one cycle takes about 25 minutes.
3. Final Drying
After hours of repeating this heater on/heater off drying process, the food will have so little moisture left that the vacuum pump is able to keep the vacuum chamber below 600 mtorr even with the heaters on.
When the Harvest Right freeze dryer “brain” sees that the dryer pressure remains below 600 mtorr with the heater on, it switches to the Final Dry phase. This is another fixed time phase. The factory default is 7 hours. You can change this time using the touch screen, but I typically use the factor default.
During this final dry cycle, the refrigeration system continues to maintain a low temperature. The heaters are cycled on and off to maintain the temperature of the heated trays, rather than the vacuum chamber pressure as in the Drying Phase.
Harvest Right Freeze Dryer Electrical Usage
When I had my house built, put in a 20 amp “non-GFCI” outlet to run a freezer. I didn’t want the freezer getting shut off because I put too much load on a standard 15 amp household circuit and tripped the breaker. We never bought the freezer, so my Harvest Right freeze dryer is now connected to that outlet.
I use an electrical power meter to measure voltage, current draw, power (watts), and energy used (kw-hours). Power use for the freeze dryer is listed below.
Freezing Cycle
During the freezing cycle, my dryer starts out pulling 8.3 amps. It slowly reduces this to about 6.4 amps at the completion of the cycle. The dryer is using an average of 330 watts of power during freezing, and it takes approximately 3 kW-hrs of energy for the factory default 9 hour freezing cycle.
Drying Cycle
During drying, the freezer keeps the refrigeration system running, plus it turns on the vacuum pump, plus it intermittently operates resistive heater under the food tray shelves. My electrical meter is not a peaking meter, so I don’t get the instantaneous inrush current when the vacuum pump comes on. All I measure is the steady state value.
In any case, with the pump running and the heaters are off the dryer is drawing almost 13 amps. When the heaters are turned on the current draw goes up to just slightly over 16.1 amps. When the heaters are off the power used is about 625 watts. With the heaters on the power jumps up to about 1350 watts due to the resistive characteristic of the load. The heaters are on approximately 20 percent of the time and the average power consumed is about 725 watts. If the drying cycle runs for 10 hours the dryer would use about 7.25 kW-hrs during this cycle.
Would you like to save this?
Final Drying Cycle
The Final Drying cycle for the Harvest Right freeze dryer is very similar in electrical use to the Drying Cycle. The refrigeration unit and vacuum pump run continuously, and heaters are cycled on and off to maintain food drying temperatures. The average power consumption is still around 725 Watts. The 7 hour factory Final Drying Cycle uses approximately 5 kW-hours of electrical energy.
The following table summarizes the electrical current, power and cost of operation for each dryer phase:

Harvest Right Freeze Dryer Electrity Cost per Load
My cost to run a small load of food requiring 10 hours of drying time would be $1.57. I tend to run larger loads of food, as I will discuss in a bit, which typically take 18 hours to dry. My average electrical usage is 21 kW-hours/load and I pay about $1.90 per load, except in the summer time when my electrical rates go through the roof.
Moisture Content of Foods for Freeze Drying
I accurately weigh the food that I put into the dryer both before and after freeze drying to determine the moisture content of the foods I dry.
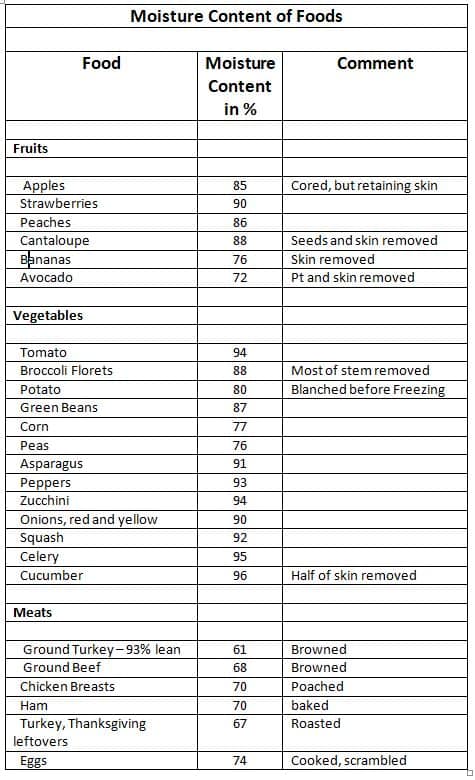
The following table gives the values for moisture content of the foods that I have measured. Fruits and vegetables are all dried raw (except as noted) and meats are all dried cooked. Cooking meats removes a significant amount of water. The moisture content in the table is the moisture content of the meats after cooking.
Using a Harvest Right Freeze Dryer Efficiently
My goal is to operate my dryer in such a way that I dry the most amount of food for the least amount of money and the least amount of operating time on the dryer. Just like your car, the more you operate your freeze dryer, the sooner it needs parts and maintenance.
There are many factors that probably affect dryer efficiency but I look at it this way:
- The Freeze and Final Dry cycles are fixed times and are not dependent on the amount of food put into the dryer. These two cycles combined take 16 hours of dryer operation for every load, big or small.
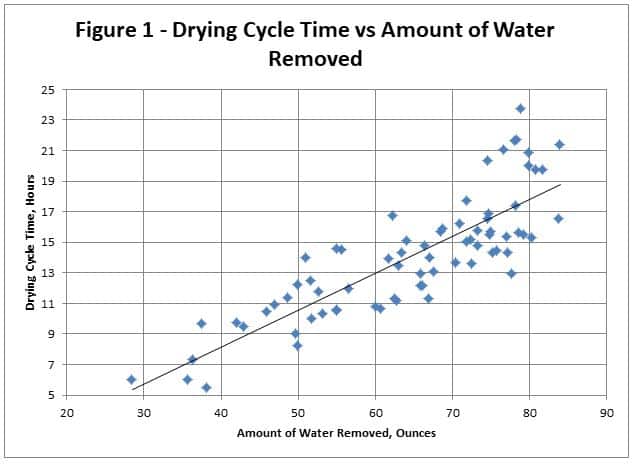
- If you double the amount of water that the dryer has to remove, it takes more than twice as long to remove that extra water. In the range of 40 to 75 ounces of water this effect is very small. (See Figure 1 for this data.) There is a lot of scatter in the data because I am drying all kinds of different foods, which have different textures. I’m sure that some foods dry easier than others.
- Below about 75 ounces of removed water, the drying time is pretty linear. Above this, the drying time seems to increase significantly. This may be because the ice formed in the dryer is coming into contact with the heating trays and is getting reprocessed. The Harvest Right manual warns about this. I have not run many loads above 80 ounces, but I am going to try to run some really large loads and see how long it takes.
Comparing Dry Times and Load Sizes
Using the data shown on Figure 1, we can compare the time it takes to dry 35 and 70 ounces of water. The drying times, on average, are 7 hours and 15.5 hours respectively. However when we combine the drying times with the fixed Freezing and Final Drying times things change significantly. The total time for all three cycles to remove 35 ounces becomes 23 hours and the total time for removing 70 ounces is 31.5 hours.
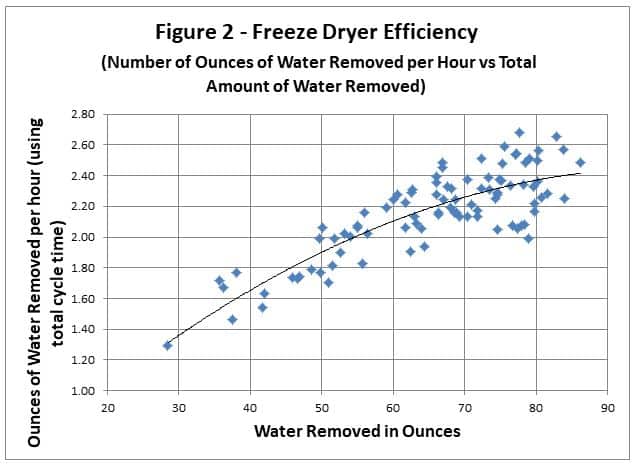
Running two 35 ounce loads would take 46 hours of total dryer operation or 14.5 hours more than running one larger load. To see this effect graphically I calculated the amount of water removed per hour of dryer operation and plotted this data which appears as Figure 2. More water removed per hour of operation is what I/we are looking for. Remember, that this is for total hours of operation factoring in the Freezing and Final Drying times as well as the Drying Cycle.
Optimizing Load Size
For my dryer, small loads of food result in water extraction rates of about 1.5 ounces per hour of operation. At 80 ounces of water removed the water removal rate has increased to 2.4 ounces per hour. However, the data shows that this effect is leveling off and probably doesn’t get higher than this. I expect that as I increase moisture content significant above 80 or 90 ounces of water the amount of water removed will start to decrease.
Looking at the shape of the curve in Figure 2, my dryer appears to be approaching maximum dryer moisture removal rate of 2.40 ounces/hour around 80 ounces of removed water.
Using the moisture content of food that I have measured in the past, I can calculate how much weight of any of those foods I need to put into my Harvest Right Freeze Dryer to have it extract 80 ounces of water. For example, poached chicken breasts have a moisture content of 70%. I can then load 80/.7 = 114 ounces of chicken breasts into the dryer and, on average, have the dryer extract 80 ounces of water. Doing this keeps me operating the dryer near the point of best efficiency. It also allows me to estimate with pretty good accuracy just how long the dryer will take to complete the total drying process.
More Information on Home Freeze Drying
There are several more posts about home freeze drying on the site, or you can go directly to the Harvest Right website for current pricing and other specification.
CLICK HERE TO ORDER OR LEARN MORE ABOUT HARVEST RIGHT FREEZE DRYERS
If you choose to purchase a Harvest Right freeze dryer through my site, I receive an affiliate payment at no extra cost to you. (Thank you.)
- Home Freeze Drying – The Good, The Bad and The Ugly
- 11 Freeze Drying Mistakes to Avoid for Best Storage Quality
- Dehydrator Versus Freeze Dryer – What’s the Difference?
- Harvest Right Freeze Dryer Oil Change and Filtering
This is a guest post by one of our Common Sense Home readers, Dennis Alexander. Dennis shared some detailed comments on the original Harvest Right freeze dryer review, so I asked him to share a little more about his experience with home freeze drying with the Harvest Right Freeze Dryer. – Laurie Neverman, editor
See also – Home Food Preservation – 10 Ways to Preserve Food at Home


in the drying phase, you said this cycle takes around 5 minutes, each cycle how much is the increase of temperature per cycle? And what is the final temperature in the drying phase?
The secondary drying is the vacuum and heater are working or just the heaters.
I don’t know the answer to your first two questions. You’d have to contact Harvest Right. In secondary drying the vacuum and heater are both still working.
In the second cycle is drying by reducing the pressure to 500 mtorr and turning on the heater, does in this cycle the refrigeration system is working along with the vacuum and the heater? And how many hours this cycle is?
And the final dry, what the difference between it and the previous dry ?
The vacuum chamber stays cold during the entire process. There are heaters on the trays, so the trays warm up and warm the food, but they don’t warm the entire chamber. Water sublimates out of the food and condenses on the chamber walls. This is the main reason that it’s not good to overload the freeze dryer. If you tried to do too large of a load, too much ice would build up on the walls.
The timing of the second cycle will vary depending on the load and the environment where the freeze dryer is located – how big the load it, how wet the load is, food size in the load, ambietnt temperature and humidity, etc. It can be a few hours or more than a day.
The final dry is similar to the main drying cycle, but the humidity sensors have registered that the moisture level of the food is down and drying will soon be complete.
Hi Laurie,
I was just squirreling over to your pages on solar to see how many kw you’re producing and/or if you’re still on grid. Have you been able to use the freeze dryer on solar with no problem, or do you also have grid running to back it up? We are trying to figure out if we can run a dryer on our solar setup for that length of time with the amp spikes and without draining our batteries below where we’re willing to go for longevity’s sake. We will be contacting our solar guy-who is really great and has been very helpful through multiple issues affecting solar, usage, output etc, but wanted to see what experience you’ve had with it.
Our new icf house (live in south central MO) finished fall ’21 (built with a lot of your aging in place suggestions and passive solar heating as well-thank you!!) is on a 12 kw solar system but high amp spikes from our well when we’re running a couple minisplit heaters has crashed our system a few times. (we don’t run the minisplits all the time-it’s more our backup heat, and a/c in the summer) My husband is going to change a breaker on the well so it doesn’t draw so much power at one time. We may have to go to a smaller pump…
Thanks so much for your website, and taking the time to share on it.
Maggie
Hi Maggie.
I wouldn’t recommend running a freezer dryer off of solar only, though your system is a little larger than ours (we have 10.5 kW in panels with a 7.6 kW inverter). We’re still grid tied here. While the dryer and pump are running, it’s a steady load, and most loads of food require 24 hours or more to process. There’s excess power in the day time if it’s sunny, but not at night.
When we had our freeze dryer plugged into the main garage circuit, we’d regularly trip the breaker if the freezer was also running and the garage door opener got used. We finally got a dedicated circuit just for the freeze dryer. There’s also a power spike when the pump kicks on. Our batteries regularly drain with just a few hours of normal evening use, so running the dryer overnight off of batteries isn’t going to happen.
Be careful with your well pump. You want enough head pressure to get the job done, and even pressure extends the life of appliances.
When I mentioned your mini split heaters to August, his first words were, “Don’t they have propane?” Heat pumps are great because they can do both heating and cooling, but they are power hogs, so that’s something to keep in mind, too.
Good luck on getting it all sorted out. It tends to be interesting troubleshooting problems that most folks have never seen.
It’s still running at 27 hours just went down to 500 still hasn’t switched over to final dry. I’m wondering if there is a problem. I’m going to retire for the evening but will probably check on it throughout the night.
If it is warm in the room where the dryer is, or there is sweetener in the sauce, or the trays are heavily loaded, a longer dry time is not unusual.
How full are the trays? How warm is it where the dryer is? Those two factors are very important to dry cycle times. I have a history of over filling trays. Temperature is not as big an issue for me because I have it in my basement but in the summer when my harvest is coming in and I am running it 24X7 it heats up my basement pretty good.
Thank you so much for all the info. I am so new to all of this and was really unsure if I should turn the machine off since it’s been running for 22.09 hours and is in the drying stage at 625 motor
I am doing bbq chicken. My unit is the midsized with the oil pump.
If it’s still running, let it do what it needs to do. It’s impossible to dry foods too much, so extra time is better than not enough time.
I am thinking of purchasing one of these machines so that I can make and sell camping meals, eg spaghetti bolognese, beef stew …
Would this machine be suitable or would it not be commercially viable for doing this?
People have used these units for small scale production. You’d need to check with your local cottage food laws to find out if you need permits or special facilities, like a certified commercial kitchen.
Thanks Laurie
Hi everybody, I would like to have some informations about where goes the water extracted from food, there is a container for it or something similar? I haven’t seen this information anywhere. thank you for the answers!
Hi Luca.
i can help you out. During the freeze drying process, the water turns to ice, and is deposited on the walls of the freeze drying chamber.This is why you don’t want to overload the freeze dryer, because the ice buildup would get too thick and interfere with the drying process.
Once the cycle is complete, the valve on the drain hose is opened. The water melts, and is drained into a bucket via the drain hose.
The freeze dryer has a two hour defrost cycle at the end of the drying cycle. Once the dried food is removed, you close the door and hit “continue to defrost”, and it warms the chamber to clear the ice.
If you don’t mind a slow defrost and want to save electricity, you can cancel the defrost cycle, open the door to the freeze dryer, and let it thaw naturally.
Once the unit is done defrosting, it’s best to leave the door open when not in use for good air flow into the chamber.
Wondering if you have any info on pre-freezing trays that fit into a grid for chest freezers that someone came up with to maximize prepping food for the Harvest Right unit.
I’m not sure I understand the question.
You can buy an extra set of of the trays themselves from Harvest Right. There are various folks making after market frames that the trays can fit on in a freezer. We usually just level freezer contents and set the trays in on top.
If you’re looking for a specific recommendation of what to buy, I don’t have one at this time.
I’m not sure I understand the question myself but I have a second set of trays and use the little gizmos that keep pizza boxes from crushing to use as spacers and stack them in my chest freezer. I might add I hate my chest freezer and I would love to replace it with an upright. I would never get a chest freezer again.
Good idea, Eric.
It should be noted that chest freezers are better if an area is prone to power outages, as they hold temp more consistently than uprights. We keeps mostly meat in the chest freezer and veggies and other more frequently turned over items in the upright. The upright frosts up much more quickly, too. We have to defrost that annually, but can usually go a couple years on the chest freezer.
I was talking to my brother, and he says they’ve finally got sheet steel manufacturing back on line for vehicles and appliances, so hopefully the backlog of orders on appliances will be improving soon.
Why not freeze dry the meat? The problem I have with a chest freezer is that stuff gets buried at the bottom and I don’t know what is in it. Now I only use it for prefreezing for the dryer. When I cleaned it out because I was getting the dryer I found venison from a deer I shot over 10 years ago. My dogs loved it! I have to stand on my head to reach the trays at the bottom. I might add I have to defrost it just as much as an upright because there is so much frost on the sides I can’t fit the trays in it. For liquids I put the trays in the freezer empty and then pour in the liquid.
We freeze dry some of the meat, but since it needs to be processed into small chunks off the bone for freeze drying, I prefer frozen meat for some recipes.
Interesting note about the frost. Not as much of an issue here.
I keep both my freezers organized into zones (shelves in the upright, with vertical dividers in the chest). Within zones, like products are grouped within bins or bags. This helps to avoid things getting lost in the shuffle.
Frost in a freezer can be the result of a bad, dirty, or worn seal around the door. Either the seal is bad or the freezer may be too full and something is stopping the door from shutting tight. Frost and/or ice build up on the sealing surface can also cause more frost build up. Every time I close my freezer, I do a “soft” tug on the door to see if there is resistance to opening. If the resistance is there and it doesn’t easily open, I know it sealed good.
During the freeze cycle, does the refrigeration unit not run continuously? I was under the assumption that it ran non-stop throughout the FD process. If it *does* run continuously, the power consumption you cited is low. Even at 6.8A, the power should be 760W on the low end. Average would be a little higher.
Hi,
Why are my trays warm or super cold when the cycle is complete?
I haven’t seen this specifically documented anywhere, but the unit does cycle through hot and cold temps to cause sublimation, so I would suspect that it’s a matter of where it hits in the cycle that determines whether your trays are hot or cold when the moisture sensors say the food is ready.
Dear Harvest team,
I’m using scientific Harvest Freeze dryer, could you please tell us, for how low this tools could be running without stop, or at what time We should stop it after so many load profile run?
thanks,
You’d need to contact Harvest Right about this directly. I’m just a product owner, as is Dennis.
Awesome detail. Sending to SO to hope convince him to how awesome these are!
The numbers are likely to be even better now with the new software upgrades that make the old units perform very close to the newer ones. I’ll be updating my unit shortly and giving it a go. Our temps have been so cold here in Wisconsin (still below zero overnight) that I can’t run my freeze dryer at the moment, as it is out in the garage.
How do you update?
You can contact Harvest Right for the update, or I can email it to you with installation instructions.
Hi, I am considering a Harvest Right machine. I have a number of chest freezers. Could there be a benefit in freezing product first in our chest freezers and transferring into the machine in batches, giving the product a head start? Plus we have a lot of product to freeze dry and storing in a freezer will help preserve the freshness? Thanks for your guidance.
Pre-freezing can save a little time, but the freeze dryer gets much colder than a conventional freezer, so I wouldn’t trim more than two hours from the freeze cycle with most foods.
The new units that came out in late 2018 (after this was originally published) have cut the freeze drying time significantly. I’m not sure what the default cycle times are now, because I don’t have a newer unit.
Once freeze dried, the food is extremely dry and does not require freezing. The only case where freezing might be helpful is if the freeze dried food had a fair amount of oil. Freezing could potentially extend the shelf life in that case.
The new dryers have an additional cycle that turns the vacuum pump on at 0 degrees and uses the vacuum to speed the freezing process from 0 to -40. Pre-freezing saves about 9 hours off of a cycle.
Yep. Same general principles apply, even though Dennis hasn’t updated the article.
Hi Laurie,
VERY good article! Especially the science you put behind it. Especially the before and after weights. The new model says it completes the cycle 25% quicker – did they change the freeze times? I live in FL and after the last two years with hurricanes I am looking at getting one of these. Is the oil-free vacuum pump worth the cost with lower maintenance – such as changing/filtering the oil?
The stats are all Dennis. He’s been talking to Harvest Right about the new freeze dryer. I know there’s been a software change, but I haven’t gotten the full scoop and how and where the time’s been cut.
Changing the oil is not difficult, but it does take some time. It’s really a matter of personal preference. I know many people in the groups are raving about them, since they are also a little quieter in addition to being easier to maintain.
If I buy a unit with the oil filter, can I buy an oil-less on later and just switch it out?
Absolutely. The pump is separate from the main body of the machine.
I’m considering buying a large unit with the oil less pump. Is the pump truly maintenance free? I have concerns about drying raw meats. Do you need to trim all fat from meats? And can those meats now be put on a shelf unrefrigerated? Is the shelf life good for 25 years? I saw a video of someone trying sausage that ended badly with fat coating the inside of the unit.
I haven’t invested in the oilless pump yet, but so far I’m hearing good reviews.
As for the meats, I personally would opt for cooked over raw for long term storage. It’s just an extra layer of protection, and if you need it for emergency food, cooked meat is a “heat and eat” or eat right out of the container option. In theory, you could freeze dry raw meats for long periods of time – but I like to be extra careful.
The shelf life estimates for best meat quality are more in the 5-10 year range than 25 year range, as it is difficult to eliminate any trace of fat and that’s your fail point. I tried freeze drying cooked sausage patties and ended up coating the inside of my unit with grease, too. Big mess.
Once freeze dried, yes, the foods are shelf stable and do not require refrigeration. For best quality, they should be stored in a cool, dry location. You wouldn’t want to stick them somewhere with a lot of moisture or large temperature fluctuations.
The 25 year storage life with good quality is more likely for naturally fat free foods like fruits and vegetables.
I have done meat a couple times, and shrimp. I noticed that some of the meat took on a very gamey flavor. Have you experienced this? How do you cook it? I would assume that the cooking method would make a difference.
I haven’t done seafood, only beef, pork, ham and chicken. I didn’t notice any particular gameyness, but it does intensify whatever flavor the meat has before it is dried. We stick to cooked meat, seasoned for specific recipes, and cut or ground into small or thin pieces to minimize drying time.
Hi Laurie.
Did your energy consumption changed after the new pump, because the eliminator has a 1/2 HP, while the new one is a 3/4 HP? Also did it made the new bacthes faster?
I didn’t notice a change in energy consumption. Loads do seem to dry a little quicker. We are fairly light users – say one or two loads a week – not like some folks who keep their units running virtually non-stop. I only have so much room for storage, so we preserve more as we use up what stored.
Yes, the 3/4 HP will consume more power, but it’s not a significant cost. About 50% more power. That’s about 185 watts more. So, the new pump adds about 1kW more cost (10 cents, roughly) every 5 hours the pump is running.
Thanks, Sherri.
In order to be sure that the load is fully dried, at the end of the standard cycle I weigh each tray on a kitchen scale reading in grams. I note the weight on a tablet that I keep by the freeze dryer. I then put the trays back into the freeze dryer and run an additional 2 hours of drying. At the end of the time, I reweigh the trays. If the change is 1 gram or 0 gram, I consider the drying complete.
This process has saved me a number of times from packaging food that is not fully dried.
Have you ever tried a moisture meter or infrared camera? I’ve had those options suggested by others. The camera seems like it would be easiest, as you just snap a photo of the trays and look for cold spots.
What moisture meter do you suggest? I’ve been trying to find one for food, but I’m only seeing huge, spendy industrial meters.
I don’t have a moisture meter, other than the type that fits on a mason jar, but maybe something like this one, which is supposed to work on many different types of materials, would get the job done?
Thank you so much for taking the time to help me with this!
You’re welcome.
I have only completed 6 loads with my dryer. Each time I drain and filter the oil. My last load the oil came out of the pump dark grey almost black. Has anyone else experienced this? I am using the brand of oil that came with my unit (robinair). Any thoughts would be much appreciated.
What did you process? Different types of foods can make the oil darker.
Sorry for the delay, I missed the notification that there was a reply. I believe it was sweet potatoes. I have drained the oil and started with fresh oil since then and still it is very dark and smells almost burnt. At this point I am hesitant to use the dryer, I have reached out to Harvest Right but have yet to hear back.
Have you cleaned the pump and inspected it? I’ve done sweet potatoes and had no issues. It’s odd that you would be having trouble so early on, but with so many units shipping things do happen. Do you have the JB pump or the newer model? The JB has interior parts that do tend to corrode with use – a splash guard and some screws. You can order replacement parts from third party suppliers.
Betty shows how to replace the splash guard in this video: