Gingerbread House Recipe (That Actually Holds Together)
This post may contain affiliate links. Read my full disclosure here.
Our family has been making gingerbread house recipes for over 50 years. As a girl, I helped my mom and sisters craft beautiful elaborate designs. Local stores would hold gingerbread construction contests, and we entered every year. We’d brainstorm around Thanksgiving, and spend weeks creating elaborate designs.
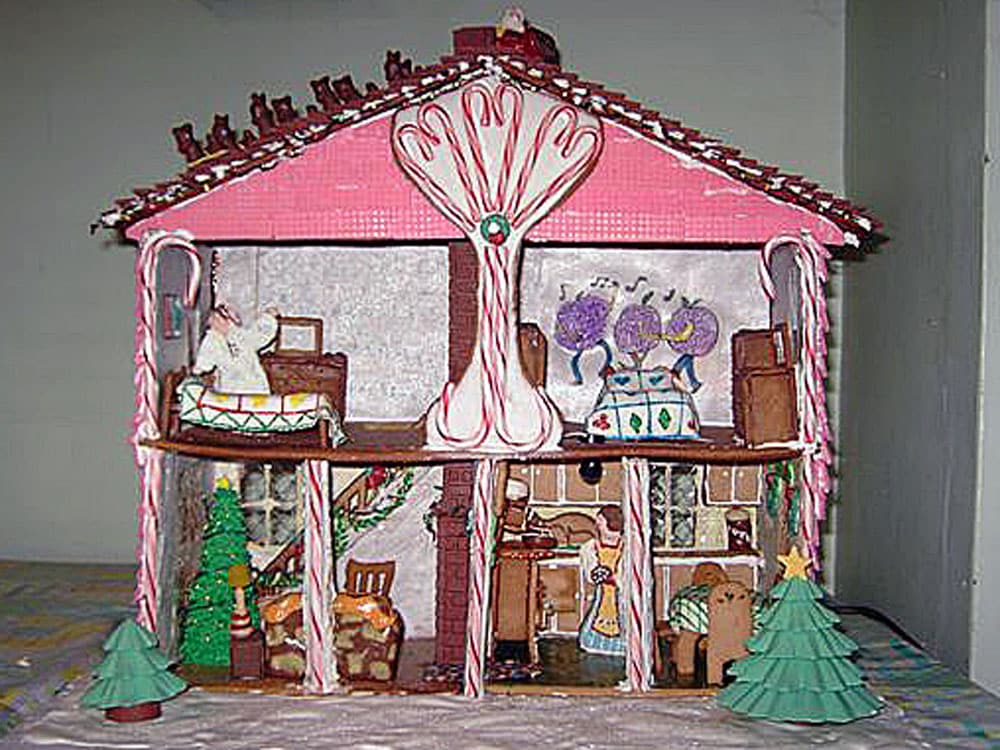
We made Santa’s Workshop, log cabins, snow-covered farmsteads with barns and animals, and even a gingerbread merry-go-round on a moving carousel. (That was my sister Lois’s idea.) One year they made a dollhouse style gingerbread creation with a Night Before Christmas theme.
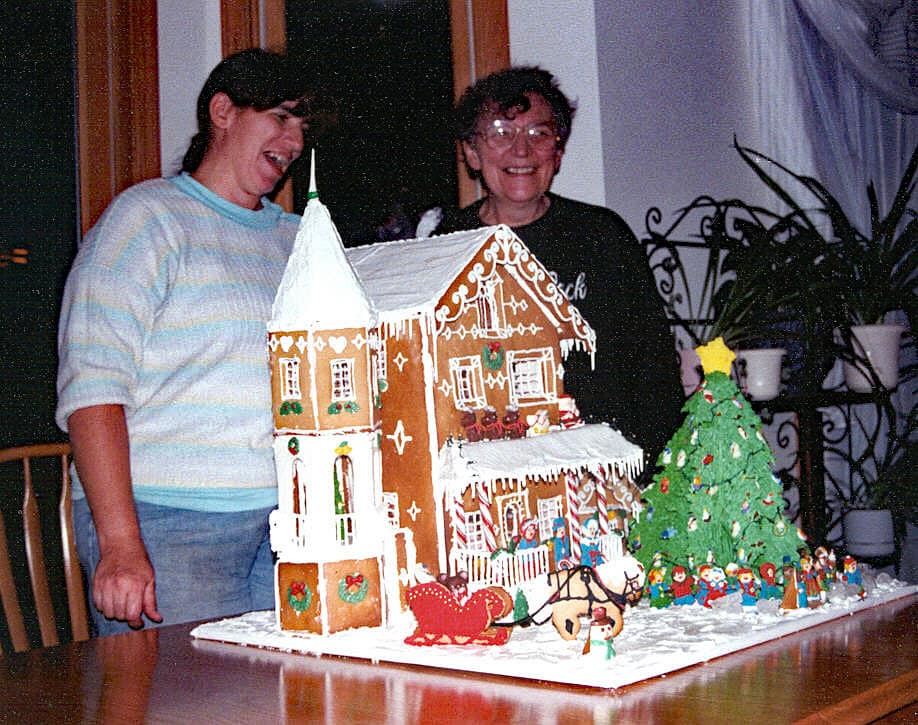
Another year we made a Victorian style gingerbread house that was raffled for a local Christmas tour of homes. With these big construction projects, we used melted sugar to connect the pieces. That can be dangerous work, so I stuck to royal icing for our current project.
Fast forward to 2025, and mom’s been gone for over 15 years now. The stores don’t hold gingerbread house contests anymore, and it’s been a while since we’ve built one. Since I talk about gingerbread in the 12 Days of Christmas email series, I decided it was time to build again.
We adapted a pattern and recipe from The Gingerbread Book. Years ago, we used to use a corn syrup recipe since it was more budget friendly. This year we used a molasses based recipe for more flavor. I’ve included both below.
If you like, you can use different gingerbread types for different colors on your gingerbread house. Make half batches and mix and match pieces, or make two houses.
Table of Contents
- Before You Make a Gingerbread House Recipe
- Gingerbread House Recipe
- Equipment You’ll Need
- Step 1: Mix the Gingerbread Cookie Dough
- Step 2: Prepare the House Template
- Step 3: Roll and Cut the Gingerbread Pieces
- Step 4: Bake Until Firm and Lightly Browned
- Step 5: Make the Royal Icing (Your Edible Cement)
- Step 6: Assemble the Gingerbread House
- Step 7: Decorate Your Gingerbread House
- Make-Ahead Tips
- Troubleshooting Common Gingerbread House Problems
- Can You Eat a Gingerbread House?
- A Family Tradition Worth Keeping
Before You Make a Gingerbread House Recipe
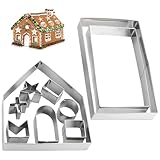
If you want to make a bigger gingerbread house from scratch, that’s a project for older kids and adults. For the youngest kids, graham cracker “gingerbread houses” are a simple option. The next step up is kits with pre-baked pieces. You can also get cookie cutter sets that allow you to quickly cut house pieces out of any sturdy dough.
I recommend using a sturdy portable base to build your house on. That way, you can easily move it around to work on (or temporarily move it out of the way). For our project, we covered a large cutting board that we rarely use with freezer paper. Several layers of cardboard works well for smaller projects, or a plate.


It’s best to allow plenty of time for this project. Bake the pieces in the morning, assemble in the afternoon, decorate the next day. Or bake one day, assemble the next day, and decorate the next day. The cookies need time to cool after baking, and the assembly icing needs time to dry to keep the structure stable.
Unlike soft gingerbread cookies meant for snacking, gingerbread house dough is intentionally firm and low-spread. That’s what keeps walls straight and roof pieces flat. You can still eat the house, but it’s crunchy. I like to soak the pieces in coffee.

Gingerbread House Recipe
You can bake this gingerbread house recipe to give it as a gift, or enjoy it as a cozy winter kitchen project. The firm dough and royal icing will keep this holiday decoration in good condition for weeks.
Dry Ingredients
- 8 cups all-purpose flour
- 2 teaspoons ground cinnamon
- 2 teaspoons ground ginger
- 2 teaspoons nutmeg
- ½ teaspoon salt
Wet Ingredients
- ¾ cup butter, softened
- 1/2 cup brown sugar, packed
- 1 3/4 cup molasses
This gingerbread cookie dough is sturdy but workable — exactly what you want for construction baking. It also smells wonderful. The whole house smelled like gingerbread on baking day.
Equipment You’ll Need
- Stand mixer (or large bowl and sturdy spoon)
- Rolling pin
- Baking sheets
- Parchment paper
- Sharp knife or pizza cutter
- House template (printed and cut out)
- Plastic wrap
- Cooling racks
- Piping bag and decorating tips (or zip-top bag with corner snipped)
Step 1: Mix the Gingerbread Cookie Dough
In a large bowl or stand mixer fitted with the paddle attachment, combine flour, cinnamon, ginger, nutmeg, and salt.
In a 2 quart saucepan, stir together molasses, brown sugar, and butte. Cook over medium heat, stirring occasionally, until butter is melted and ingredients are well mixed.
Pour liquid mixture into flour mixture and stir until well blended. Form into a ball and knead until smooth and pliable. The dough will be thick — that’s intentional. Add a tiny bit of water, if needed, to bring the dough together.
Divide the gingerbread cookie dough into two or three portions. Flatten into disks, wrap tightly in plastic wrap, and refrigerate for at least 1 hour, or up to overnight. Chilled dough is easier to roll evenly and prevents spreading.
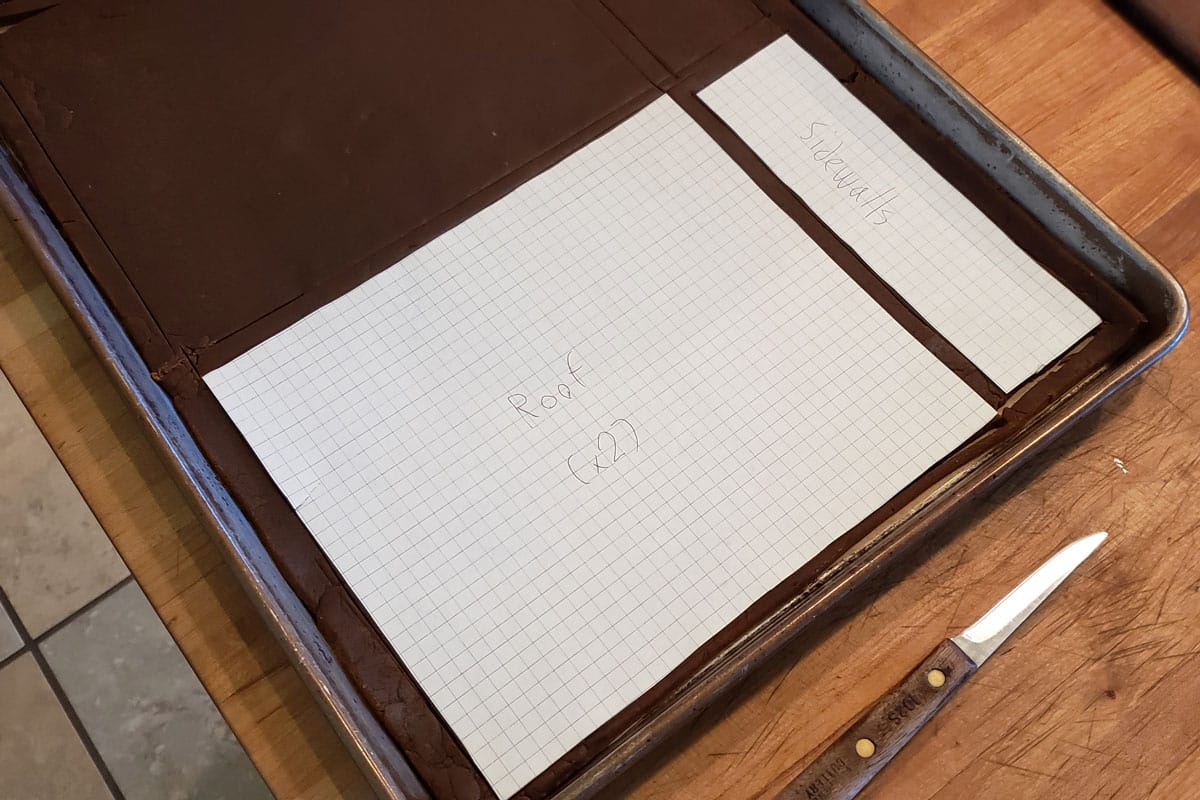
Step 2: Prepare the House Template
While the dough chills, prepare your house template. You can design your own or print one online. Suncatcher Studio has simple printable templates similar to the one we used.
A basic template includes:
- Two side walls
- Front and back walls
- Two roof pieces
Cut templates from cardstock or paper and set aside. A good house template is essential for evenly sized gingerbread pieces that fit together cleanly.
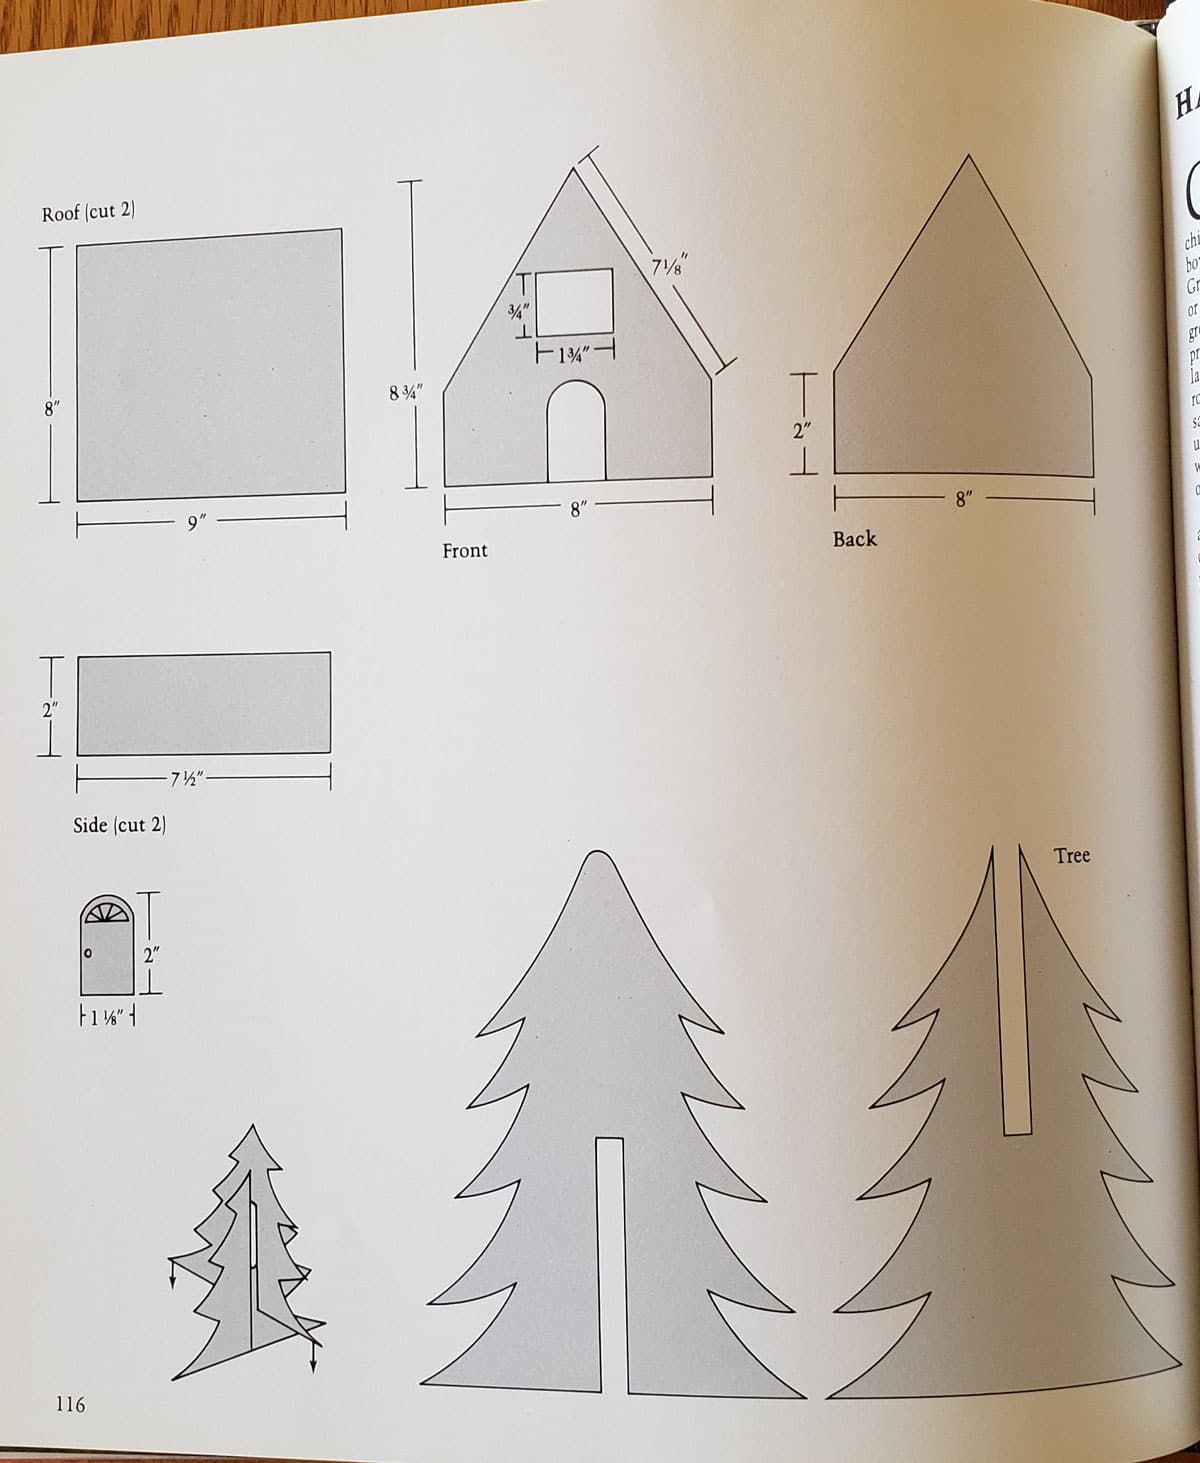
Our house dimensions:
- 8″x9″ roof pieces (cut two)
- 8 3/4″ high front and back, 8″ wide, with 2″ straight section at bottom edge (cut two, one with door and window)
- 2″ x 7 1/2″ side wall (cut two)
We kept the cut out door and window parts to attach to the house in an open position.
Step 3: Roll and Cut the Gingerbread Pieces
Preheat the oven to 350°F.
Line baking sheets with parchment paper. Lightly flour your work surface and rolling pin, or roll out the dough directly on the parchment.
Roll the dough to ¼ inch thick (slightly thicker is fine for larger houses). Keeping a consistent inch thick measurement helps ensure even baking and sturdy walls.
Place the house template pieces on the dough and cut around them with a sharp knife. Transfer pieces carefully to the baking sheets, leaving space between each piece.
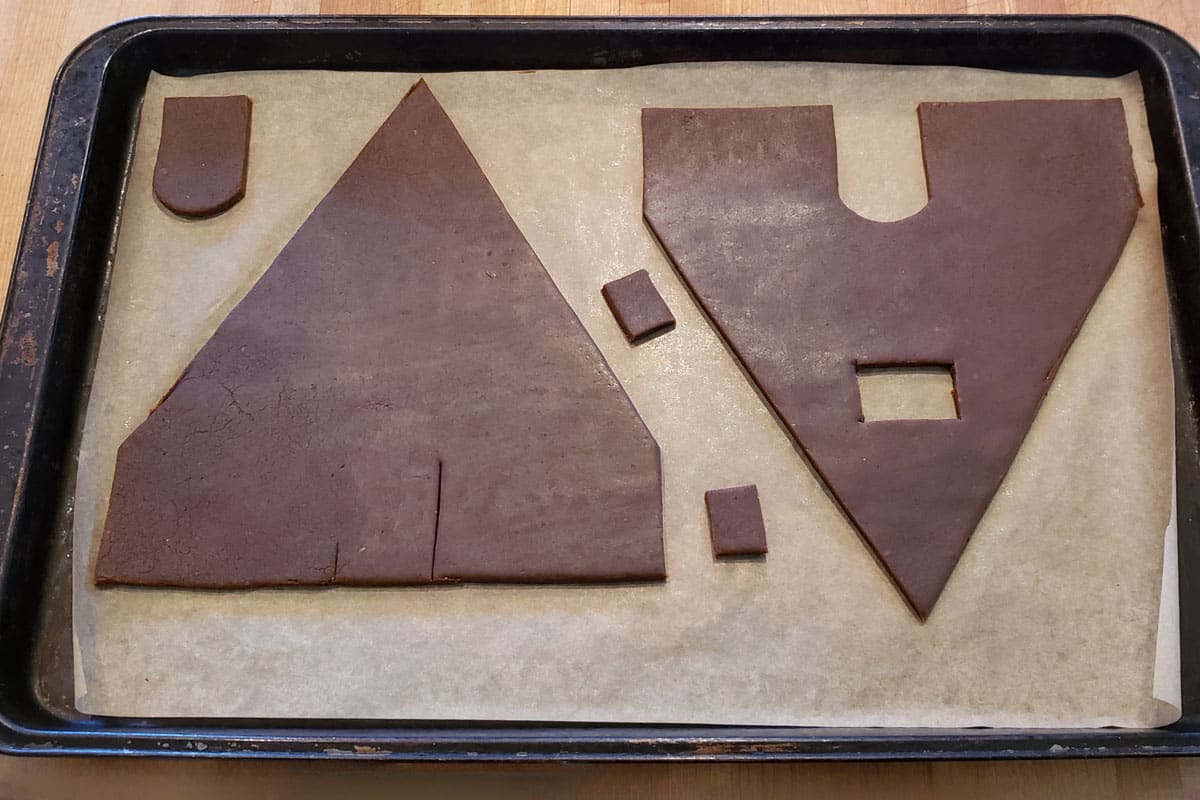
Re-roll scraps as needed, lightly flouring to prevent sticking.
Step 4: Bake Until Firm and Lightly Browned
Bake gingerbread pieces for 12–15 minutes, depending on size and thickness. You’re looking for pieces that are:
Would you like to save this?
- Firm to the touch
- Lightly browned around the edges
- Flat and evenly baked
If dough puffs slightly during baking, you can prick the bubbles with a fork. We put the slightly bubbled side facing inward on the gingerbread house.
Allow pieces to cool completely on the baking sheets before moving. Warm gingerbread is fragile; cooled gingerbread is strong.
Step 5: Make the Royal Icing (Your Edible Cement)
Royal icing is what holds everything together. Don’t substitute here — this is structural.
Royal Icing Ingredients
- 1 pound powdered sugar (confectioner’s sugar)
- 3 egg whites
- 1/2 teaspoon cream of tartar
- 1 teaspoon vanilla extract (optional, if you’re planning to eat the house)
Beat ingredients together in a stand mixer for 5–7 minutes until thick and glossy. The icing should hold stiff peaks.
Transfer icing to a piping bag or zip-top bag. Keep unused icing covered with plastic wrap to prevent drying out, or cover your icing bowl with a damp towel. I like to stick the end of my piping bag in the damp towel when not in use, so it doesn’t dry out.
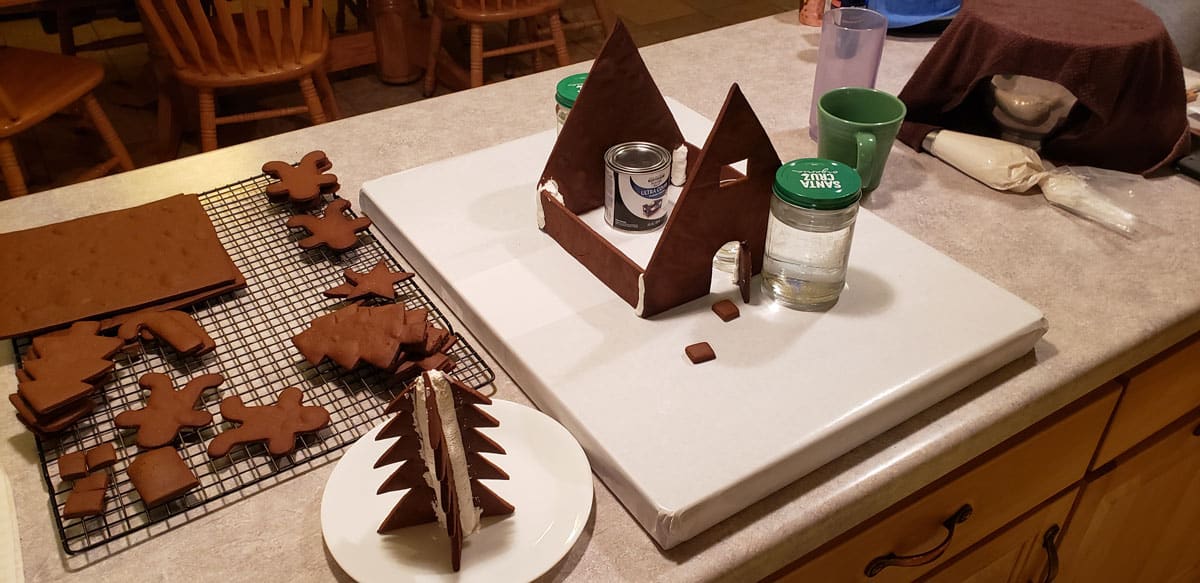
Step 6: Assemble the Gingerbread House
Assembly works best in stages.
- Build the walls first
Pipe a thick line of royal icing along the bottom edge of one wall and press it onto the base. Add adjoining walls, piping icing along vertical seams. - Let walls set
Allow walls to stand for 20–30 minutes before moving on. Royal icing firms quickly but needs time for strength. - Add the roof
Pipe icing along the top edges of the walls and gently add the roof pieces. At this point, I like to put props in place to hold everything steady. - Let the structure dry
Allow the assembled house to dry for at least an hour before decorating. Overnight is even better. By the next day, that frosting will be absolutely dry and stable.
This staged approach prevents collapse and frustration.
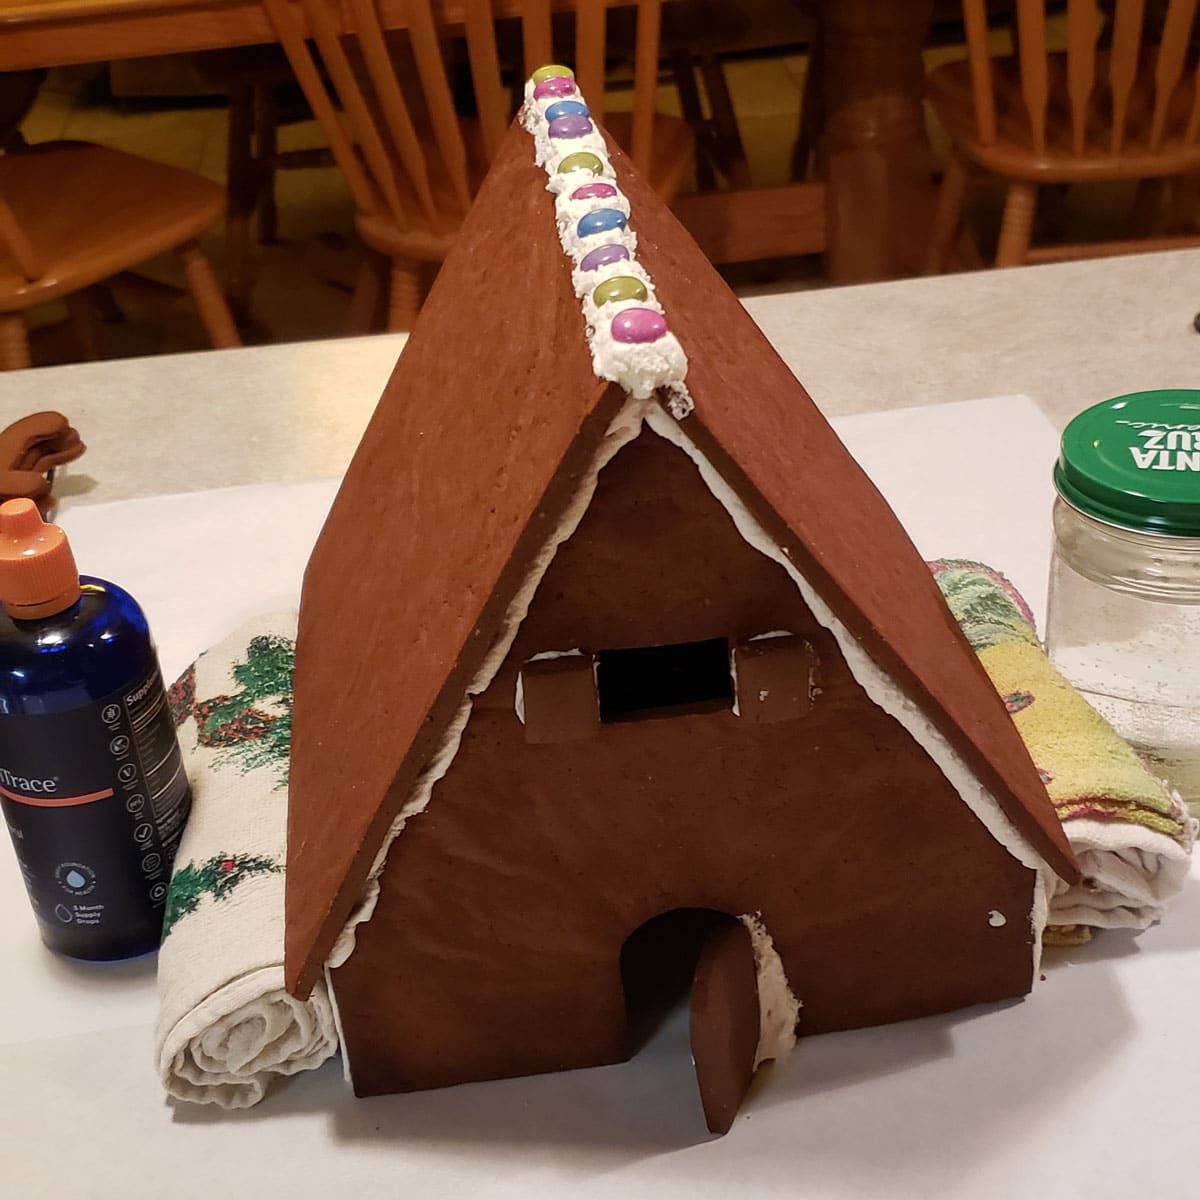
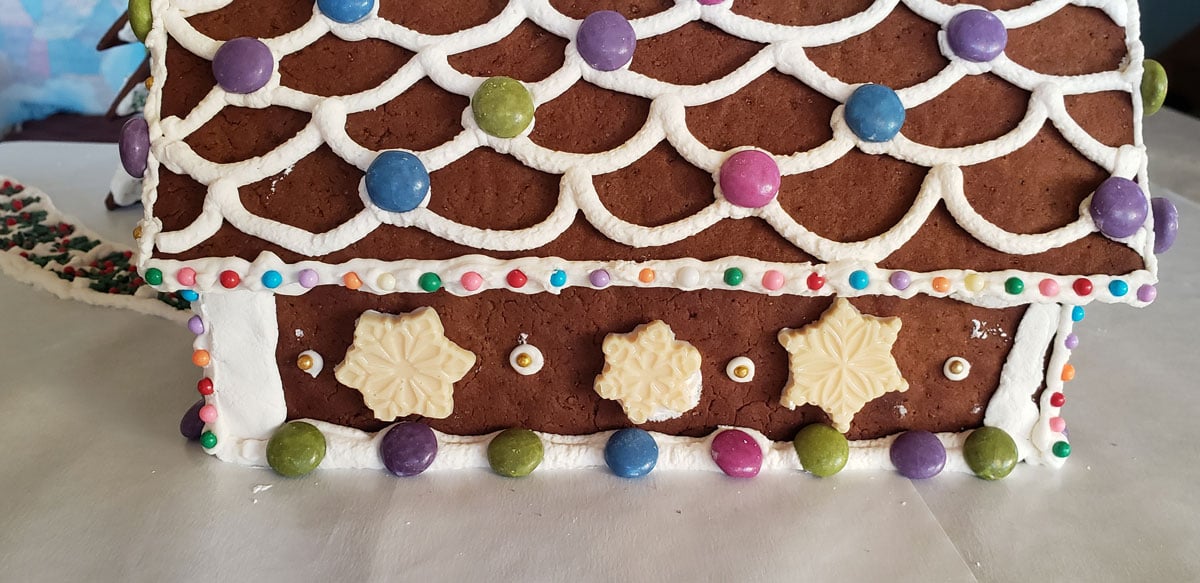
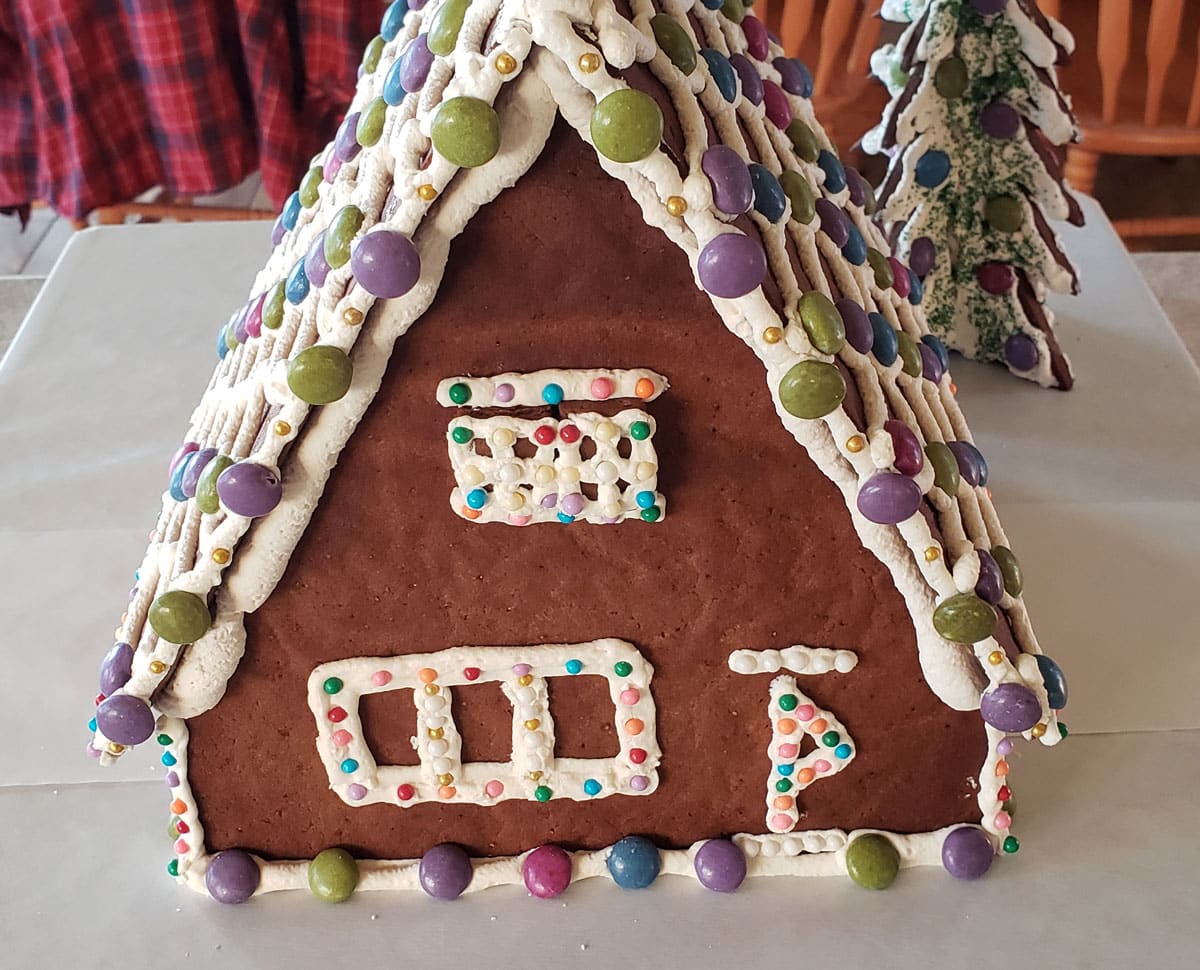
Step 7: Decorate Your Gingerbread House
Once the structure is solid, the fun begins. This was our favorite part of the build. Duncan was a natural, keeping up the family tradition. We spent the afternoon dressing up our creation.
Popular decorations include:
- Candy canes for pillars or fences
- Gumdrops for windows
- Chocolate bars for roof shingles
- Sprinkles for snow
- Icing trim for doors and windows
Royal icing works as both glue and decoration. Pipe details slowly and let layers dry before adding heavy candy. Every gingerbread house becomes a unique Christmas decoration — no two ever look the same. Visit your local craft store to see what sort of edible holiday sprinkles they have for more decorating options.

We used a combination of icing, Unreal chocolate gems, edible sprinkles, and molded candy melts. (I have a collection of old candy melt molds from earlier crafting days that I used to make wreaths and snowflakes.)

Make-Ahead Tips
- Baked gingerbread pieces can be stored at room temperature in an airtight container for up to one week.
- Unbaked dough keeps refrigerated for 3–4 days or frozen for up to 2 months.
- Assembled houses keep best in a cool, dry room — avoid humid kitchens.
If pieces soften slightly, allow them to air dry overnight before assembly.
Troubleshooting Common Gingerbread House Problems
Walls spreading while baking
Dough was too warm or rolled too thin. Chill dough longer and maintain consistent thickness.
House collapsing
Royal icing too thin or not enough drying time between steps.
Roof sliding off
Walls not fully set before you add the roof. Patience pays here.
Cracked pieces
Over-baking or moving pieces before fully cooled.
Can You Eat a Gingerbread House?
Yes — technically. This gingerbread house recipe is food-safe, but most families consider it decorative only. Since we only handled it a little during assembly, we’re eating ours after the holidays – with coffee.
If you want edible gingerbread cookies, you may want to use a softer cookie recipe.
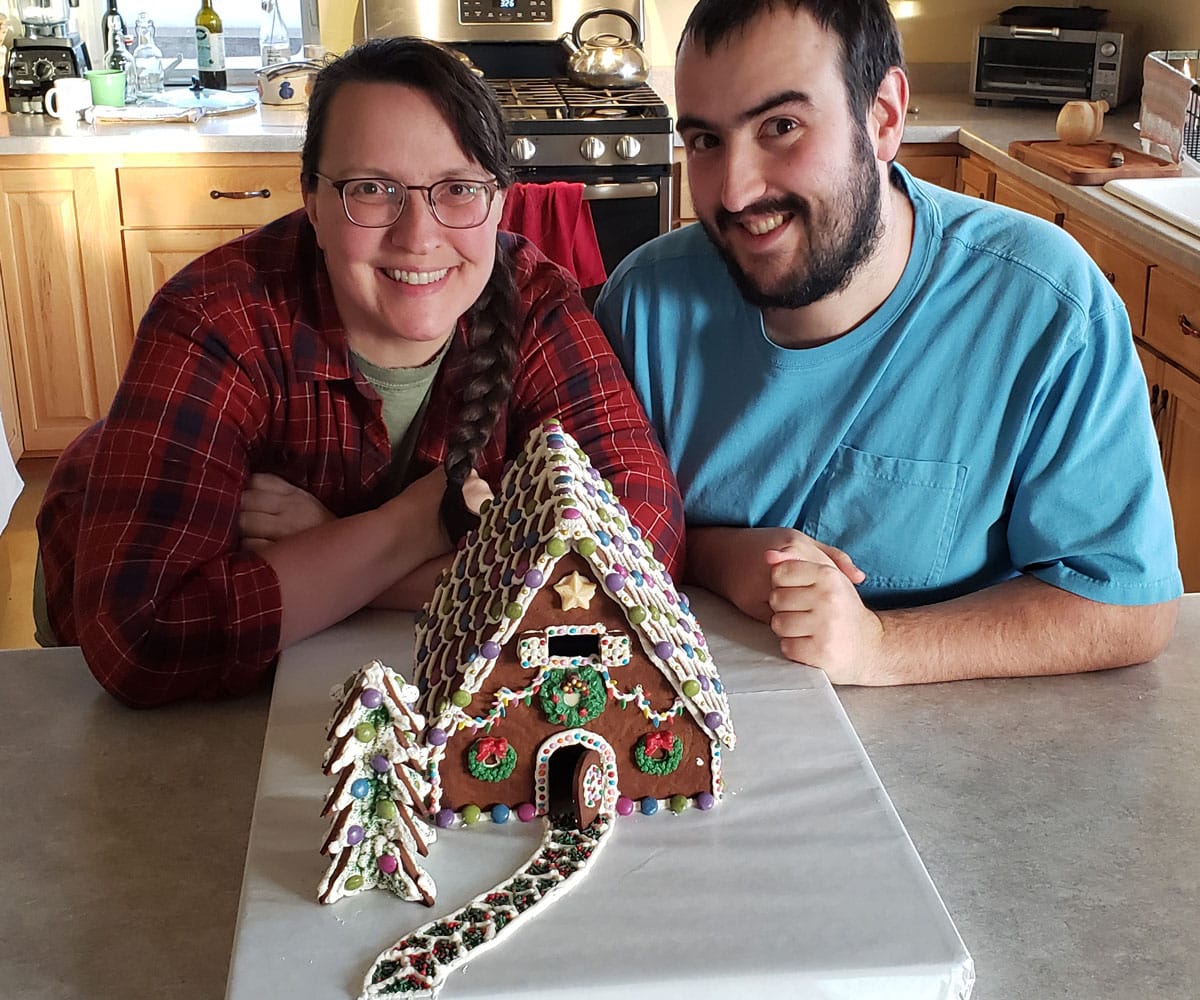
A Family Tradition Worth Keeping
Building a gingerbread house isn’t about perfection. It’s about a kitchen filled with the aroma of holiday spices, sneaking candy, and creating something together. Now that we’ve started up the family tradition again, I think next year we’ll be inviting friends over to join in. We can make a day of it and build a whole mini gingerbread village.
You may also enjoy these holiday goodies:
Christmas Tree Pull Apart Bread
Old Fashioned Christmas Bread Pudding
PrintGingerbread House Recipe

A sturdy gingerbread dough and icing recipe for construction.
- Prep Time: 20 minutes
- Chill time: 60 minutes
- Cook Time: 12-15 minutes
- Total Time: 0 hours
- Yield: 1 gingerbread house 1x
Ingredients
Dry Ingredients
- 8 cups all-purpose flour
- 2 teaspoons ground cinnamon
- 2 teaspoons ground ginger
- 2 teaspoons nutmeg
- 1/2 teaspoon salt
Wet Ingredients
- 3/4 cup butter, softened
- 1/2 cup brown sugar, packed
- 1 3/4 cup molasses
Royal Icing Ingredients
- 1 pound powdered sugar (confectioner’s sugar)
- 3 egg whites
- 1/2 teaspoon cream of tartar
- 1 teaspoon vanilla extract (optional, if you’re planning to eat the house)
Instructions
In a large bowl or stand mixer fitted with the paddle attachment, combine flour, cinnamon, ginger, nutmeg, and salt.
In a 2 quart saucepan, stir together molasses, brown sugar, and butte. Cook over medium heat, stirring occasionally, until butter is melted and ingredients are well mixed.
Pour liquid mixture into flour mixture and stir until well blended. Form into a ball and knead until smooth and pliable. The dough will be thick — that’s intentional. Add a tiny bit of water, if needed, to bring the dough together.
Divide the gingerbread cookie dough into two or three portions. Flatten into disks, wrap tightly in plastic wrap, and refrigerate for at least 1 hour, or up to overnight.
While the dough chills, prepare your house template.
Preheat the oven to 350°F.
Line baking sheets with parchment paper. Lightly flour your work surface and rolling pin, or roll out the dough directly on the parchment.
Roll the dough to ¼ inch thick (slightly thicker is fine for larger houses). Keeping a consistent inch thick measurement helps ensure even baking and sturdy walls.
Place the house template pieces on the dough and cut around them with a sharp knife. Transfer pieces carefully to the baking sheets, leaving space between each piece. Re-roll scraps as needed, lightly flouring to prevent sticking.
Bake gingerbread pieces for 12–15 minutes, depending on size and thickness. You’re looking for pieces that are:
- Firm to the touch
- Lightly browned around the edges
- Flat and evenly baked
If dough puffs slightly during baking, you can prick the bubbles with a fork. We put the slightly bubbled side facing inward on the gingerbread house.
Allow pieces to cool completely on the baking sheets before moving.
Make the royal icing:
Beat ingredients together in a stand mixer for 5–7 minutes until thick and glossy. The icing should hold stiff peaks.
Transfer icing to a piping bag or zip-top bag. Keep unused icing covered with plastic wrap to prevent drying out, or cover your icing bowl with a damp towel.
Assemble the gingerbread house:
- Build the walls first
Pipe a thick line of royal icing along the bottom edge of one wall and press it onto the base. Add adjoining walls, piping icing along vertical seams. - Let walls set
Allow walls to stand for 20–30 minutes before moving on. Royal icing firms quickly but needs time for strength. - Add the roof
Pipe icing along the top edges of the walls and gently add the roof pieces. At this point, I like to put props in place to hold everything steady. - Let the structure dry
Allow the assembled house to dry for at least an hour before decorating. Overnight is even better. By the next day, that frosting will be absolutely dry and stable.
Decorate the gingerbread house and enjoy.
Notes
Alternate Corn Syrup Gingerbread Dough
Dry Ingredients
- 9 cups all-purpose flour
- 1 tablespoon grated lemon rind
- 1 1/2 tablespoons ground cinnamon
- 2 tablespoon ground ginger
- ½ teaspoon salt
Wet Ingredients
- 1 1/2 cup butter or margarine, softened
- 1 1/2 cup brown sugar, packed
- 2 cups light corn syrup
Prepare dough as above.

This article is written by Laurie Neverman. Laurie grew up in the kitchen, learning baking and home cooking from her momma. At age 15, she and her mom and two sisters created Irene’s Custom Cakes & Catering. This was her summer job through most of high school and college.