Protecting Plants from Frost – 12 Ways to Beat the Cold Weather
Protecting plants from frost is easier with good garden planning. In this post, we'll talk about DIY cold weather protection for your garden in early spring, fall, and winter to protect your plants from frost. Our cold weather protection for your garden, includes cold frames, frost covers, greenhouses, and other products; plus frost protection garden planning tips.
Planning Your Garden to Avoid the Need for Frost Protection
Good garden planning and preparation can help avoid the need for frost protection, or be used in combination with frost protection for plants.
A microclimate is a small area with a climate that differs from the surrounding area. In the case of frost protection, you want to warm the air and soil where you’re planting, and shelter plants from excess wind and temperature fluctuations.
A good microclimate can give your garden a boost in spring and fall. In spring, it gives you an earlier start, in fall, it can buy you a few degrees to ward off light frost, especially if combined with elements like floating row covers.
#1 – Avoid Frost Pockets
Frost tends to settle in low lying areas. If you have a choice in elevations for your garden, opt for a higher spot to avoid low lying frost.
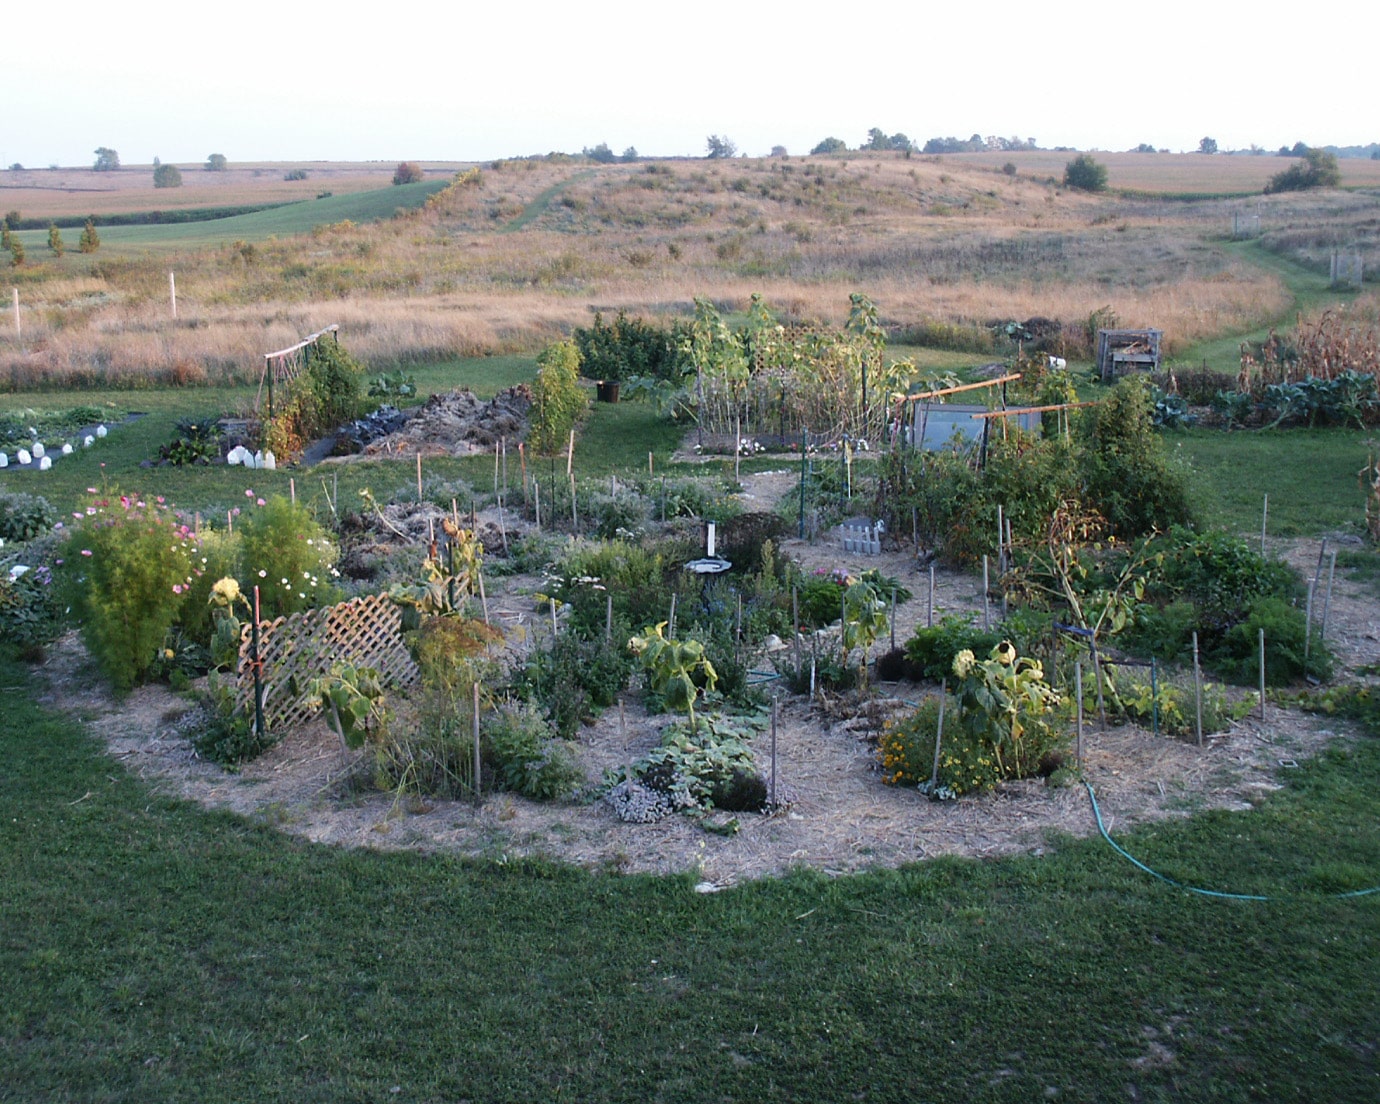
My gardens are a great example. Our south beds are around 20 feet lower than the beds on the north side of the house. The south beds will freeze while the north beds are still intact. The north beds are more exposed to the wind until our treeline gets taller, so there are pros and cons to both locations.
#2 – Use Raised Beds
If you don’t have a high spot to plant your garden for frost protection, make your own. Raised beds heat up faster and stay warmer. (For those who face the opposite problem (too much heat) planting in troughs can provide cooler temps and wind protection.) Raised beds tend to dry out quicker, so plan accordingly with watering and mulch if needed.
#3 – Add Heat with Hot Composting
One old technique for frost protection (and boosting plant growth) was to place partially finished compost or composting manure in the center of a raised planting bed. The heat of the working compost to warms the soil for planting. Don’t plant your seeds or transplants directly in hot compost, as the heat and excess nitrogen can kill plants.
#4 – Preheat Your Soil
Another way to add heat to your soil is to cover the ground with plastic or other dark material. This raises the soil temperature so you can transplant earlier. Preheating the soil promotes better germination rates and easier transplanting.
Clear plastic warms the soil well, but can promote weed growth if it isn’t hot enough. Black plastic mulch is commonly used, as it is cheap and blocks weed growth. Recently, IRT (Infra-Red Transmitting) plastic mulch has become available, which blocks visible light but allows infrared light to pass through.
I always use black landscape fabric in my melon patches. Depending on the season, I may also do it for other heat loving crops such as cucumbers, tomatoes, summer squash, and eggplants. Some plants, such as corn, might like warmer ground temperatures to germinate, but cooler temperatures while growing. Make sure to check preferred growing temps before you put down soil covers.
#5 – Don't Rush to Plant Too Early
Even when air temperatures are above freezing, ground temperatures can lag behind, so don’t rush to plant too early. To learn more about the your planting conditions you might want to read this article: Plant Hardiness Zones and Microclimate – Creating Your Best Garden
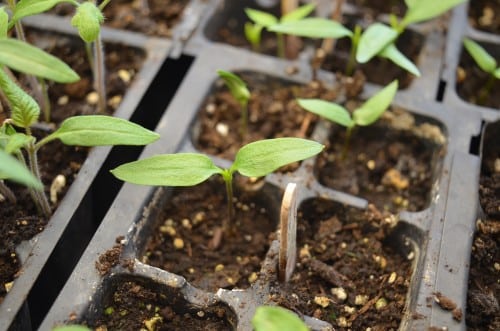
#6 – Start Seeds Indoors
Figure out the average date of last frost in your area by checking with your local extension office or researching online. Then check the seed packets of your desired crops to see which ones are best started inside before setting outside as transplants. Count back from your average last frost date the appropriate number of weeks to determine your indoor planting schedule.
*Note: Don’t forget to check whether your seeds need to be stratified to improve germination. Stratification is the process of placing seeds in cold storage for a time to mimic the natural freezing process. This is more common for herbs and wildflowers.
For instance, many slow growing herbs and flowers suggest starting indoors 10-12 weeks before last frost. Tomatoes and peppers may suggest 4-8 weeks before last frost. Vine crops may be started inside 1-2 weeks before last frost (if the plants get too large they do not transplant well and are more likely to get transplant shock and be set back). You can also start seeds for fall plantings inside when it's too hot for them to germinate outside.
For more information on seed starting, see:
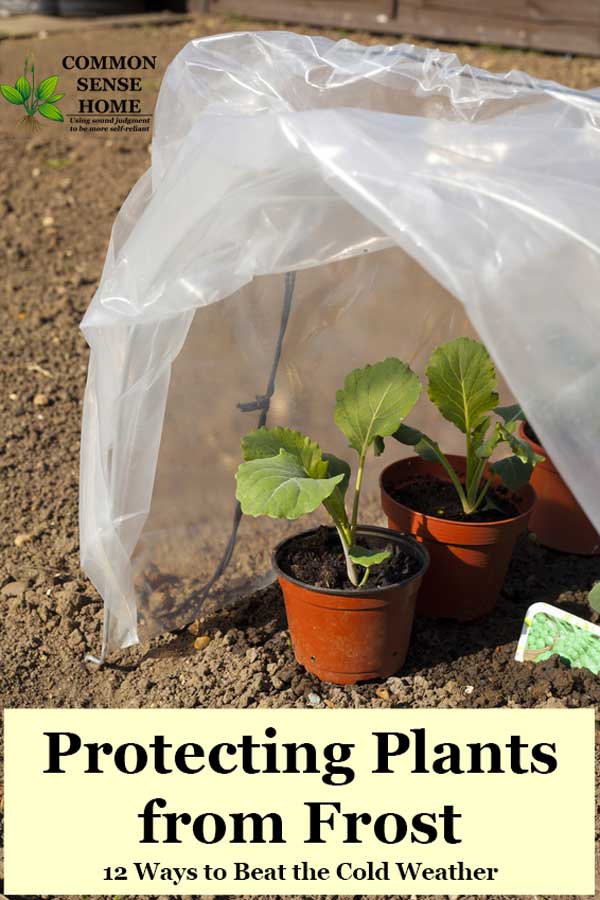
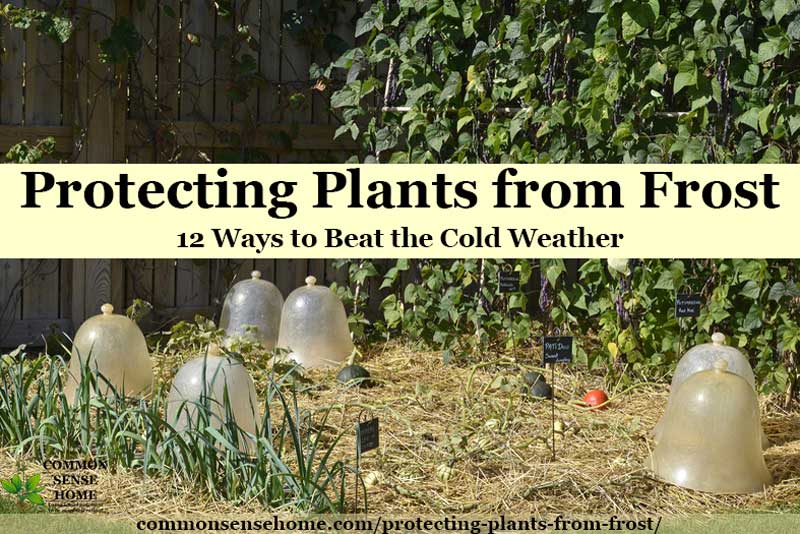
#7 – Frost Covers for Plants
One of the cheapest, easiest frost covers you can make is to cut the bottom off of a gallon plastic jug, such as a vinegar jug. Simply slip the jug over your seedling and wiggle it gently into the ground. If it gets warmer during the day, open the lid for ventilation. When the danger of frost is past, remove the cover for a few hours each day, extending the time left uncovered slowly to give your plant a chance to adjust.
If you’d like an option that’s a little more attractive, gardening supply stores sell glass or plastic cloches in a little bell shape with handle for easy use.
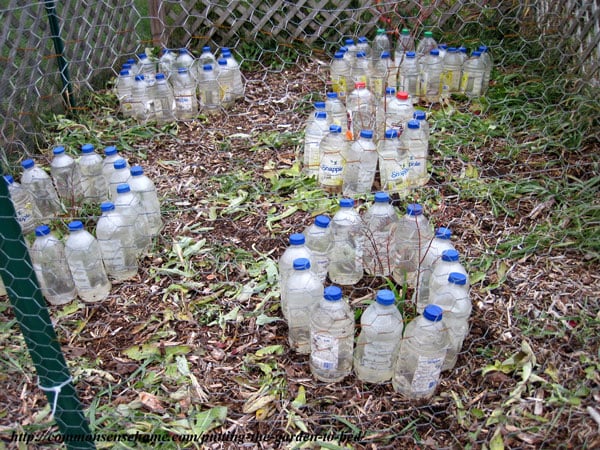
#8 – Water Filled Containers, Such as Wall-o-Water
The wall-o-water is a series of plastic tubes connected into a cylinder that fits over your seedlings. The tubes are filled with water. When the temperature drops, the water in the plastic tubes freezes instead of your plants.
See Wall O' Water 12 Pack – GREEN
You can also make a homemade version of the wall-o-water products. Fill empty plastic jugs with water, and use them to create a wall around a transplant (for instance, around a hill of melons). If you don’t have enough to completely circle the plant(s), use the jugs to block prevailing winds. I use gallon jugs from milk and vinegar; I’ve seen others use two liter soda bottles. These will typically last several seasons before ending up in recycling. (Vinegar jugs are much sturdier than milk jugs.)
#9 – Frost Blankets or Frost Cloths
If fall frost is threatening to cut your harvest short, an old blanket or tarp can be draped over plants for frost protection. An air gap between your plants and the frost blanket adds more protection. You can add the air gaps by combining the frost blanket with a hoop framework to form a garden low tunnel. I have a friend in a slightly warmer climate who keeps cold tolerant greens growing in her garden tunnels all winter long.
See Agfabric Warm Worth Floating Row Cover & Plant Blanket
Can I cover my plants with plastic for frost protection?
Yes, sometimes plastic is used for frost protection. For instance, on low garden tunnels, high tunnels, garden cloches and greenhouses. You need to be careful that your plants don’t overheat when the temperature goes up, because plastic doesn’t breath like garden fabric. You also have to watch out for moisture buildup inside plastic covers, which can increase the risk of fungal diseases.
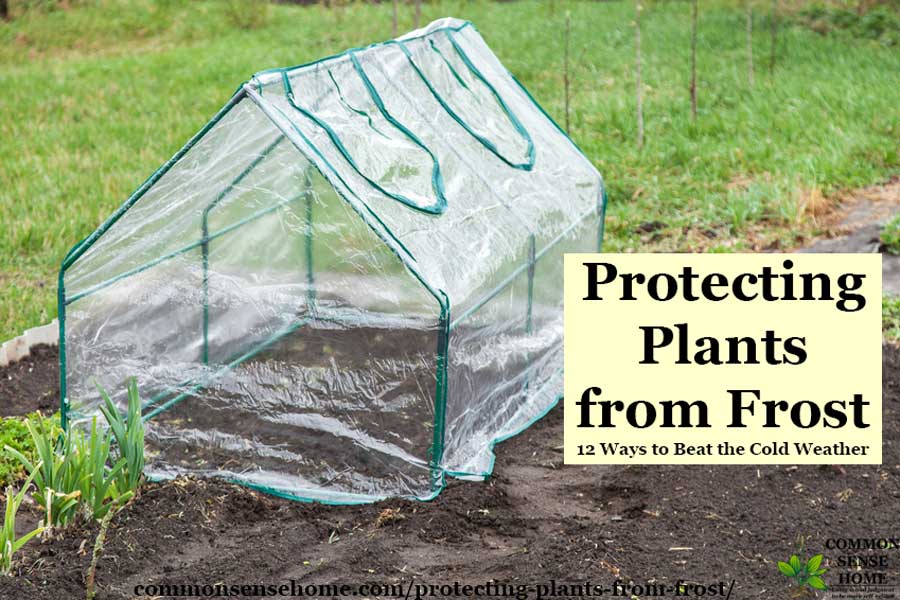
#10 – Mini Greenhouses
For a small garden, sometimes a mini greenhouse is all you need for frost protection. These little kits are relatively inexpensive and set up in minutes. Just make sure to anchor your mini greenhouse securely so it doesn’t get caught by the wind and whipped away.
There are several different types of mini greenhouses. Some come with shelves, and work best for seed starting, when the plants are small. Others are shorter and wider, and are intended to go directly in the garden. The mini greenhouse in the photo has small access doors on top, but some models open entirely on one side. (This makes access much easier.)
See:
- Gardman R687 4-Tier Mini Greenhouse
- Quictent Super Large Zipper Doors Mini Greenhouse Portable Cloche
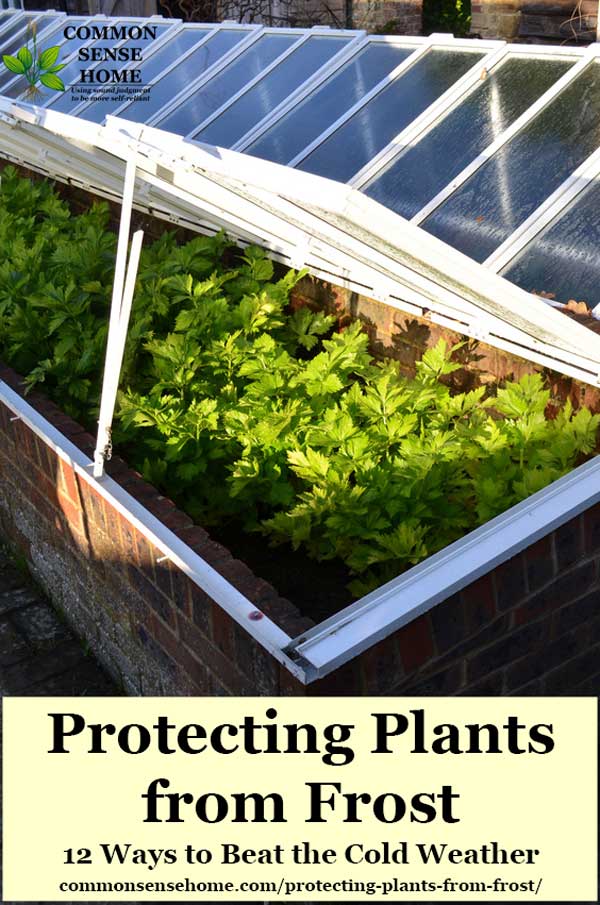
#11 – Cold Frames
A cold frame is a box, typically with opaque walls and a clear cover. It can be simple, such as an old storm window over a rectangle of straw bales, or a custom built wooden frame and cover, or a pre-packaged unit. Most home built units are lower in the front and higher in the back to allow more sun to reach the plants, and sized to accommodate whatever used windows are available. The fronts should be at least eight inches tall so that you have room to accommodate some plant height. We have two cold frames sized to fit old patio doors. *Note: Make sure any old windows you use do not have lead paint on them. Obviously, that’s not something you want around your food.
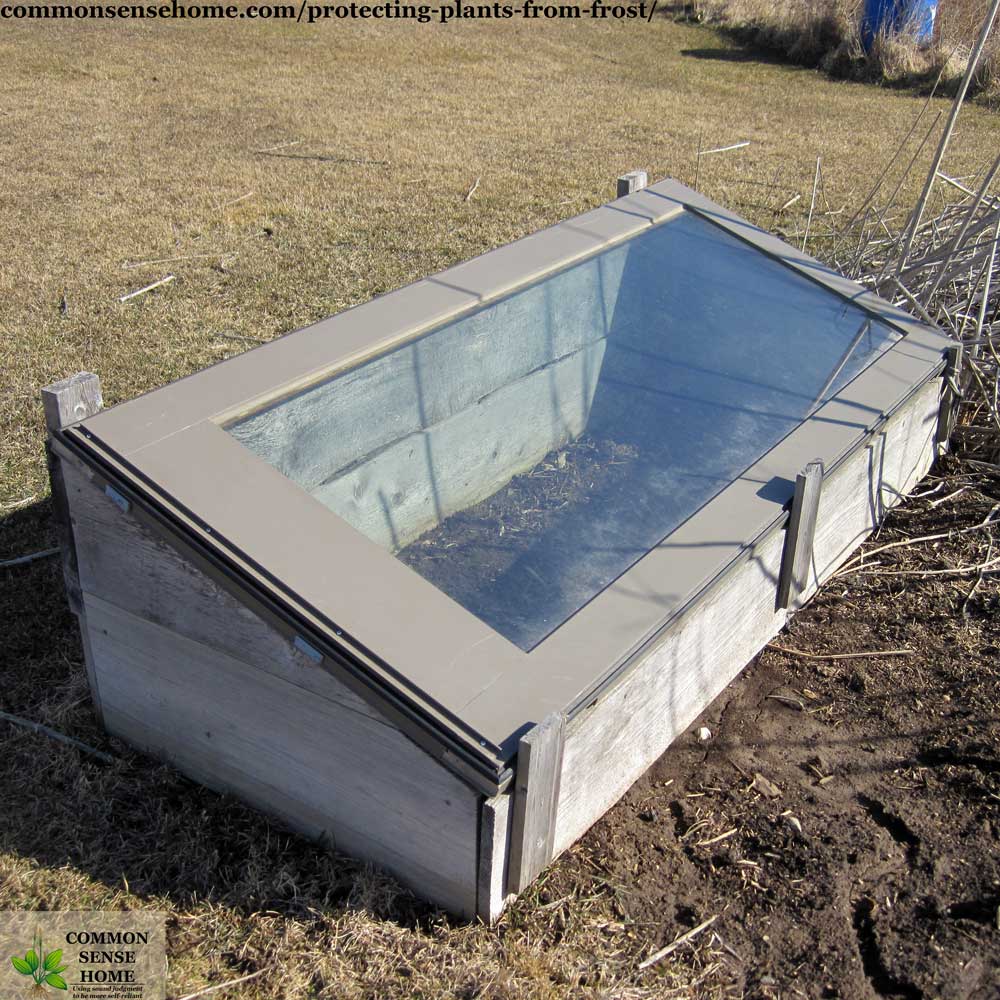
Cold frames are unheated (except for by the sun). Their primary advantages are to protect from the wind and overnight cold temperatures. When using them (as when using a greenhouse), be careful to vent to avoid overheating on sunny days.
#12 – Greenhouses
I have a small greenhouse attached to the southeast corner of our home. We also added a detached greenhouse in 2015. I transition plants from seed starting shelves inside, to the greenhouses or the cold frames, to out in the garden. The greenhouses have allowed me to significantly reduce the time the plants spend under grow lights. Our attached greenhouse is a simple wooden frame covered in multi-wall polycarbonate, and is built into the hillside as part of our retaining wall so it is earth sheltered.
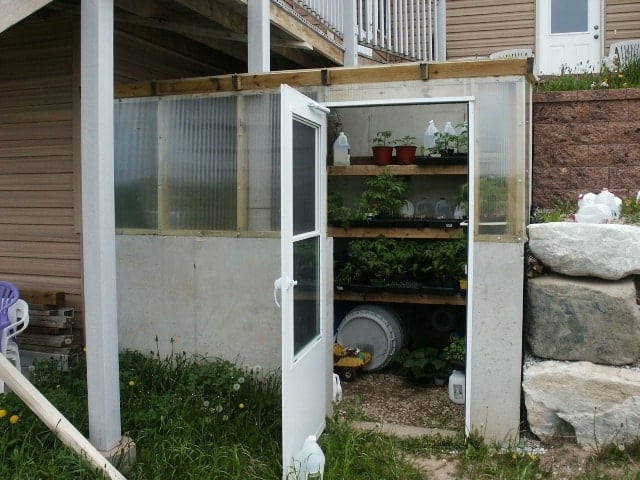
Our detached greenhouse is also multi-wall polycarbonate, and sheltered at the north end by a combination coop/garden shed. Multi-wall polycarbonate provides more frost protection than single wall plastic or poly covers.
Many different sizes and types of greenhouses are available, depending on your space and budget. A greenhouse may or may not have supplemental heat. See also, “The Forest Garden Greenhouse“.
If you'd like more information on building a greenhouse, check out how we built the foundation of our detached greenhouse. The video below features a greenhouse built from recycled materials.
We’ll also be reviewing a Harvest Right greenhouse later this year. For more information on greenhouses, see “The Practical Greenhouse Guide – What You Need to Know Before You Build a Greenhouse“.
Plants That Survive Cold Weather
Keep in mind that many crops will tolerate cold weather, and some (like kale) even improve their flavor after a light frost.
Some crops that prefer cooler (but not freezing) temperatures include:
For hardcore frost protection and season extension advice, I recommend checking out Eliot Coleman's books:
“Four-Season Harvest: Organic Vegetables from Your Home Garden All Year Long” and
Don't Forget About Low Input Storage
From my perspective, it's easier to spend time preserving some crops than battling the elements to keep them going outside. My favorites are the ones that hold “as is” with little or no effort. You can read more about these crops in:
- Root Cellars 101
- Above Ground Root Cellars – Enjoy Your Local Produce Longer
- The 5 Easiest Vegetables to Store
- Plant Hardiness Zones and Microclimate – Creating Your Best Garden
I hope you found this post useful. Don't forget to take a peek at the rest of our Gardening Articles.
If you need additional information on season extension, I recommend the books below.
Four-Season Harvest: Organic Vegetables from Your Home Garden All Year Long.

Originally published in 2013, updated in 2018.
This past year I tried seeds from North Circle Seed, a company that networks with Northern regenerative growers to adapt garden seeds to our colder, shorter growing seasons. Due to the weird weather, which scorched some of our early seedlings, we ended up planting a little later that usual. The tomatoes would have done better if we had planted in our usual late May/early June window. They took the early chilly weather well, and we were picking cherry tomatoes and the smaller slicing tomatoes into early Oct. I am reactive to more than just a tomato or two each Summer, but seem ok with a prudent few ground cherries at a time. The North Circle ground cherries were great despite the late planting, and I was picking fully ripe ground cherries after having to cover them a few times against frost. We will try everything again, but look for a sunnier spot and maybe stagger planting a bit in case the weather continues to be unseasonably hot or cold.
I keep 3 horses and I have a LOT of fresh manure!
I read your article and I am curious about HOW to use fresh manure for Hot Composting. Without instruction, I might think to partially bury cardboard and fill with fresh manure in my Spring/Fall beds.
How would you suggest I do this?
Thanks!
I haven’t experimented with this yet, as we only have small poultry flocks, so no large amount of waste. I know you want to keep the composting material aerated to keep it active, and will want some sort of insulation or cover to trap the generated heat, like a hot bed or hooped row cover.
We grew up on an 80-acre farm in southeastern Wisconsin. Our family garden was HUGE, and I remember canning and sharing with family and friends. The one thing we have a problem with (now that we are older and on our own) is the “starting” part. We (my sister and I) now live on about 20-acres in northeastern Colorado. A very different turf from our childhood. For the life of me, I cannot remember how our folks figured out when to start? We never seed-started – every. I remember dad tilling up the huge garden (easily 100′ long by about 50′ wide – it was enormous). I remember a large strawberry patch on the north and an even larger raspberry patch on the south ends (we were constantly raiding both – LOL – don’t know how they ever had enough for jams?) Everything in the middle was east-to-west rows of veggies. Mounds,make-shift cages, and clear walkways between all rows were all you could see at the peak of harvest. We were so bad as kids that we would even dig up potatoes before harvest and get caught eating them raw. The best part is we were never discouraged from raiding the feast ahead of time, just reminded that if we at it all we would have none in winter or to share – that sunk in strong. Now we have about 5-acres of gardening spaces including a huge greenhouse. A tornado shredded the top of our greenhouse in late 2018 and, unfortunately, we have not had the funds to replace it yet. The reason I mention this is that if we started seeds too early (confession: it is my sisters fault as she is in charge of the starting, I get all the growing, and we harvest together), we would simply transplant into the greenhouse. They would be safe from any freak frost. The last two springs have needed better timing and we just can’t seem to get it together. I hate losing any plants, but losing to bad timing kind of ticks me off. Any words of wisdom on fixing this issue? I know we are in a whole different zone now, but I will take any tips and tricks you can share – thank you.
The weather in recent years has been erratic, at least for us here in Wisconsin, which makes the timing even tougher. I had a little frost damage inside the greenhouse this spring at the end of May when temps dipped into the 20s. (Should have trusted my gut instead of the forecast. It was a cold, clear night.) In 2019, we had snow at the beginning of June.
Are you subscribed to the newsletter? In the subscriber bonuses there are charts for what to start when, based on last frost dates, with Excel and PDF versions.
Cold frames and row covers can buy a few degrees, and are less expensive than the greenhouse.
My mom’s garden was similar to how you describe your parents’ place – though I never ate a raw potato. Huge bed tilled up in spring, completely filled by fall. Ours rambles all over and we tackle it in sections.
I am in zone 3 No. Wisconsin and the unpredictable weather has been an interesting challenge in a 76 day growing season. I did not grow up here, and hav a very tight budget. In years where a sudden heat wave or the searingly intense sun gives our early transplants some unexpected scorching weather, I gather some small branches from a brush pile (pick something that will not root) poke 3 or 4 10″ to 12″ branches into the soil around the plant, and drop a modest handful of straw over the tops of the branches to make a temporary umbrella. This protects from peak heat solar rays, and will still permit some sun and air to keep the plant growing. When the plants are study enough to take intense solar rays, I pull the branches and straw and use them as mulch, which can buffer them from ongoing high heat and dryness. For an early light frost when more plants need cover than usual, I sometimes drop a cardboard box over the branches of the tougher, but still vulnerable plants. Depending on circumstances, the box might still be glued or taped into a rectangular shape. In desperate times when a lot of cardboard is needed, I might flatten them out to stretch the amount of cover over the tops of more tender pants for extra insulation and protection from frost burn. If the frost is colder than initially predicted, I can throw a plastic tarp, sheet or blanket over the boxes, which then serve as a way to prevent frost burn. This may not work as well in foggy or wet conditions when powdery mildew is a risk.
Question: is it possible to grow cold-tolerant crops in a cold frame even when the temperatures go sub-zero? Thanks in advance.
Maybe – depending on conditions and what you’re trying to grow. Warm weather crops are toast, but cold tolerant crops might make it. Growth will stall, but you’d still be able to harvest.
Eliot Coleman does a double wall system to keep crops alive all winter. He has a larger greenhouse or hoop house, and then he has hoops directly over the rows that are being protected. They used to have a copy of his book “Four Season Harvest” at the Central Library.
I’ll look for the book. I’ve also ordered a copy of the Winter Harvest book. Seems to me though that growing some stuff indoors in containers will be more fun than tromping out in the snow & cold. We’ll see how well that works first. Otherwise, just use the cold frames to extend the growing season until the first snow or so.
Until my trees get bigger so I’ve got more of a wind block, it’s more fuss than I care to mess with right now, but I think the idea is intriguing. I’m really glad we live in a concrete house today. This wind is completely nuts!