How to Build a Greenhouse Foundation
In 2015, we decided to build a hobby greenhouse to extend our growing season. We thought that the aluminum frame would be rigid enough that our greenhouse foundation could be a simple heavy wooden frame on the ground. (Most greenhouse kits recommend a concrete slab foundation, or railroad ties or cinder blocks for small greenhouses.)
Unfortunately, that didn't work out so well. No matter how carefully we tried to level the frame, we still couldn't get it completely square along the entire length.
I didn't want to sacrifice the ability to plant straight in the dirt inside the greenhouse. We also needed a foundation that stays level during the course of yearly freeze and thaw cycles here in Wisconsin.
We had to build a different type of foundation. This is how we did it.
Our Uber-Sturdy Greenhouse Foundation
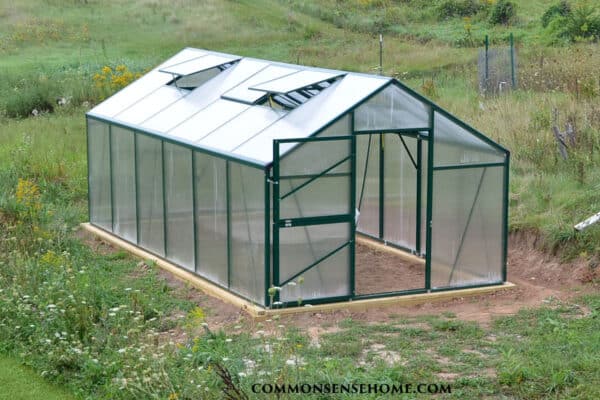
Our greenhouse is 20'x10′, with an aluminum frame and 10mm double wall polycarbonate wall and roof panels.
The greenhouse foundation design resembles a frost protected deck footing. I'll explain the concept and then follow up with step by step photos.
There are six 8″ concrete tube footings (one at each corner and one midway down each of the 20 foot sides). These are tied together with 20 foot long 2″x10″ boards (stringers) bolted through each of the concrete tubes on the sides. There are also 10 foot long 2″x10″ boards (stringers) bolted into the 20 foot long boards on the ends.
Fill the box frame with dirt to eliminate any space where varmints might want to move in. This also helps to maintain a more uniform temperature and moisture distribution around the wood.
Finally, the box frame is capped off with 2″x 12″ boards and the greenhouse is secured the the 12′ wide boards.
A Note on Greenhouse Foundation Wood Choice and Why We Went With 12″ Wide Cap Boards
When you select the wood for your greenhouse foundation, make sure that you chose wood that is recommended for below grade installation.
Talk to your local lumber yard or hardware store personnel and they will steer you in the right direction. You'll need something pressure treated, or specific wood types.
This wood may be sitting damp for long periods of time, and if you don't use the right stuff, it's going to rot out.
On the choice of the 12″ cap boards:
Do we really need a 12 inch wide strip to bolt the greenhouse to? Yes.
The concrete tube forms' smallest default size is 8 inches in diameter. Add a couple inches on each side for the support boards, and you're up to around 12 inches across.
The 12 inch width is also more forgiving. It's challenging to keep everything exactly square over long distances, so 12 inches allows for minor misalignment.
In our area, we have glacial till that has dumped a lot of rocks in the soil. Digging a perfectly straight hole can be a big challenge.
The 12″ wide cap boards help to distribute the wind load over a wider area. This is helpful when you regularly deal with 20-30 mile an hour sustained winds, or an occasional high wind event.
Step By Step Greenhouse Foundation Building
Before you build, check on applicable local building codes.
#1 – Decide Where to Locate Your Greenhouse
The four main factors you want to consider when locating your greenhouse are:
Sunlight
The site should get at least 6 hours of sun per day. In cooler climates, more is generally better. In warmer areas, afternoon shade may be welcome.
Keep in mind seasonal changes in sun angle (lower in winter, higher in summer) and changes in tree foliage. Most commercial growers choose a north-south alignment for even light distribution.
Location Should be Level and Well-Drained
You don't want standing water in your greenhouse, and building on a level site is so much easier.
Our site is somewhat tucked into a hillside, so the neighbor leveled it with a backhoe. We dug a drainage ditch around the perimeter of the greenhouse to funnel water around the building.
Wind
Greenhouses are typically quite light with a fairly high profile, making them excellent sails in high winds. If you have a location that's a little more sheltered while still getting plenty of sun, consider it.
We have a windy site, so we elected to place the greenhouse to block the wind blowing into the main garden area.
Ease of Access
Out of site is out of mind. If you place your greenhouse in a high traffic area, it will be a constant reminder to use it to its full potential.
You may also want to consider wheelbarrow and yard tractor access for hauling materials in and out.
The image below was taken from our deck looking southwest towards the greenhouse area. (The greenhouse was temporarily moved onto the lawn while we put in the better foundation.)
You can see there's a slight hill rising to the west, but the greenhouse location has been leveled.
#2 – Clear and Level the Area and Mark the Location of Your Footings
Once you've decided where you greenhouse will be located, mark your corners and make sure they are square. Mark addition post hole spots as needed. If you need help squaring your footing, you can watch the video below.
Note: They do make a small mistake near the end when they talk about scaling up the measurements. If you start with a triangle that's 3 feet and 4 feet long on either side of the right angle, your third side must be 5 feet long.
This is based on the Pythagorean Theorem for basic algebra => a² + b² = c².
When you scale up, you must take the square of each of the two sides of the right triangle to get the third side. Just use the 3-4-5 and you'll be fine, or scale up the correct way.
Another funky option I found to help keep things lined up is the Plumatube Concrete Pier Alignment Tool. This locks on to the top of your forms in a grid pattern to stabilize and align them.
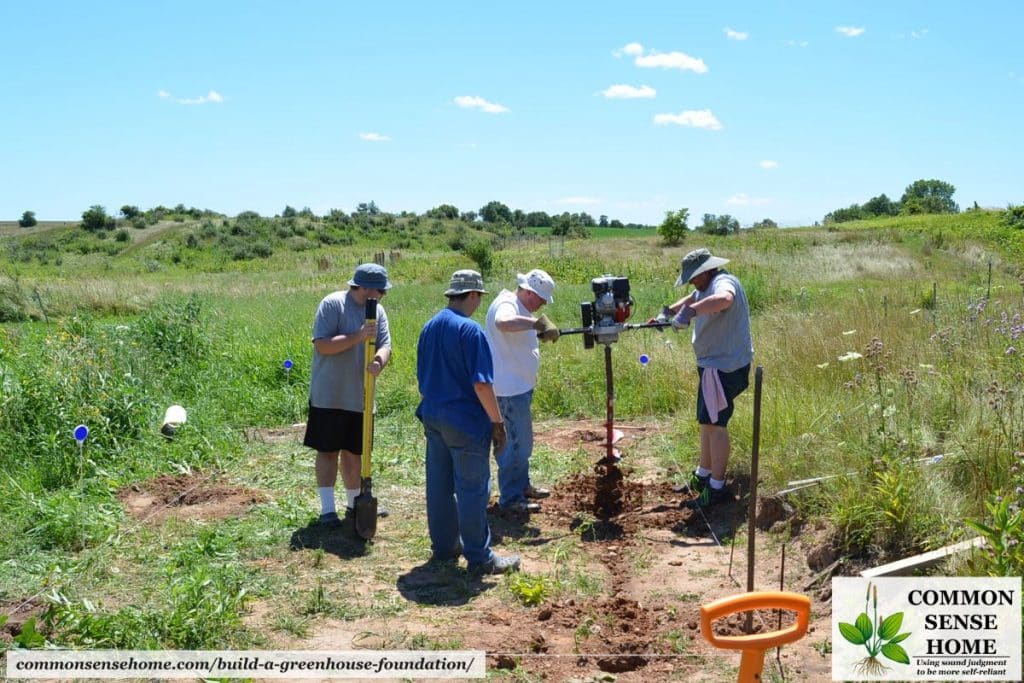
#3 Dig Your Greenhouse Frost Footings
We have found that using a gas powered post hole digger dramatically cuts the time required for digging on a project this size. You can invest in one for home use for a couple hundred dollars, or rent one at many home improvement stores.
We still have to do some work with the manual post hole digger, but the power tool is a real back saver.
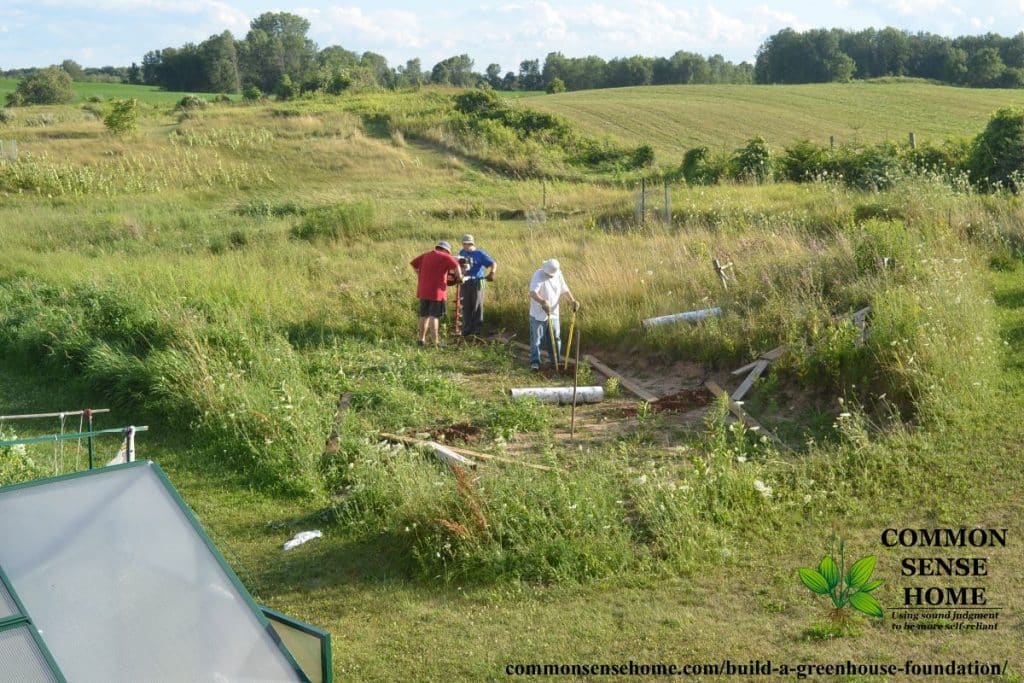
A friend of my husband's came over to help on digging day, so we had a four man team digging the holes.
There's quite a bit of vibration from the auger, and it's not light. With four people they could swap out two man teams as they moved around the building.
We also dug trenches for the stringers to sit below grade so the greenhouse itself would sit at ground level.
If you look closely at the photo below, you can see the strings marking the greenhouse location. These extend past the corners of the greenhouse.
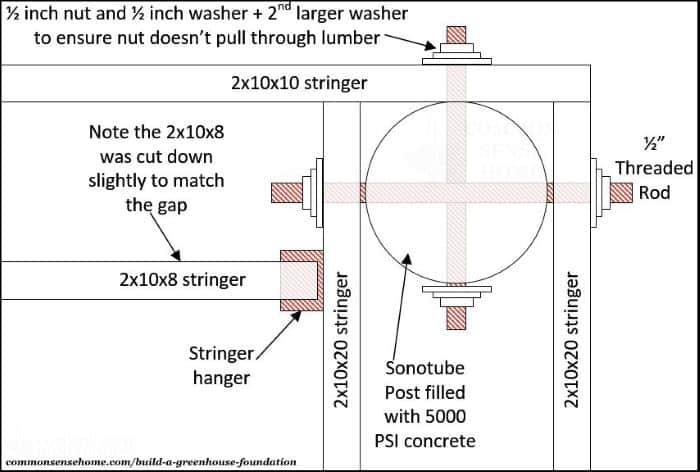
#4 – Prep Your Hardware
We used a combination of 1/2″ threaded rods and joist hangers to hold the stringers in place. The threaded rod was cut to 16 inches in length and skewered through the post form before the concrete was poured.
Once the concrete was in place, the 20′ stringers and 10′ stringers were threaded onto the rod and secured in place with a flat washer, a lock washer and a nut. The interior 8′ stringer was then hung off of the interior 20′ stringer.
For each corner post, we used:
- 2 – 16″ long 1/2″ diameter threaded rod
- 4 sets – flat washer, lock washer and nut for 1/2″ threaded rod
- Joist hangers sized to fit a 2″x10″ board
For the post that sits midway down the 20 foot length, you need:
- 1 – 16″ long 1/2″ diameter threaded rod
- 2 sets – flat washer, lock washer and nut for 1/2″ threaded rod
The 12″ cap plates were attached with 3″ galvanized deck screws. We screwed them in roughly 1 foot apart down the length of the cap plate.
The diagram below shows how the hardware attaches the stringers to the concrete pillar.
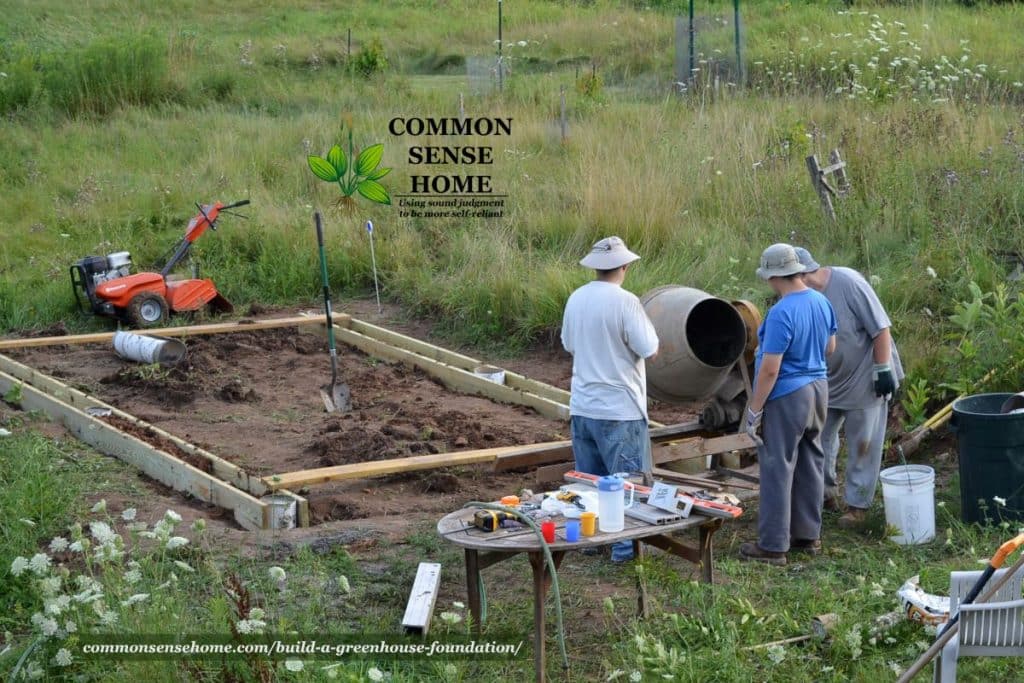
#5 – Pour Your Footings
Remember, you need to have the threaded rods in place before you fill your concrete form entirely. You don't want to have to attempt to drill through 8 inches of concrete. The outer walls of our home contain an 8″ layer of concrete, and it is not an easy task to get through them.
Level your forms before pouring, and mount your threaded rods at the same height on each form.
We used a Johnson Self-Leveling Cross Line Laser Level to level our forms. Do not skip this step!
It's critical that your forms line up so you have a level foundation and all your greenhouse seams meet smoothly. It's well worth the investment in a good quality laser level.
When we prepped for the pour, we sandwiched the 2x10x20 stringers on either side of the posts to align the threaded rod, but did not put on the washers and nuts. That held the pins in place and partly stabilized the posts while pouring the concrete.
We put a bit of dirt on each side to hold the stringers in place horizontally and vertically. Put end (10′) stringers in place to stabilize the posts crosswise.
We used 5000 psi Quikrete for the posts and mixed it in a small concrete mixer.
If you don't have a concrete mixer, you can mix up each batch in a wheelbarrow or other large container. You may also be able to rent a concrete mixer at your local home improvement center.
Allow to cure for 72 hours to one week. This ensures that you don't move the threaded bolts inside the concrete when you apply the nuts and washers.
We placed the 20′ and 10 ‘ boards and poured the concrete one weekend.
The next weekend, we bolted the boards in place, and then added the inside 8′ stringers (cut to fit) and the cap plate 2x12s.
#6 – Create the Box Frame that Supports your Greenhouse
First, get your screws, flat washers and lock washers in place on the 20′ stringers and 10′ stringers. Then, mount the interior 8 foot stringer.
This may need to be trimmed slightly, depending on the placement of the earlier stringers. (See diagram above.)

Once the stringers are in place, line up the 12″ cap boards. Cut the boards so they meet at a roughly 45 degree angle at the corners. This allows you to drill directly into the concrete, screwing the cap plates down with 3/16″x4″ Concrete/Masonry Screw Anchors.
This is not absolutely needed, as the cap boards are attached to the stringers roughly every 12 inches with 3″ deck screws. BUT – if you want one more layer of holding everything together, it's an option.
You may have to adjust the cuts where the 12 inch boards meet to get everything to line up correctly. Put them in place, mark, and then cut. You can see an example below.
It can be a little tricky to get everything to line up, so having several people helps. All four of us worked on getting the boards in place. By the time we finished, we all had sore hands and scraped knuckles. The boys screwed in all the 100+ 3′ screws on the cap plates in one evening.
#7 – Attach Your Greenhouse to the Foundation
Our greenhouse kit came with clips and anchors designed for use with a concrete pad. We swapped out 3/8″ lag screws for the concrete anchors and screwed them into the cap plates.
We placed clips at roughly 1 foot intervals, except around the corners, where we placed them more closely.
In our case, we had already assembled the greenhouse and set it aside while we built the foundation. We had a group of friends come over one morning and walk it into place on the greenhouse base.
I assume that many of you will simply build a greenhouse in place after you've built the foundation. (I highly recommend this option.)
Get This Article in Ebook Format
Click here to get the extended version of this article in printable pdf ebook format.
The ebook includes tool lists, more details, and more before and after photos.
I'd love to hear about your homestead greenhouse experiences. What else would you like to know about our greenhouse?
You may also enjoy:
- Protecting Plants from Frost
- The Forest Garden Greenhouse
- Vertical Vegetable Garden ideas
- The Greenhouse and Hoophouse Grower’s Handbook
- The Practical Greenhouse Guide

This article is written by Laurie Neverman. Laurie and her family have 35 acres in northeast Wisconsin where they grow dozens of varieties of fruiting trees, shrubs, brambles, and vines, along with an extensive annual garden. Along with her passion for growing nutrient dense food, she also enjoys ancient history, adorable ducks, and lifelong learning.
Originally published in 2016, last updated in 2023.
I am building an 18×30 engineered greenhouse similar to this. My issue is I will need to put topsoil and compost inside because our soil is desert. Sand and such. Any plans for a 1′ wide and 2′ deep foundation that will allow me to do this?
Since we have to deal with frost foundations for all building here in Wisconsin, everything has to go deeper. Maybe check with someone who does foundations in your area and see if a shorty concrete kneewall would be stable? Or you could scale this design larger, but then things would get more complicated.
Where did you purchase the foundation clips securing the shed to foundation?
They came with the greenhouse kit.
Where can I buy the clips to hook it down to the 2×4?
Ours came with the greenhouse kit.
Where did you get your greenhouse kit?
Our specific unit is no longer being manufactured.
Just wondering if the board measurements are wrong or the greenhouse use in this project wasn’t the full 20′ x 10′ when put together because you are using boards for the side for the cap boards exactly the same size as the greenhouse (20 x 10) not providing the allowance shown on the pictures you provided which seems to be about 4 to 6 inches on the outside. So I would think that if the cement posts are the corners of the foundation the wood boards for the side should be at least 1 feet longer on each side in order to wrap the 8″ diameter cement post. Am I getting this wrong? Maybe I missed something.
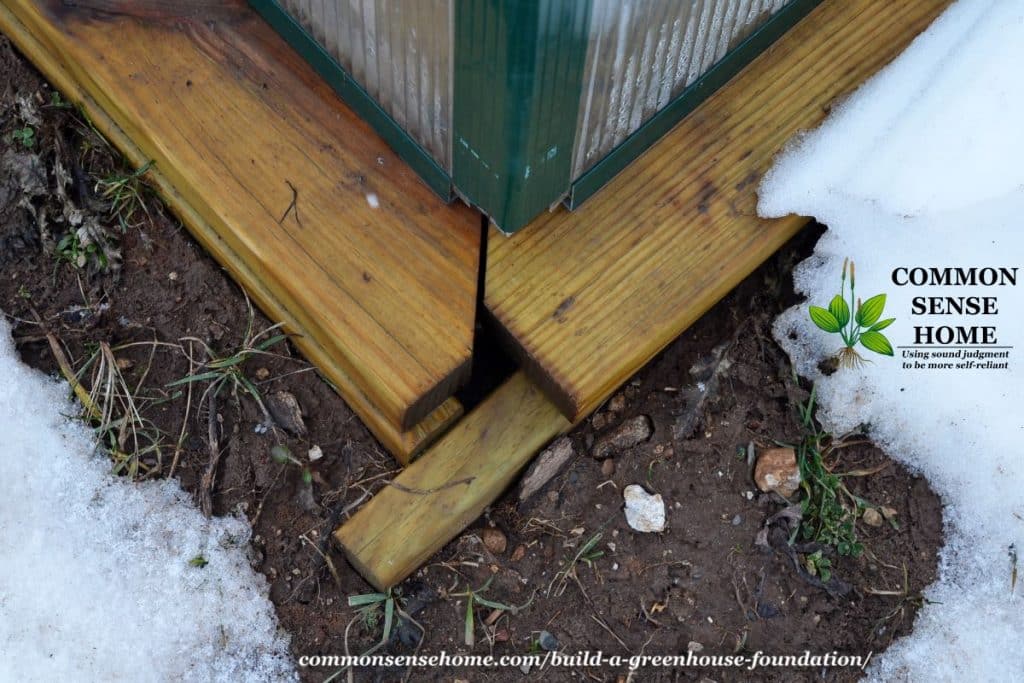
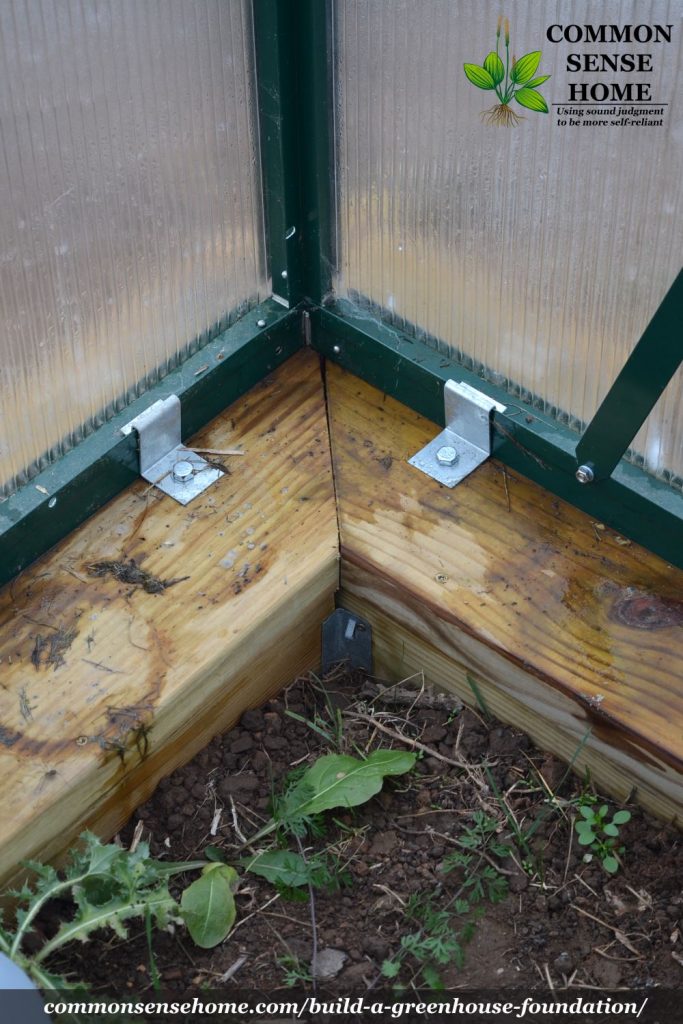
You are right the corners are screwy. The boards were not exactly 2″x12″x20ft and 2″x12″x10ft (they were 2″ or so longer sorry I don’t remember exactly). I cheated on the corners – see image below for the corner.
Notice in the picture that the corners don’t fully butt into each other. If you wanted a 100% coverage on the corners you would need to get 22ft and 12ft, but I wanted to save a few dollars and knew they were slightly longer. The board you see underneath is the “outside stringer” there is a matching one on the inside (underneath). Those sandwich the sonotube posts. You can also see that the greenhouse is exposing a bit more than 5 inches. The actual greenhouse size was roughly 3/4″ smaller (not fully 10×20) but as we had 10″ to work with, it was ok.
The 2×12 gave us 5″ leeway on either side of center. In a nutshell unless you know the exact size of the unit you want to center on your best guess to give some leeway larger or smaller unless you know the EXACT size and even then I would leave room in case you are not 100% square.
I hope this explains it. The greenhouse has held up well through 2018. The only change I would recommend is to consider sealing the panel ends with a glue gun or spray foam if you want to keep them clear. They work fine fogged up but are not as pretty.
Yeah, that makes sense. This is a great foundation and I can’t wait to finish it this weekend.
Thanks for sharing.
How deep are the holes for sonotube columns?
The sonotubes are four feet long, so the holes are about that deep.
I would strengthen the footing design by taking a 5 foot piece of rebar, bend over one end into a u pointing down.Place it in the sonotube with the u hanging over the threaded rods. This way you get the full weight of the concrete column pulling downward on the wind shear forces. I’m worried the top of the column will crack where the threaded rods go through as you only have a few inches of concrete above the rods. Other than that it’s creative and an economic solution. Well done! Please give us a status report. Here in Iowa we had several +70 wind events last year and half a dozen +50s. I want a green house, but I am nervous about loosing it to these high winds.
So far, so good. The extra rebar would add strength, but that space inside the tube is pretty tight to work in. Wouldn’t hurt to add the extra tie in. Hopefully we’ll be okay. Your load is distributed throughout the entire unit since the entire foundation framework is tied together, so it’s not quite as bad as a single point anchor being yanked on.
great ideas and will be using much of your method in my own project here in Ma., one tidbit worth consideration that I have learned on line is: when attaching aluminum frame to p.t. wood a barrier of rubber roofing or composite(plastic wood}should be used between the two materials to avoid corrosion of aluminum by the chemicals present in the p.t. wood.
Thanks for the advice. I am building this foundation for my new 8 x 12 Grandio Elite greenhouse and I am glad I read your comment. This is what the website on a well-known hardware store says about the use of pressure treated wood and aluminum.
“Hot-dipped galvanized or stainless-steel fasteners and fittings are recommended, and not suitable for direct contact with aluminum products”
Thanks again.
So would using a composite capboard do the trick?
Thank you Laurie! We live in eastern MN, right across the border, so our climate is very similar and I really appreciate all of the information you share. Because of your blog, I might succeed in growing raspberries on our little piece of prairie! And a greenhouse is on my project list too.
Yeah! Glad you got your raspberries going! The big greenhouse was a big project, but it’s such a help with the number of transplants I grow, and stretching the season.
Wonderful! I ran across this article while in the midst of planning my own lean-to greenhouse. I also want to have no floor and be able to plant directly in the ground. But I am wondering about the temp of the greenhouse having contact with the ground- does that retain less heat than if it were raised off the ground with a floor? Do you keep track of the temps inside the Greenhouse throughout the year? How many months of the year can you grow in it?
I have a simple thermometer, not a datalogger, so I don’t have a temperature record. Cold tolerant crops can be overwintered, but will basically go into stasis in deep winter when temps are cold and light levels are low. We did cover the greens with floating row covers inside the greenhouse when outside temps dropped below zero.
The ground functions, thermodynamically speaking, as a semi-infinite slab. It will get cold, but the temp of the deeper ground is always above freezing, so the topsoil can pull warmth from below. If you did an insulated raised platform with a heater, and wanted to trap heat and keep it from going into the ground, then there would be an advantage in isolating it from the ground below. so far, we’re not heating, so no advantage.
What was the total approximate cost of the entire project?
I didn’t keep receipts and it’s been around a year since we did it. Materials prices vary greatly around the country, too. I know it was several hundred dollars, versus several thousand dollars that a slab would have cost.
Laurie,
Well done and well explained.
Attaching one narrow wall directly to the south facing wall of the house allows you to pick fresh tomatoes for Christmas dinner without walking in the snow.
This is true. 🙂 In our case, it would interfere with the passive solar gain for the house, so that would be a bit of a problem for us.